
Hardware
ASUS ROG STRIX H370-I Gaming Motherboard Review
Introduction
When Intel announced the 8th generation Core processors last fall, the industry was a bit shocked to see a new platform come out in less than a year after 7th gen Kaby-Lake and Intel 200 series boards. One caveat, 8th generation ONLY works on new 300 series boards. Not that something like that is unprecedented, but we got a full range of new CPUs and exactly ONE chipset to use it on, the flagship Z370. While enthusiasts didn’t mine much, everyone else didn’t see the point of throwing a locked CPU on an expensive platform made for pushing unlocked chips to the breaking point. Nearly six months later, the rest of the 300-series family is finally seeing the light of day. The Mainstream segment of the 300 series is Intel’s H370 chipset, and ASUS is right on time with a brand-new ROG Strix H370-I Gaming to kick it off.
Can a gamer get by on an H370 board? What must you give up to save a few bucks? What are must-have features missing or changed from Z370? We’ll try to answer all of those as we check out ASUS’s new ITX offering.
ProClockers would like to thank ASUS for sending the ROG STRIX H370-I Gaming over to check out!
ASUS’s take on the ROG STRIX H370-I Gaming:
Experience mini-ITX gaming performance with the ROG Strix H370-I Gaming. Gamer’s Guardian with SafeSlot delivers hardware-level protections while you outshine the competition with customizable Aura Sync RGB lighting. Innovative dual M.2 design, USB 3.1 Gen2, dual Gigabit LAN and on-board 802.11ac WiFi deliver maximum connectivity speeds.
- Designed exclusively for 8th generation Intel Core processors to maximize connectivity and speed with dual M.2 (1 x inside double-decker PCH heatsink, 1 x back side), dual Gigabit LAN, onboard 802.11 ac Wi-Fi and Intel Optane Memory compatibility
- ASUS OptiMem improves memory stability and performance by improving trace isolation between PCB layers to maintain signal integrity even at higher frequencies
- Gamer’s Guardian with Fan Xpert 4 provides hardware-level safeguards for maximum performance with dynamic system cooling
- Aura Sync RGB lighting with additional 4-pin RGB header features a nearly endless spectrum of colors with the ability to synchronize effects across an ever-expanding ecosystem of Aura Sync enabled products
- Pre-mounted I/O shield ensures streamlined installation and represents ROG’s attention to detail and quality
Product Highlights
Mini-ITX Form Factor
Intel H370 Chipset
LGA 1151 Socket
DDR4 & Intel Optane Memory Support
2 x M.2 Slots
USB 3.1 Gen 2 | DisplayPort | HDMI
Dual Gigabit LAN | 802.11ac Wi-Fi
Gamer’s Guardian & FanXpert 4
Pre-Mounted I/O Shield | ASUS OptiMem
Aura Sync RGB Lighting | PCIe SafeSlots
Features & Specifications
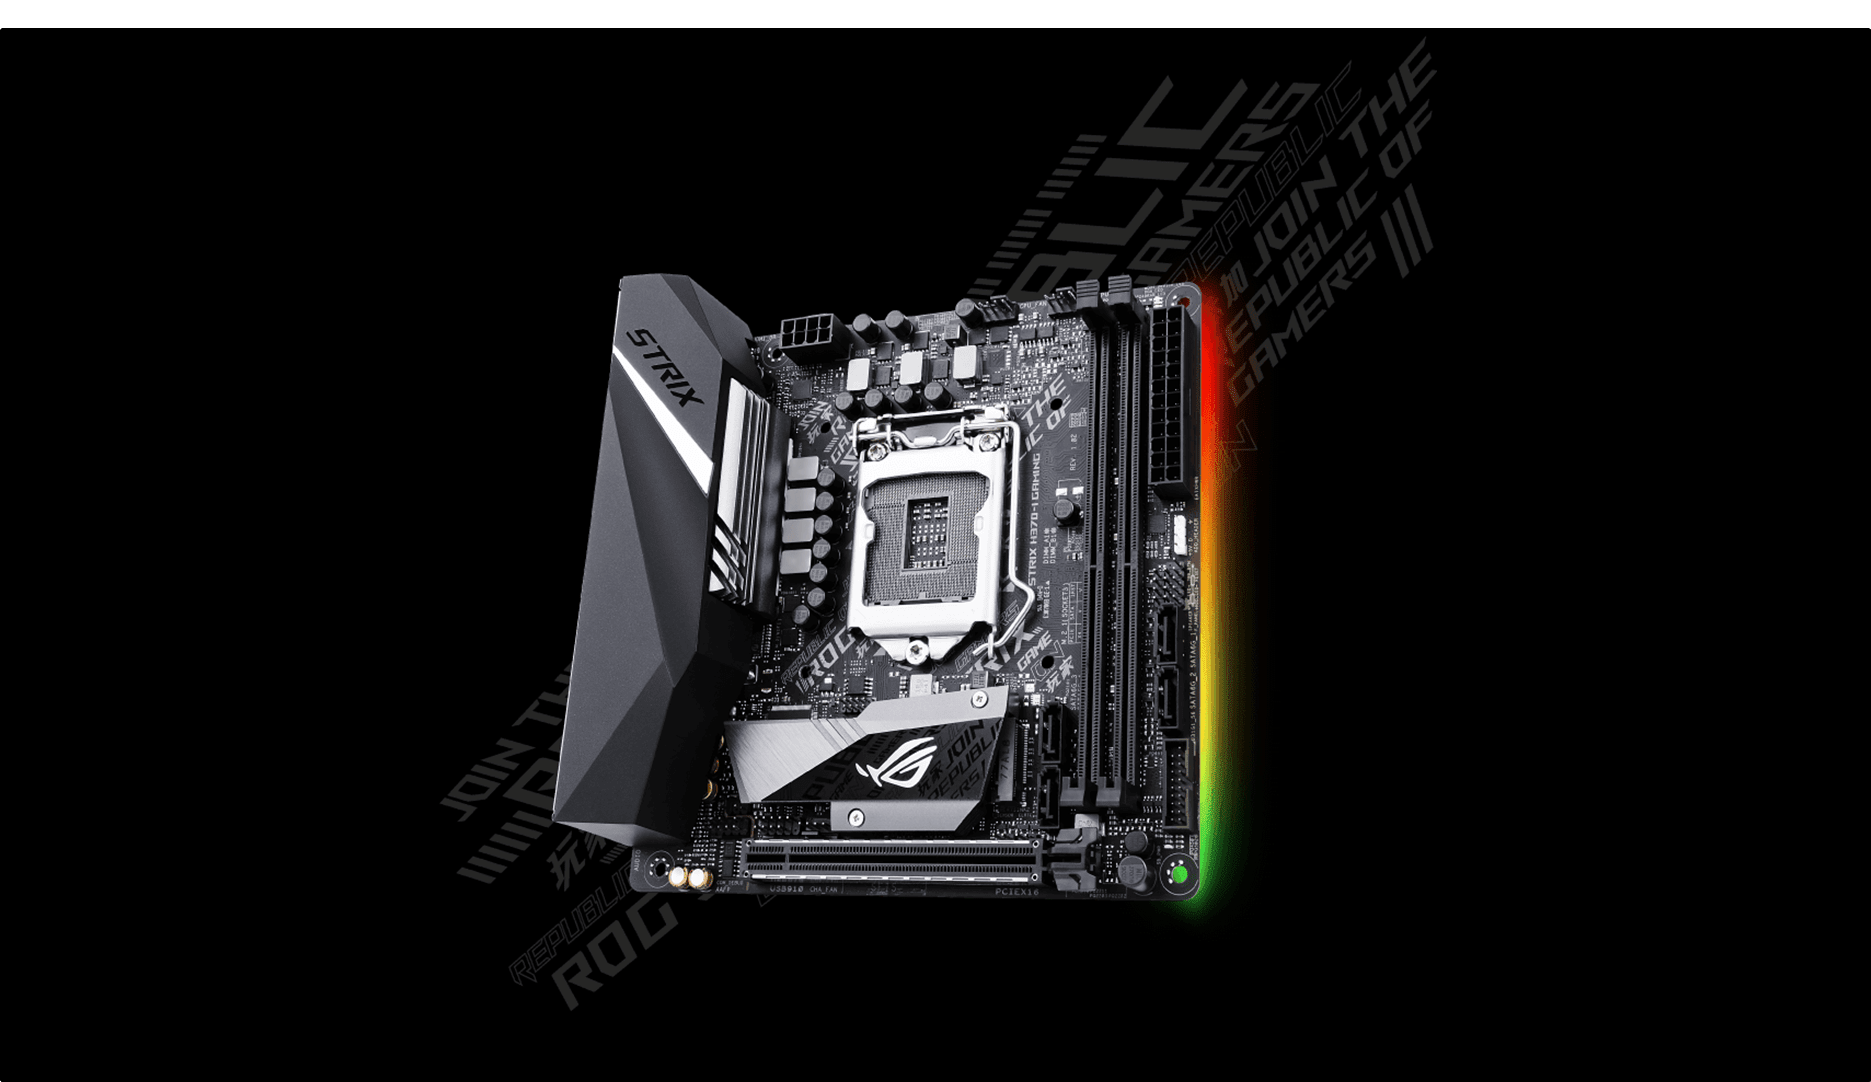
CYBER OUTLOOK – The distinctive sleek cuts across the ROG Strix heatsink are now accented with a futuristic cyber-text pattern, fusing multiple gaming cultures to create a unique identity for this generation. But it’s not all about arresting looks: the all-new ROG Strix motherboards exude material excellence, with a high-quality metal heatsink that adds a premium touch.
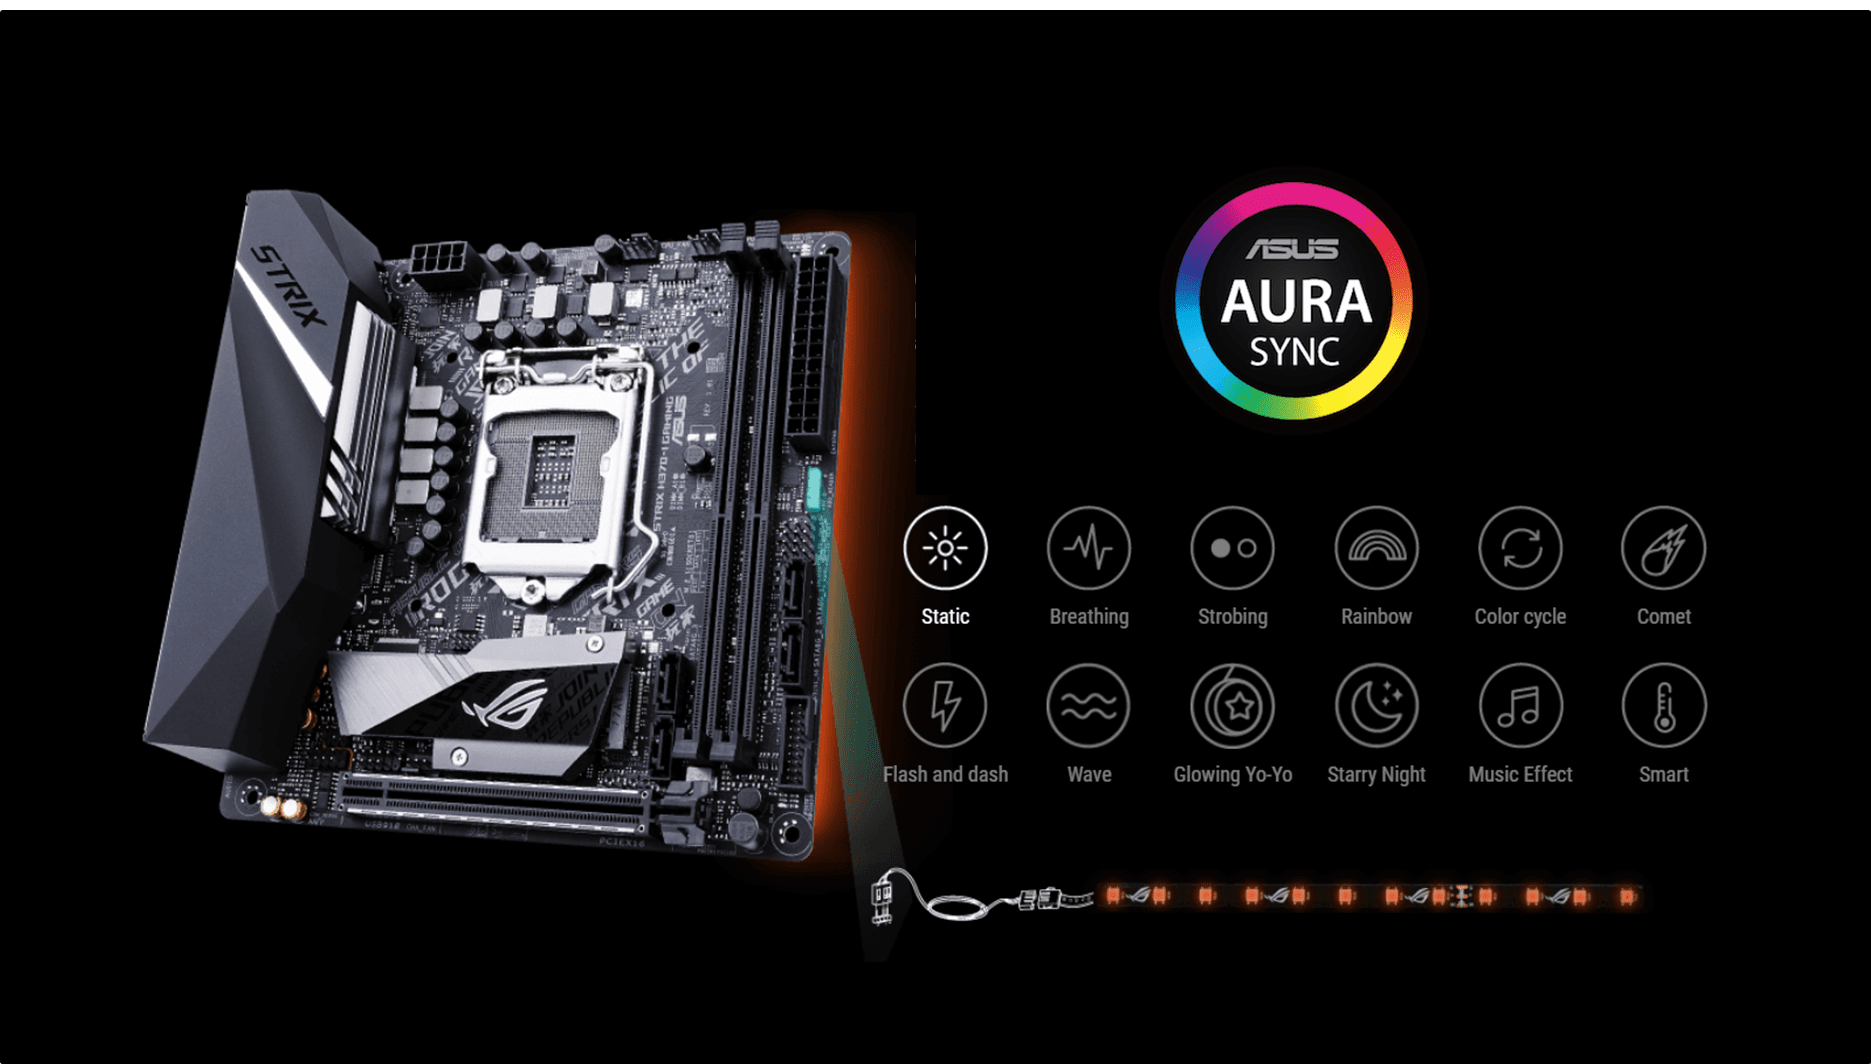
OUTSHINE THE COMPETITION – ROG Strix motherboards deliver sterling performance and superior aesthetics to Outshine the Competition. ASUS Aura offers full RGB lighting control with a variety of functional presets for the built-in RGB LEDs, as well as strips connected to the onboard addressable-RGB header — and it can all be synced with an ever-growing portfolio of Aura-capable ASUS hardware.
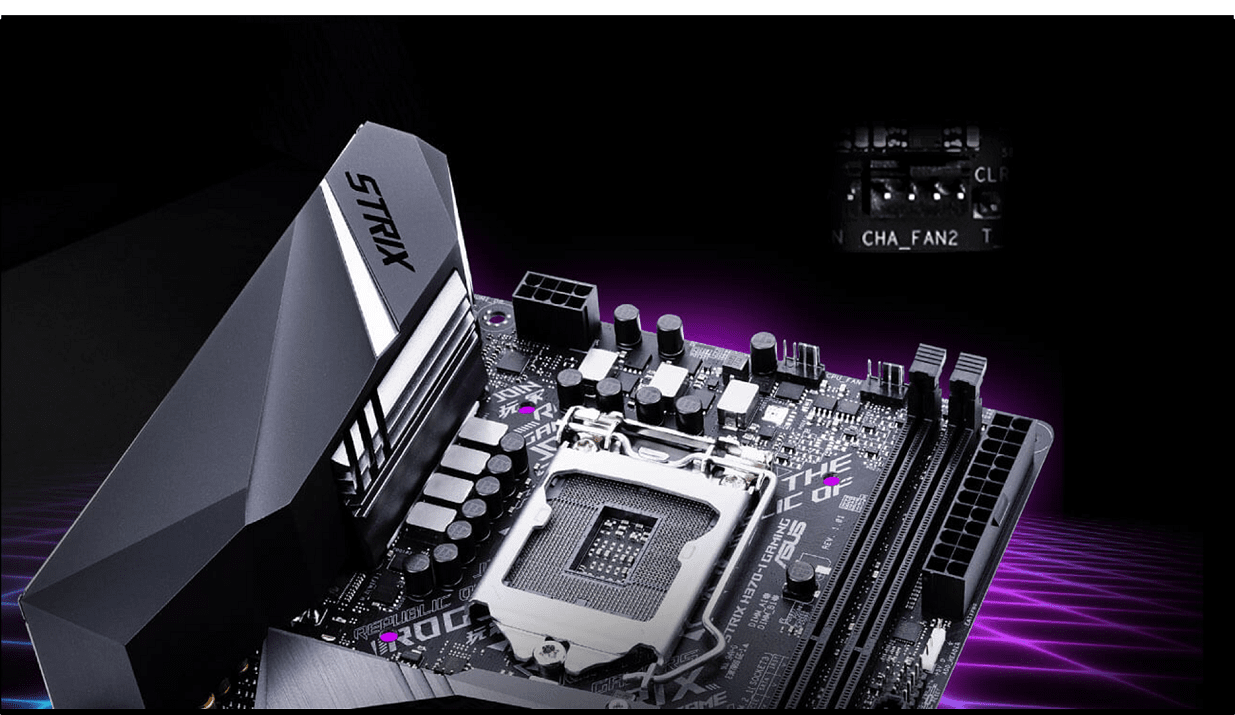
PERFORMANCE LEVEL UP – ROG Strix motherboards provide comprehensive control over fans and all-in-one (AIO) coolers via Fan Xpert 4 or via its media-acclaimed UEFI. Whether you’re cooling with air or water, Auto-Tuning mode intelligently configures all parameters with a single click. There’s also an Extreme Quiet mode which reduces all fan speeds to below the default minimum.
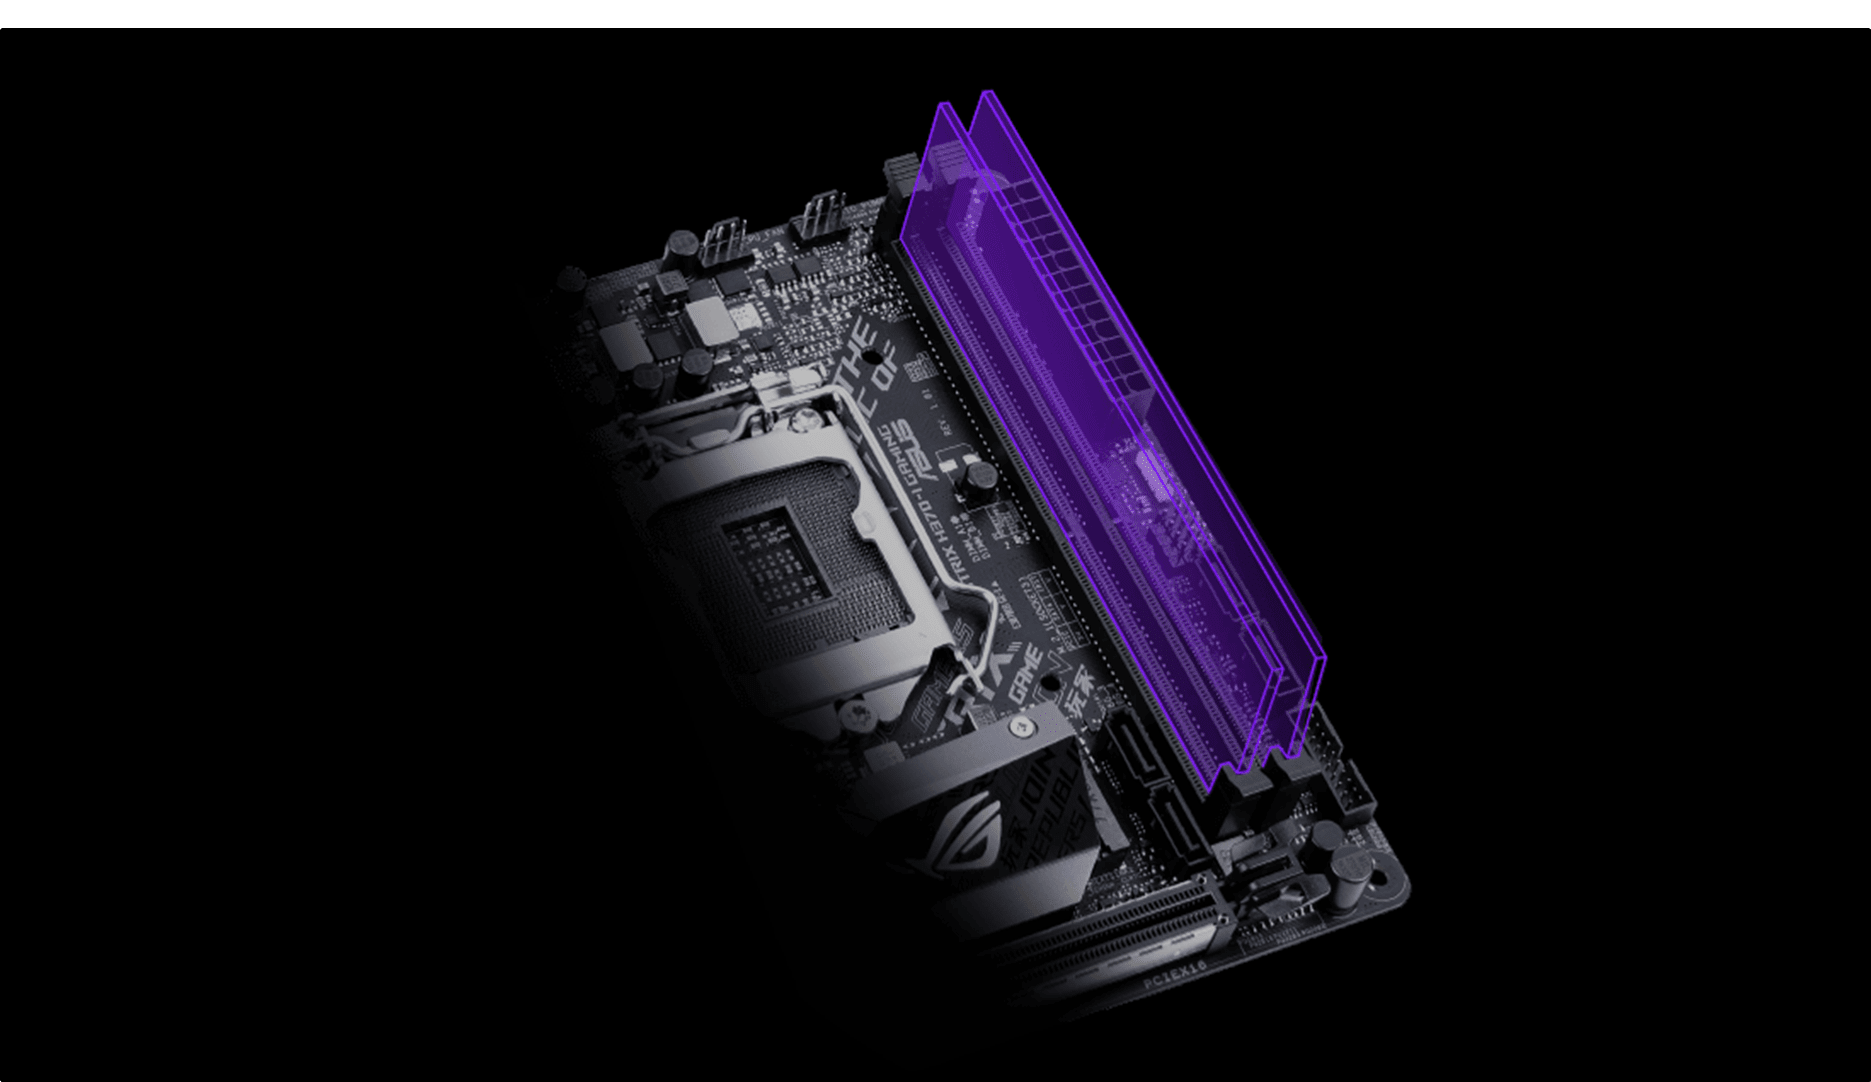
ASUS OPTIMEM – ASUS OptiMem preserves memory signal integrity by routing traces and vias to the optimal PCB layer. These improvements allow the ROG Strix H370-I Gaming to support a wide range of memory kits, and provide your build with the stability it needs to deal with any type of workload — whether you’re gaming or running intensive applications.
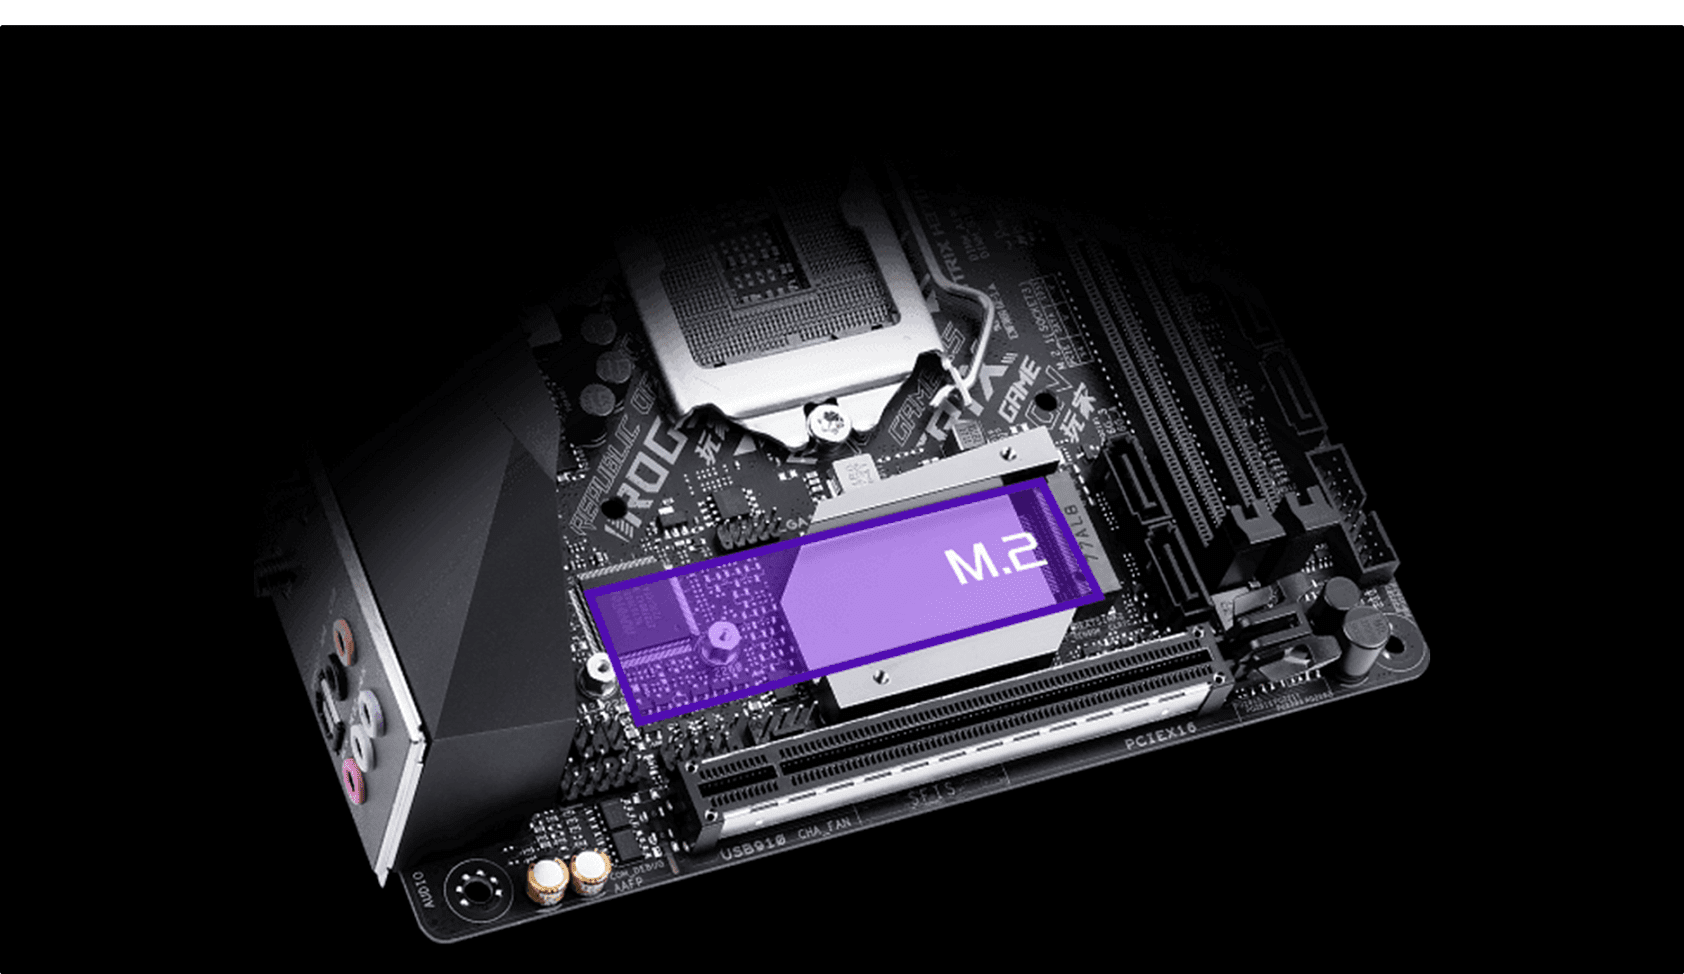
DUAL PCIE 3.0 M.2 – Dual PCIe 3.0 x4 M.2 slots provide NVMe SSD RAID support for an incredible performance boost. Create a RAID configuration with up to two PCIe 3.0 storage devices via the dual M.2 slots to enjoy the fastest data-transfer speeds on the 8th Generation Intel Core platform.
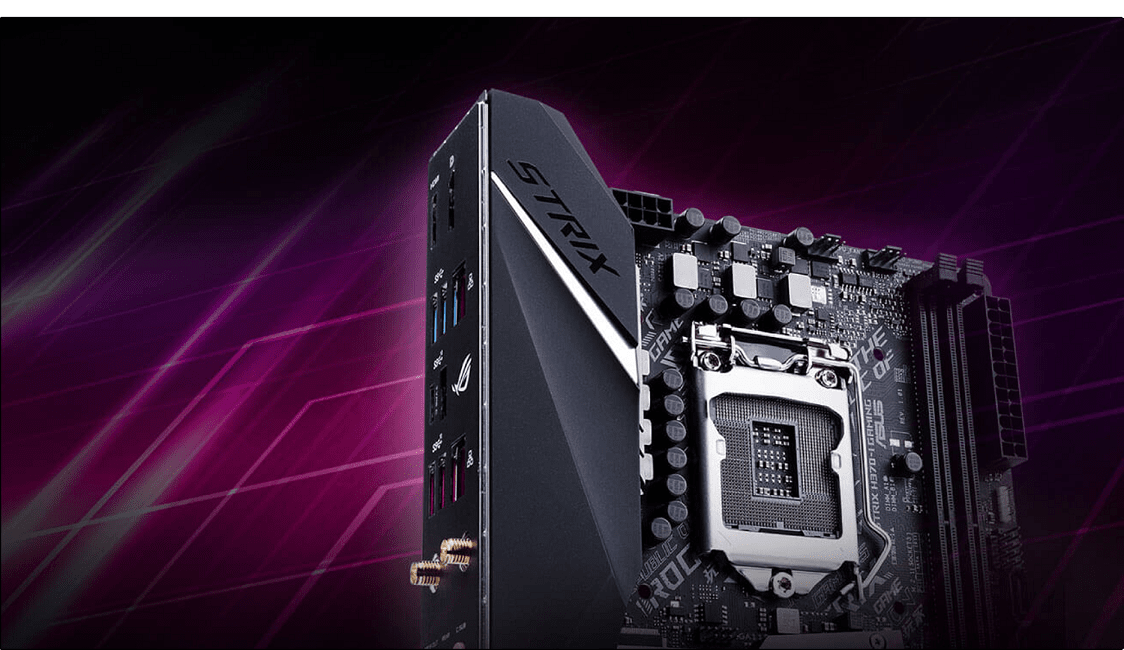
PRE-MOUNTED I/O SHIELD – ROG’s patent-pending I/O shield is finished in sleek matte black, and it’s pre-mounted to make it easy to install the motherboard.
Model
Brand – ASUS
Series – ROG
Model – Strix H370-I Gaming
Supported CPU
CPU Socket Type – LGA 1151 (300 Series)
CPU Type – 8th generation Intel Core processors
Supported CPU Technologies – Turbo Boost Technology 2.0
Chipsets
Chipset – Intel H370
Onboard Video
Onboard Video Chipset – Integrated Graphics Processor – Intel HD Graphics support
Multi-VGA output support: HDMI/DisplayPort
– Supports DisplayPort 1.2 with max. resolution 4096 x 2304 @ 60Hz
– Supports HDMI 1.4b with max. resolution 4096 x 2160 @ 24Hz
Maximum shared memory of 1024MB
Memory
Number of Memory Slots – 2×288pin
Memory Standard – DDR4 2666*/ 2400**/ 2133
* DDR4 2666MHz memory frequency is only supported by 8th Generation Intel 6-core processors. Higher memory modules will run at the maximum transfer rate of DDR4 2666MHz.
Maximum Memory Supported – 32GB
Channel Supported – Dual Channel
Expansion Slots
PCI Express 3.0 x16 – 1 x PCIe 3.0 x16 slot (supports x16)
Storage Devices
SATA 6Gb/s – 4 x SATA 6Gb/s
M.2 – 1 x M.2_1 Socket 3 with M Key, type 2242/2260/2280 (supports both PCIe 3.0 x4 and SATA modes)*
1 x M.2_2 Socket 3 with M Key, type 2242/2260/2280 (supports PCIe 3.0 x4 mode)*
* For a 2242 storage device, use the bundled 2242 mounting kit.
Onboard Audio
Audio Chipset – ROG SupremeFX S1220A High Definition Audio CODEC
Audio Channels – 8 Channels
Onboard LAN
LAN Chipset – Intel I219-V
Second LAN Chipset – Realtek RTL8111H
Max LAN Speed – Dual 10/100/1000Mbps
Wireless LAN – Wi-Fi with MU-MIMO 802.11 a/b/g/n/ac supports dual frequency band 2.4/5 GHz
Up to 1.73 Gbps transfer speed
Bluetooth – Bluetooth v5.0*
* Bluetooth V5.0 will be supported on future versions of Windows. Refer to https://www.microsoft.com for updates on Windows OS Bluetooth support version.
Rear Panel Ports
HDMI – 1 x HDMI 1.4b
RJ45 – 2 x Anti-surge LAN (RJ45) port
DisplayPort – 1 x DisplayPort 1.2
USB 3.1 – 2 x USB 3.1 Gen 2 ports [red], 4 x USB 3.1 Gen 1 ports [blue] (3 x Type-A, 1 x Type C)
S/PDIF Out – 1 x Optical
Audio Ports – 5 Ports
Antenna Connectors – 1 x Intel Wi-Fi Module (Wi-Fi 802.11 a/b/g/n/ac and Bluetooth v5.0)
Internal I/O Connectors
Onboard USB
1 x USB 3.1 Gen1 header supports additional 2 USB 3.1 Gen1 ports
1 x USB 2.0 header supports additional 2 USB 2.0 ports
Other Connectors
1 x 4-Pin CPU fan connector
1 x 4-Pin Chassis fan connector
1 x 4-Pin AIO_PUMP connector
1 x Addressable RGB header
1 x 2-pin Clear CMOS/RTS jumper
1 x Thermal sensor connector
1 x Front panel audio connector(s) (AAFP)
1 x 4-pin Internal speaker connector
1 x System panel connector
Physical Spec
Form Factor – Mini ITX
LED Lighting – RGB
Dimensions (W x L) – 6.7″ x 6.7″
Power Pin –
1 x 8-pin ATX 12V Power connector
1 x 24-pin EATX Power connector
Features
ROG Exclusive Features:
ROG Aura
– Aura effects
– 1 x Aura RGB header
ROG GameFirst IV
ROG CloneDrive
ROG RAMCache II
Overwolf
ROG CPU-Z
Special Features:
Performance Optimization
– EPU
– DIGI+VRM
– Fan Xpert 4
ASUS Exclusive Features
– AI Suite 3
– AI Charger
– AURA Lighting Control
ASUS Q-Design
– Q-Shield
– Q-Slot
– Q-LED (CPU [red], DRAM [yellow], VGA [white], Boot Device LED [yellow green])
– Q-DIMM
ASUS EZ DIY
– ASUS EZ Flash 3
– ASUS CrashFree BIOS 3
Gamers Guardian
– SafeSlot
– DRAM Overcurrent Protection
– ESD Guards on LAN, Audio, and USB 3.0/2.0 ports
– High Durable Components
– Pre-mounted I/O Shield
BIOS:
1 x 128MB Flash ROM, UEFI AMI BIOS, PnP, SM BIOS 3.1, ACPI 6.1, Multi-language BIOS, ASUS EZ Flash 3, CrashFree BIOS 3, F11 EZ RAID Wizard, F6 Qfan Control, F3 My Favorites, Last Modified log, F12 PrintScreen, ASUS DRAM SPD (Serial Presence Detect) memory information, F4 AURA ON/OFF and F9 Search, Secure Erase, User Profile
Manageability:
WOL, PXE
Support DVD contents:
Drivers
EZ Update
Anti-virus software (OEM version)
ASUS Utilities
Clone Drive
GameFrist IV
Overwolf
ROG CPU-Z
RamCache
WinRAR
Operating System Support:
Windows 10 64-bit
Packaging
Package Contents
Accessories:
1 x Panel cable
1 x Addressable RGB LED extension cable
2 x SATA 6Gb/s cables
1 x ASUS 2×2 dual-band Wi-Fi antennas
Support DVD
2 x M.2 2242 mounting kits
User’s manual
1 x ROG STRIX stickers
2 x M.2 Screw Package
1 x Cable tie
Packaging & Unboxing
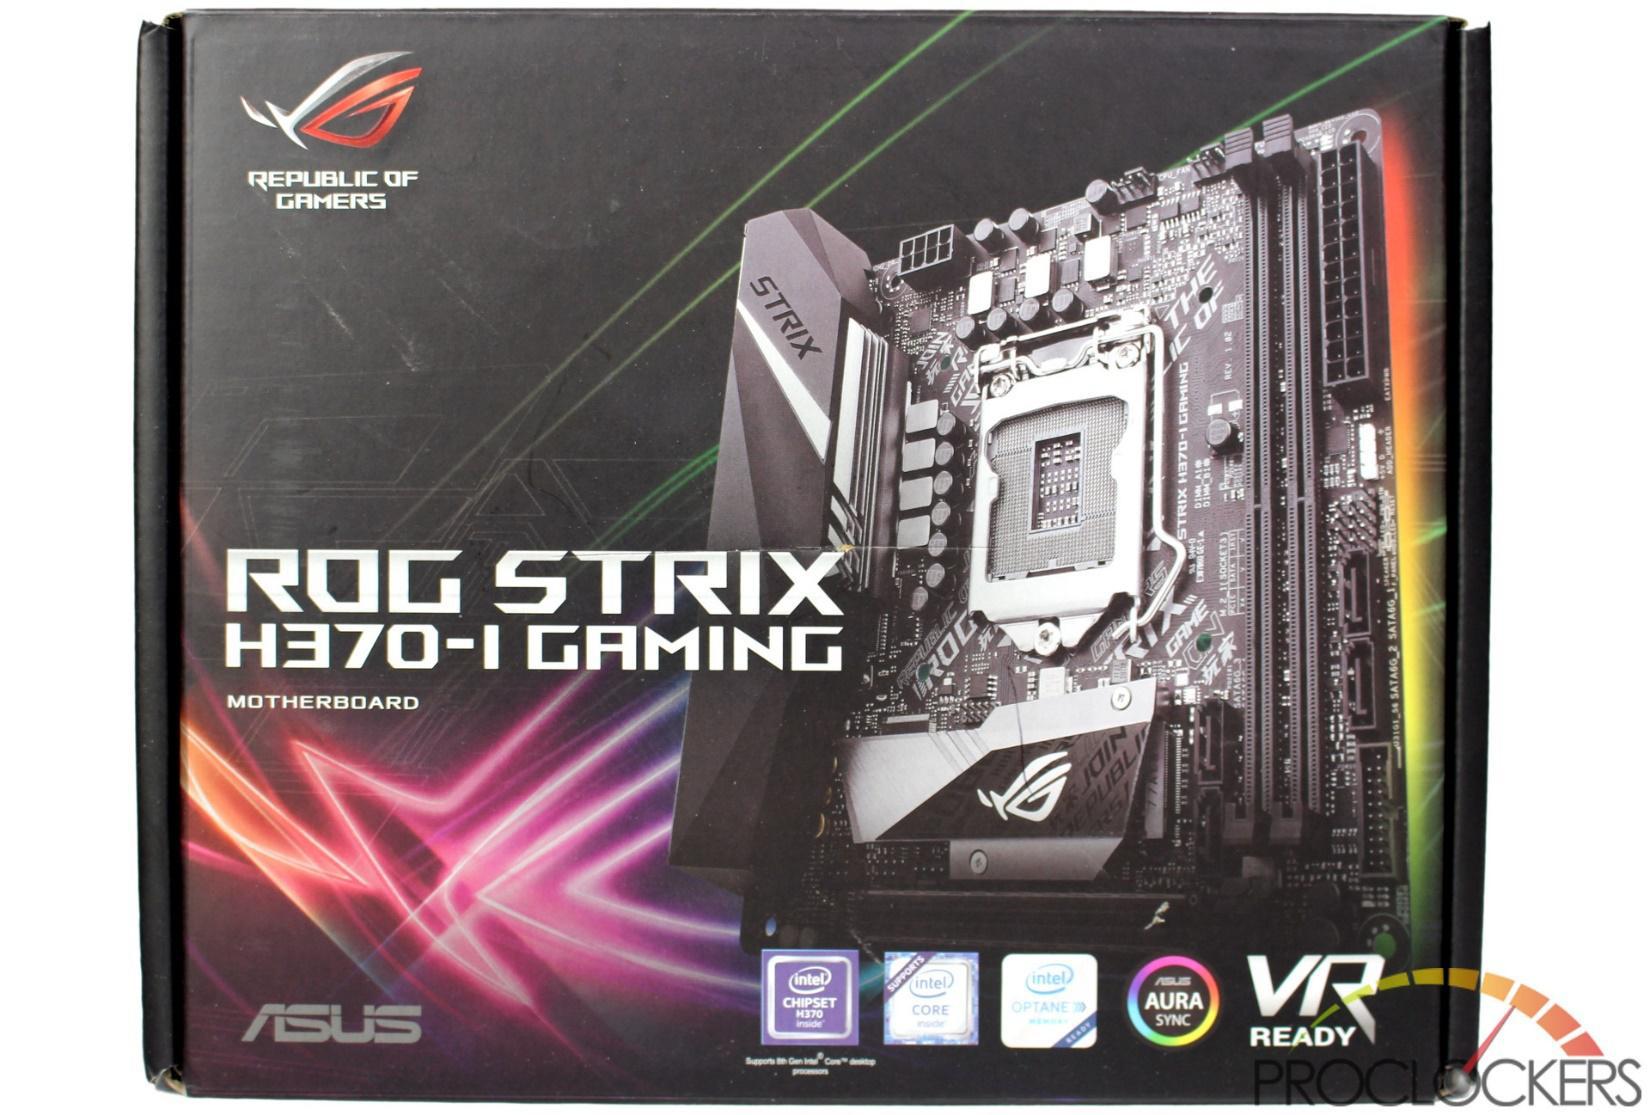
Like nearly every other board in the Strix lineup, the H370-I Gaming comes in a black box with a colorful ROG Eye logo in the background. A full-color picture of the board covers most of the front of the box with the model centered on the left and a few logos around the edges of the box.
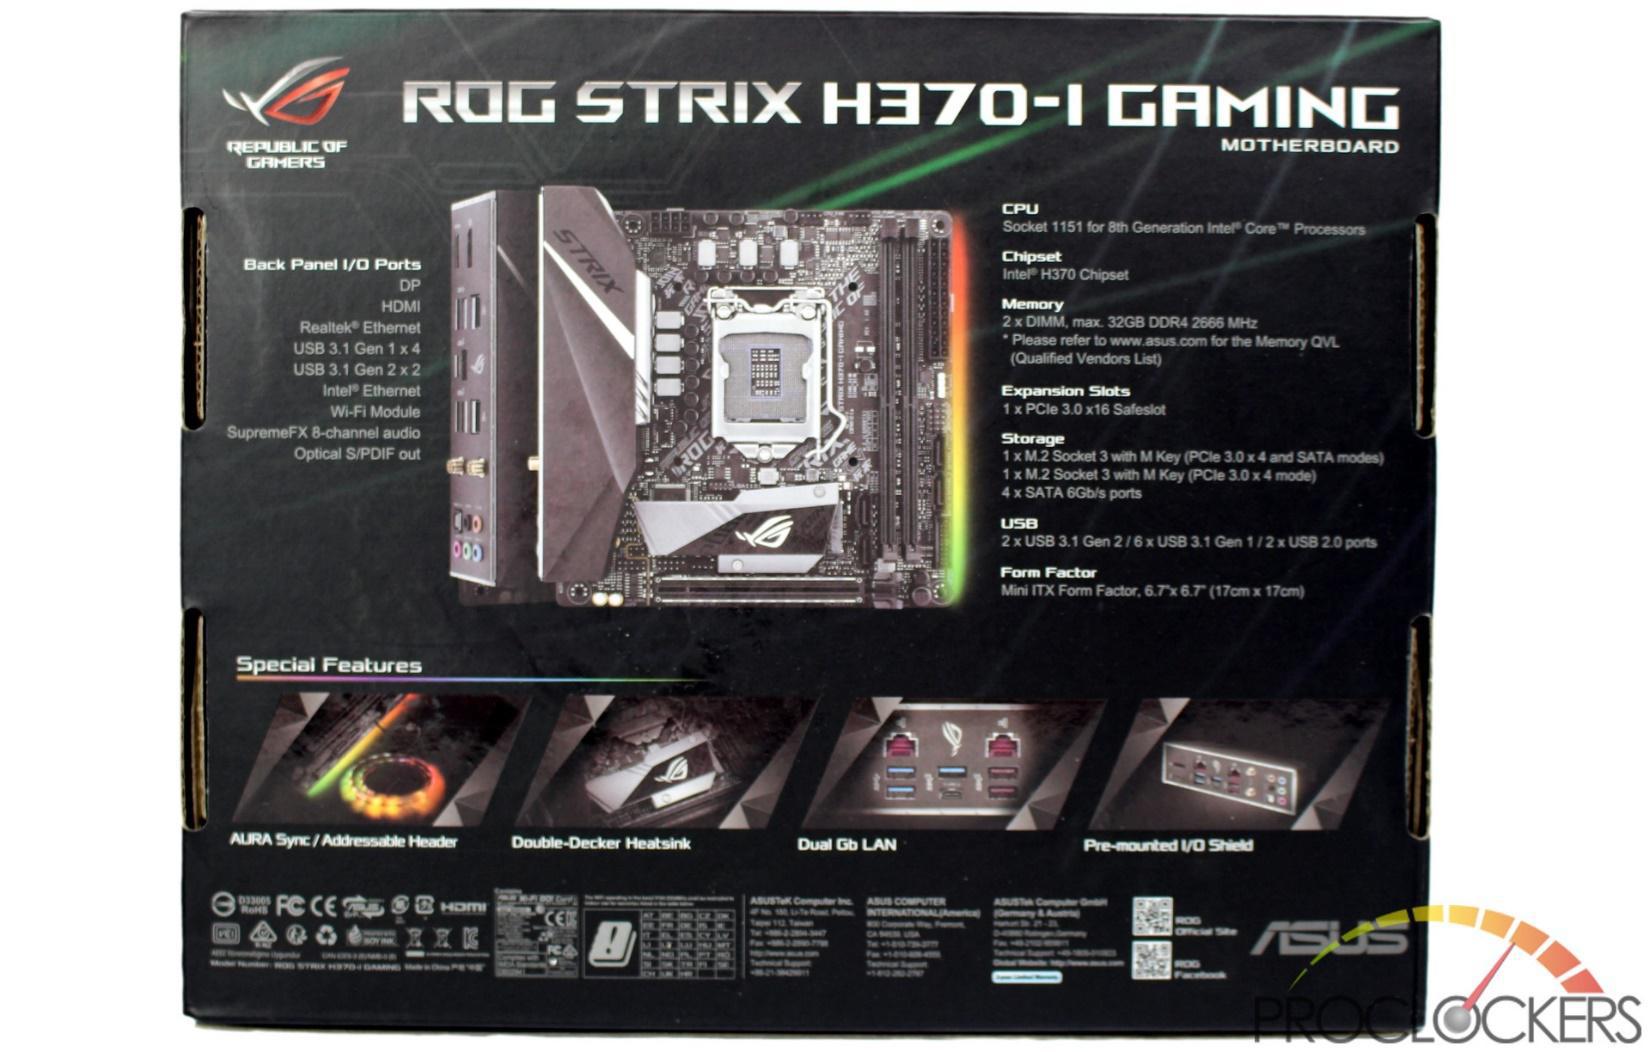
The rear of the box has a full-color picture of the board in the center with basic specs surrounding it, and some stand out features along the bottom of the box.
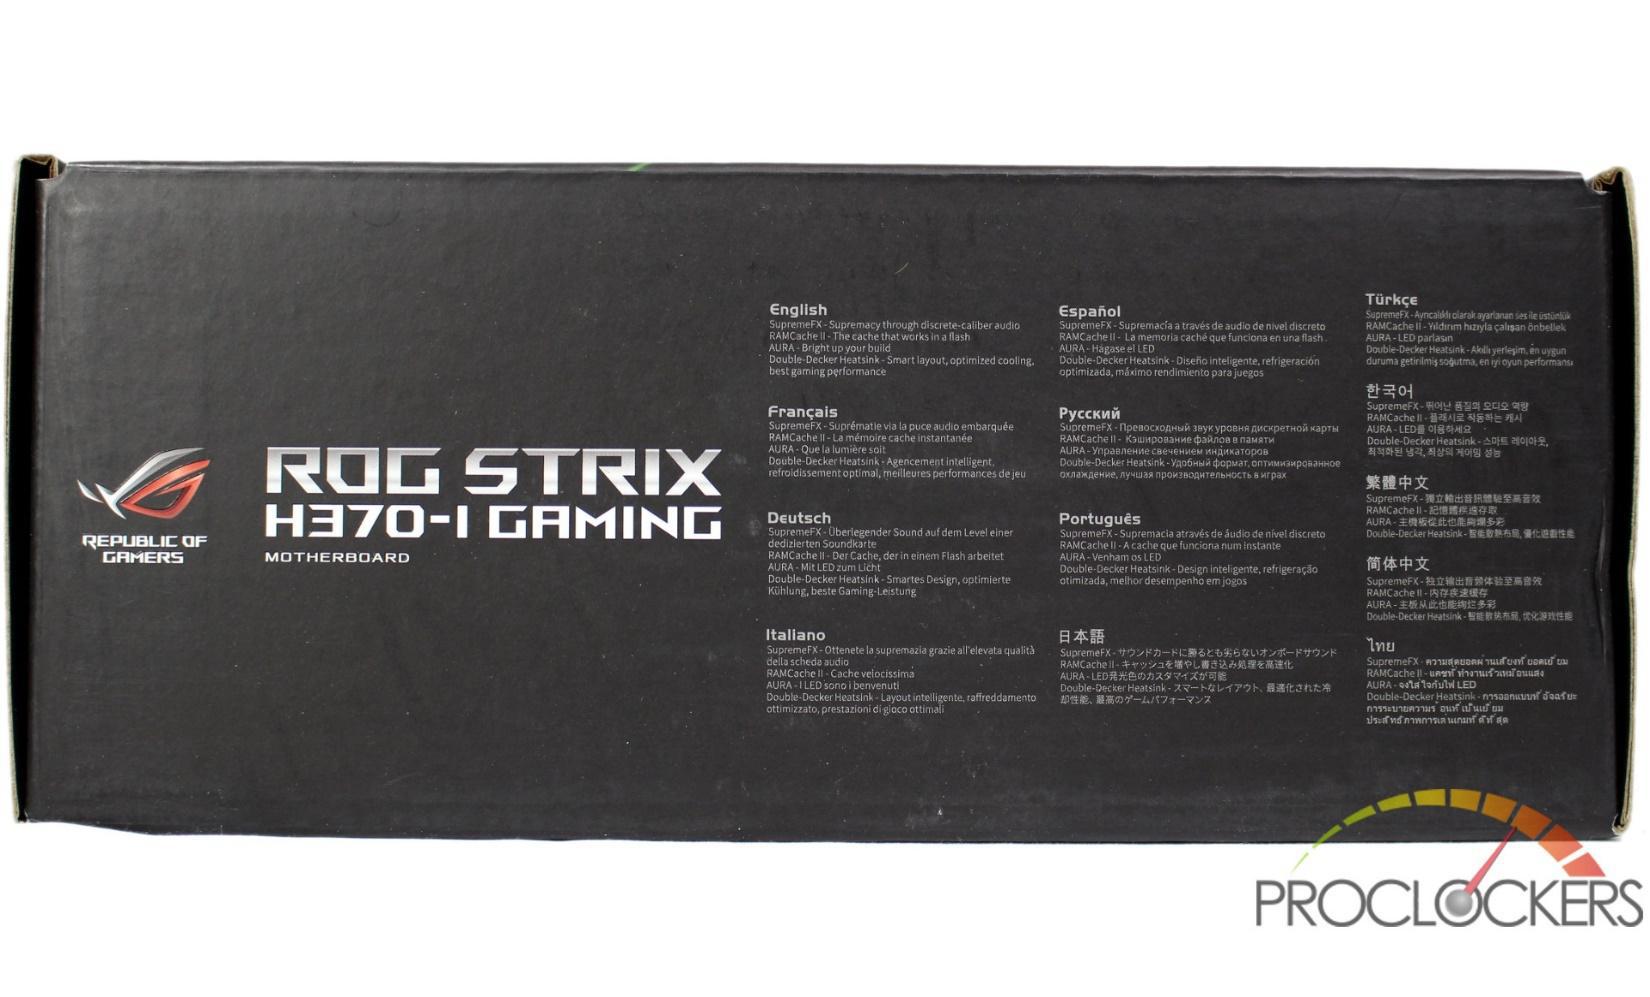
The top of the box has some basic features listed in several languages.
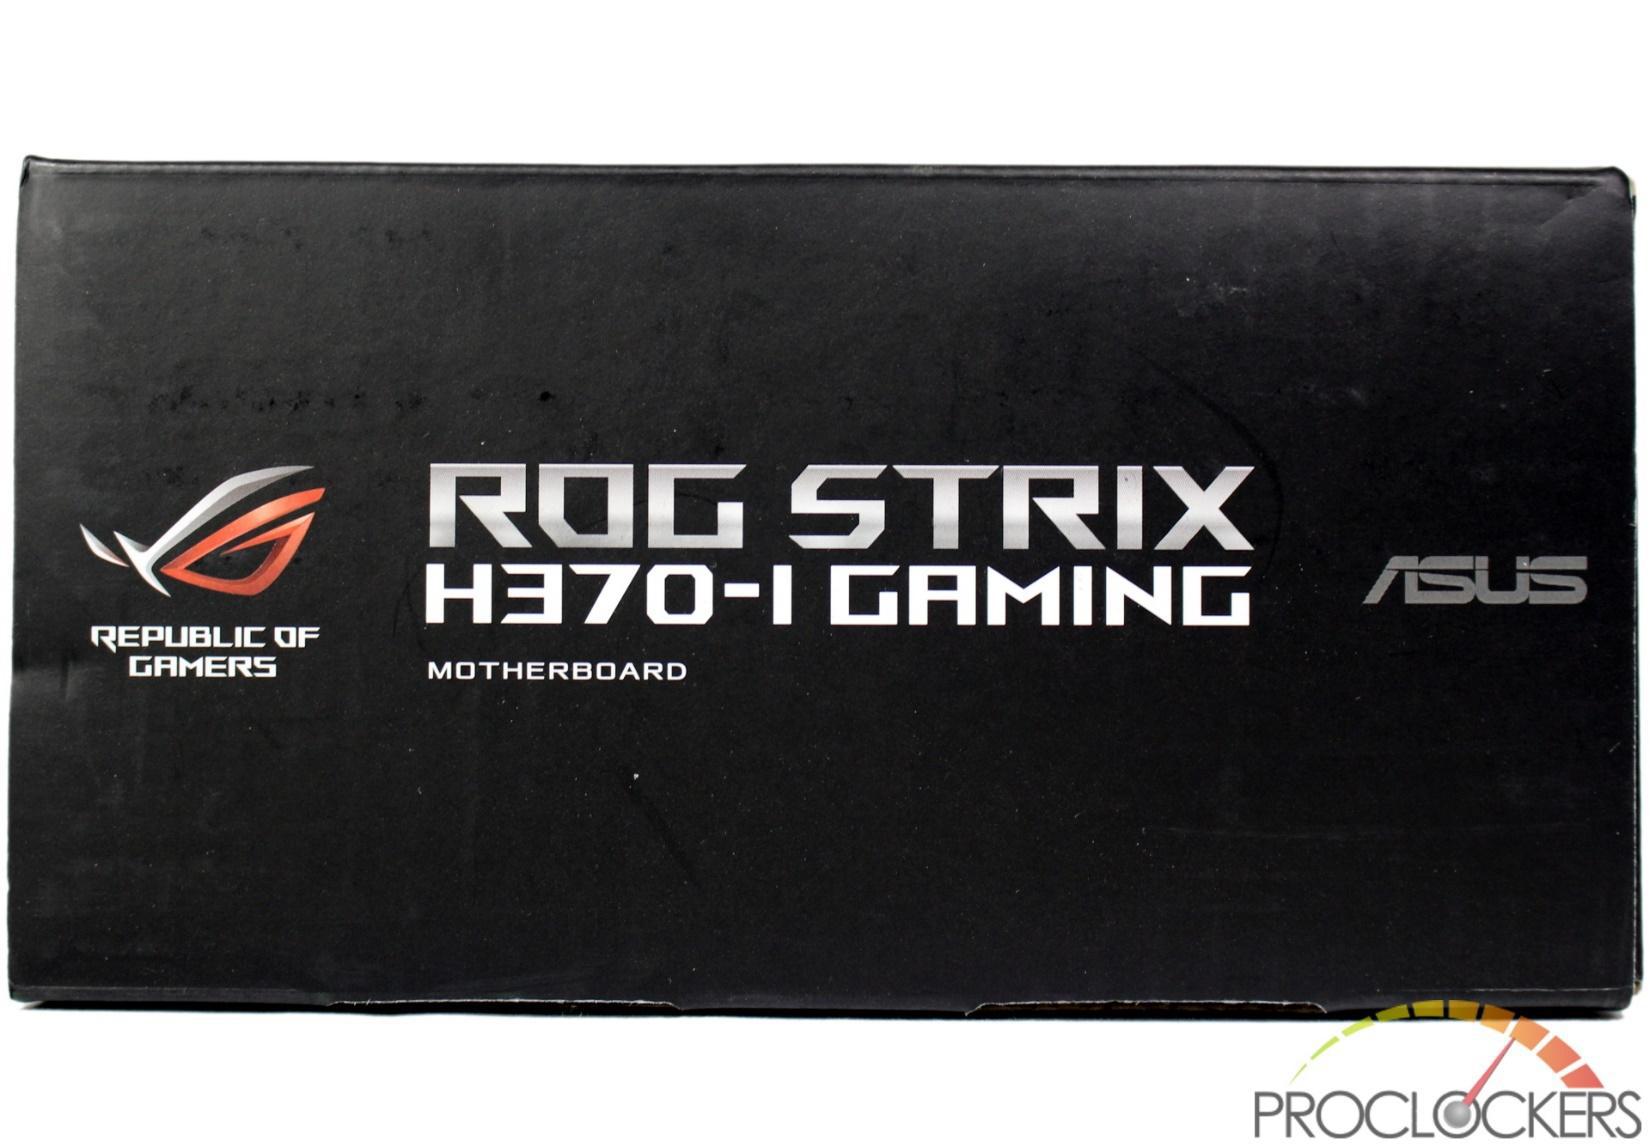
The other three sides of the box are solid black with the model listed in the center and the ASUS and ROG logos flanking it.
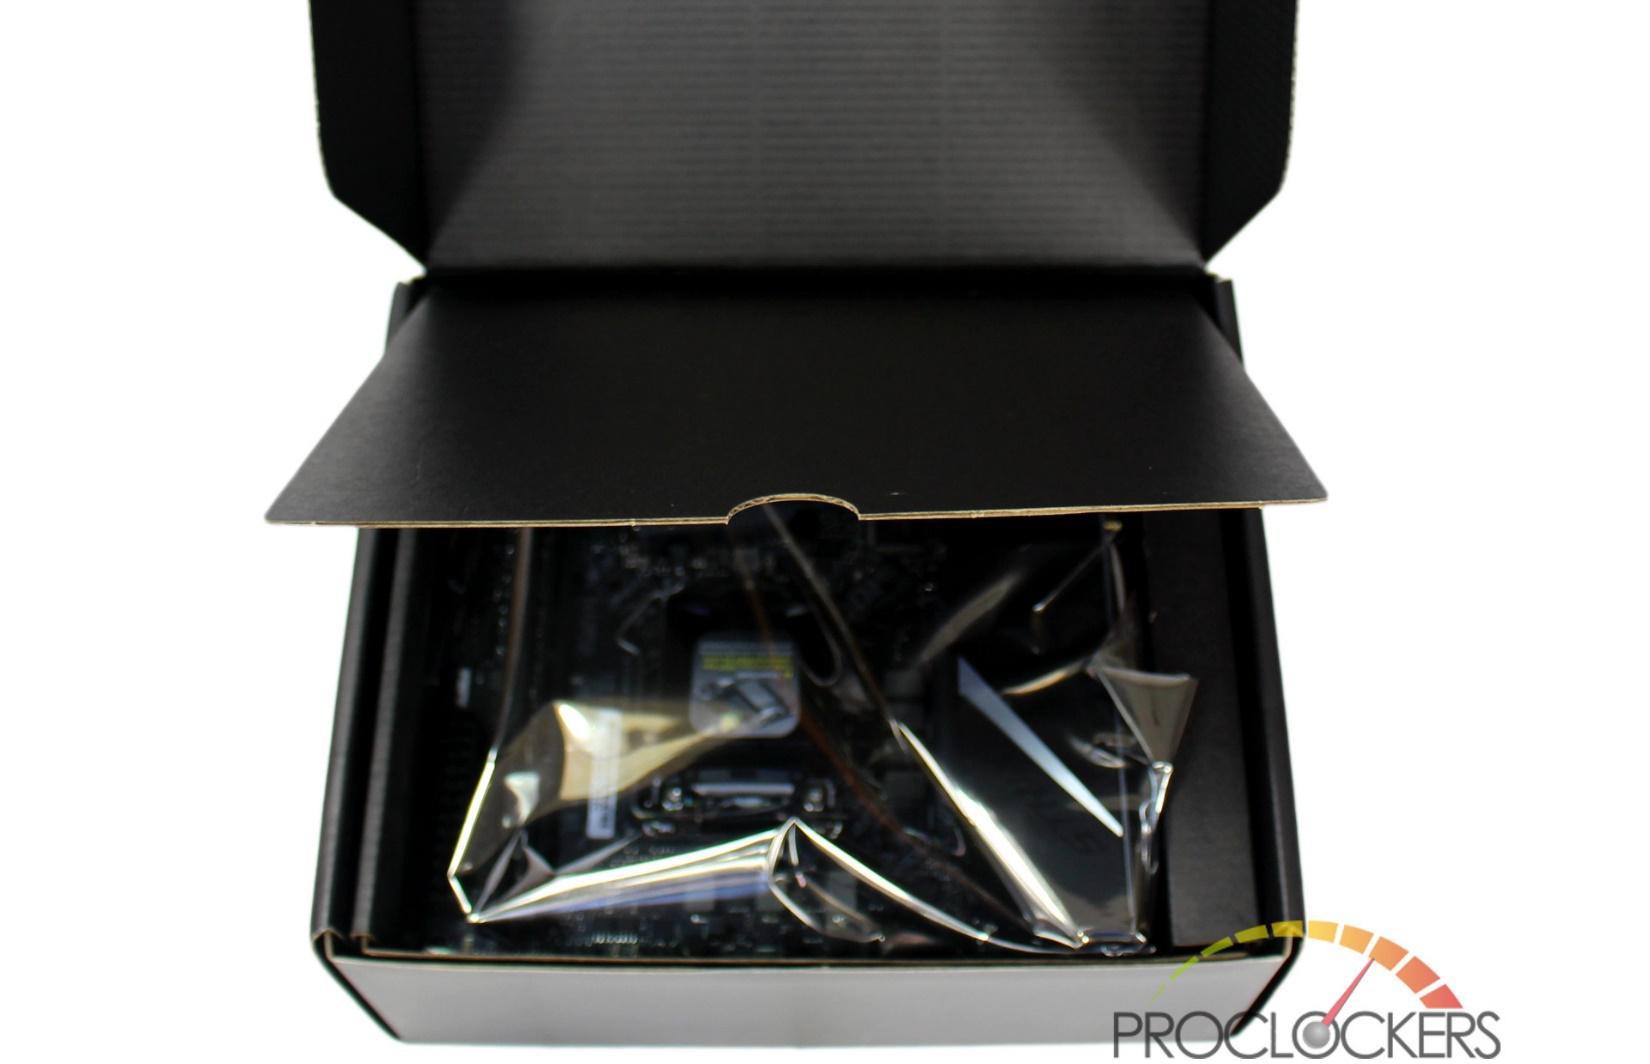
Opening the box up you don’t see much initially, the motherboard is hidden in another box internally.
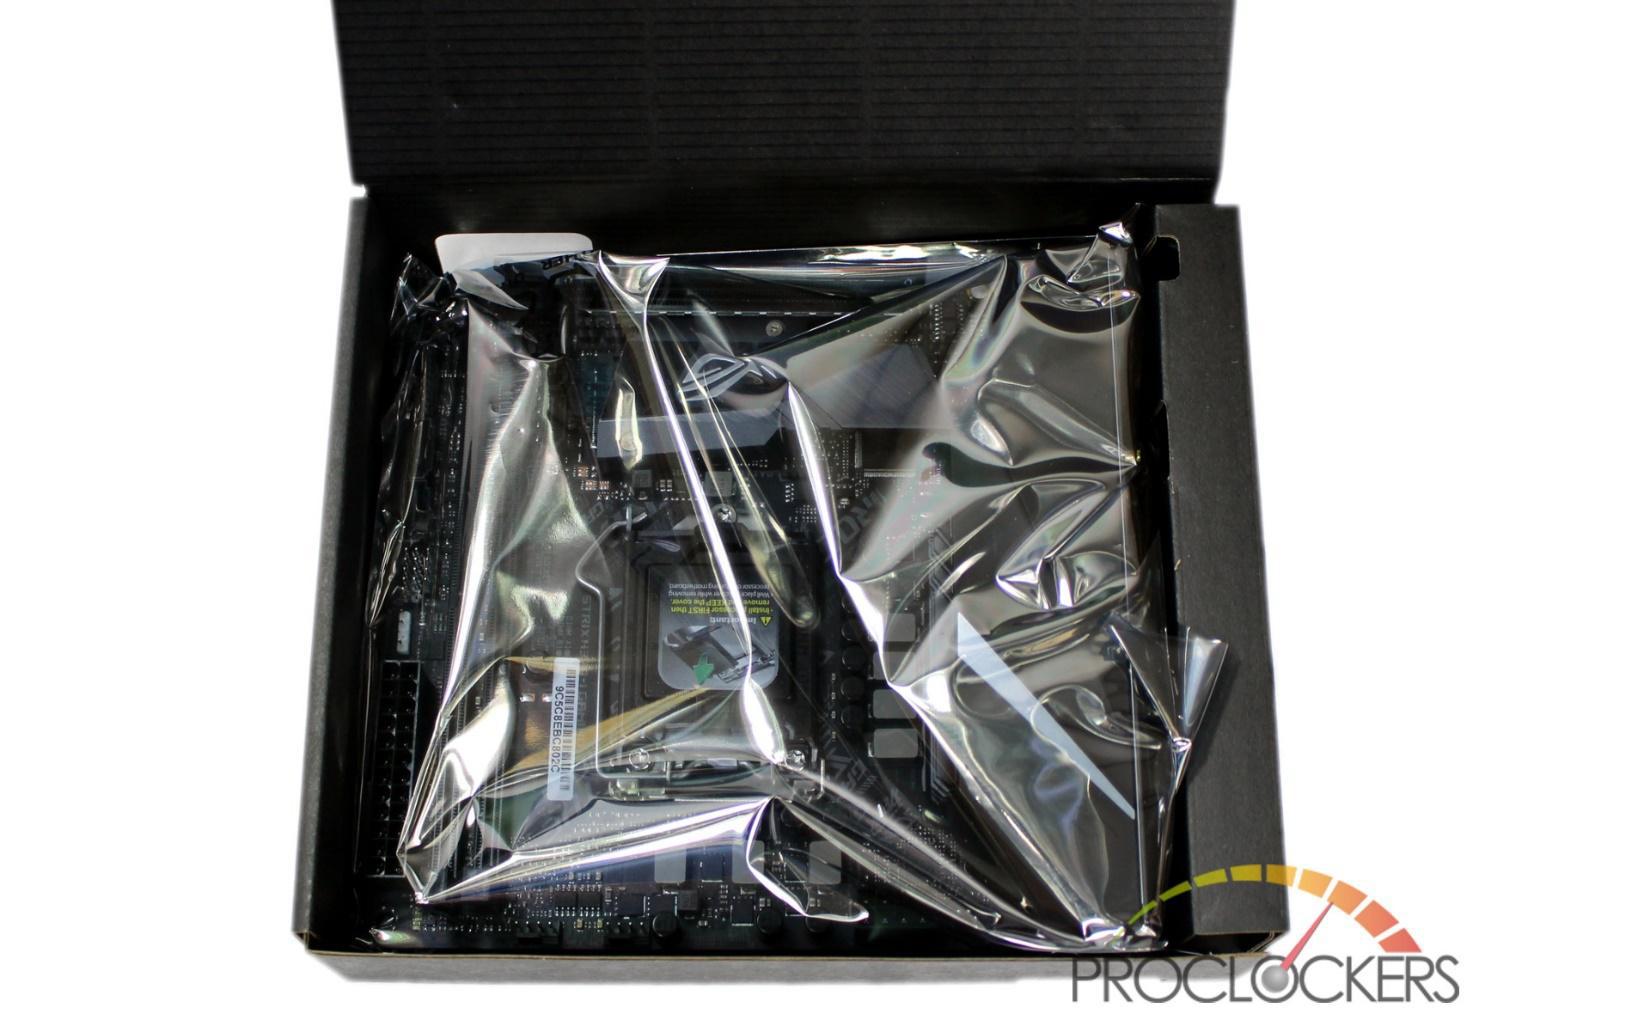
This box has a flap that opens up to reveal the H370-I Gaming wrapped in a protective ESD bag.
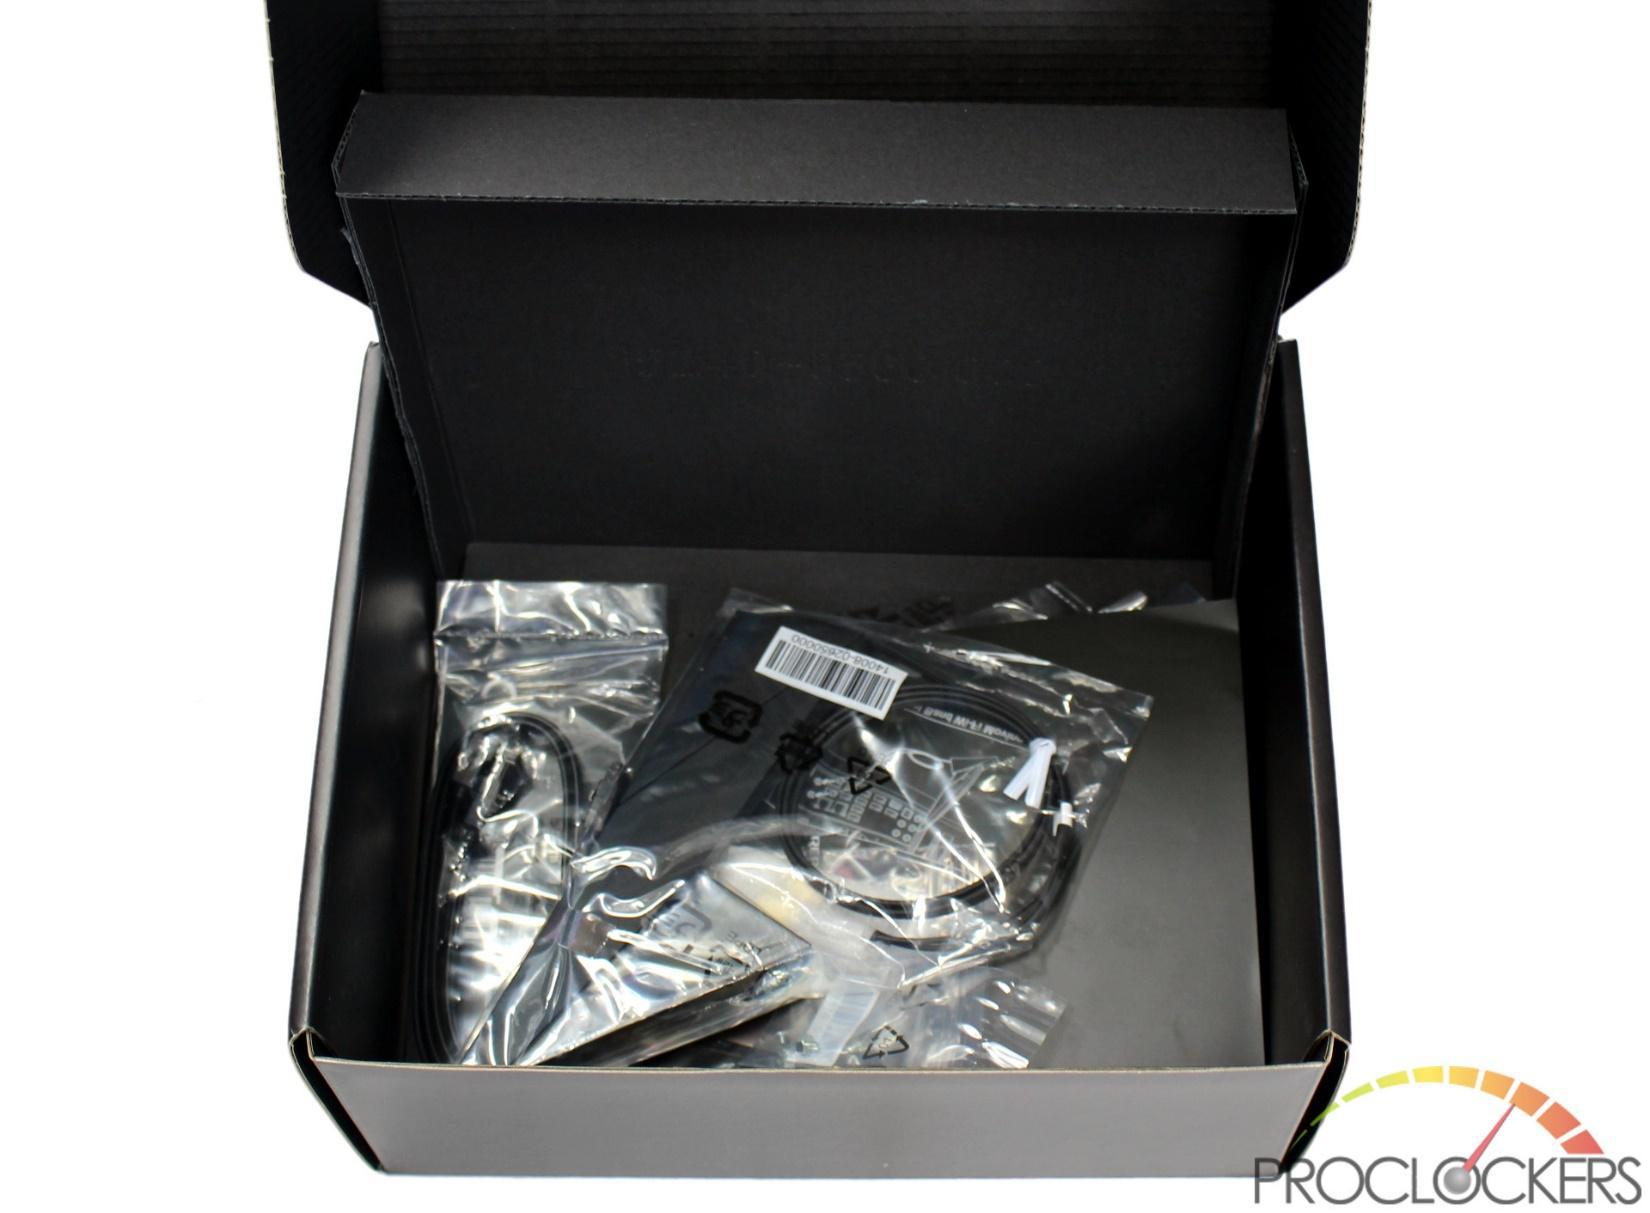
Under the motherboard box is a small divider, under which is all of the included accessories.
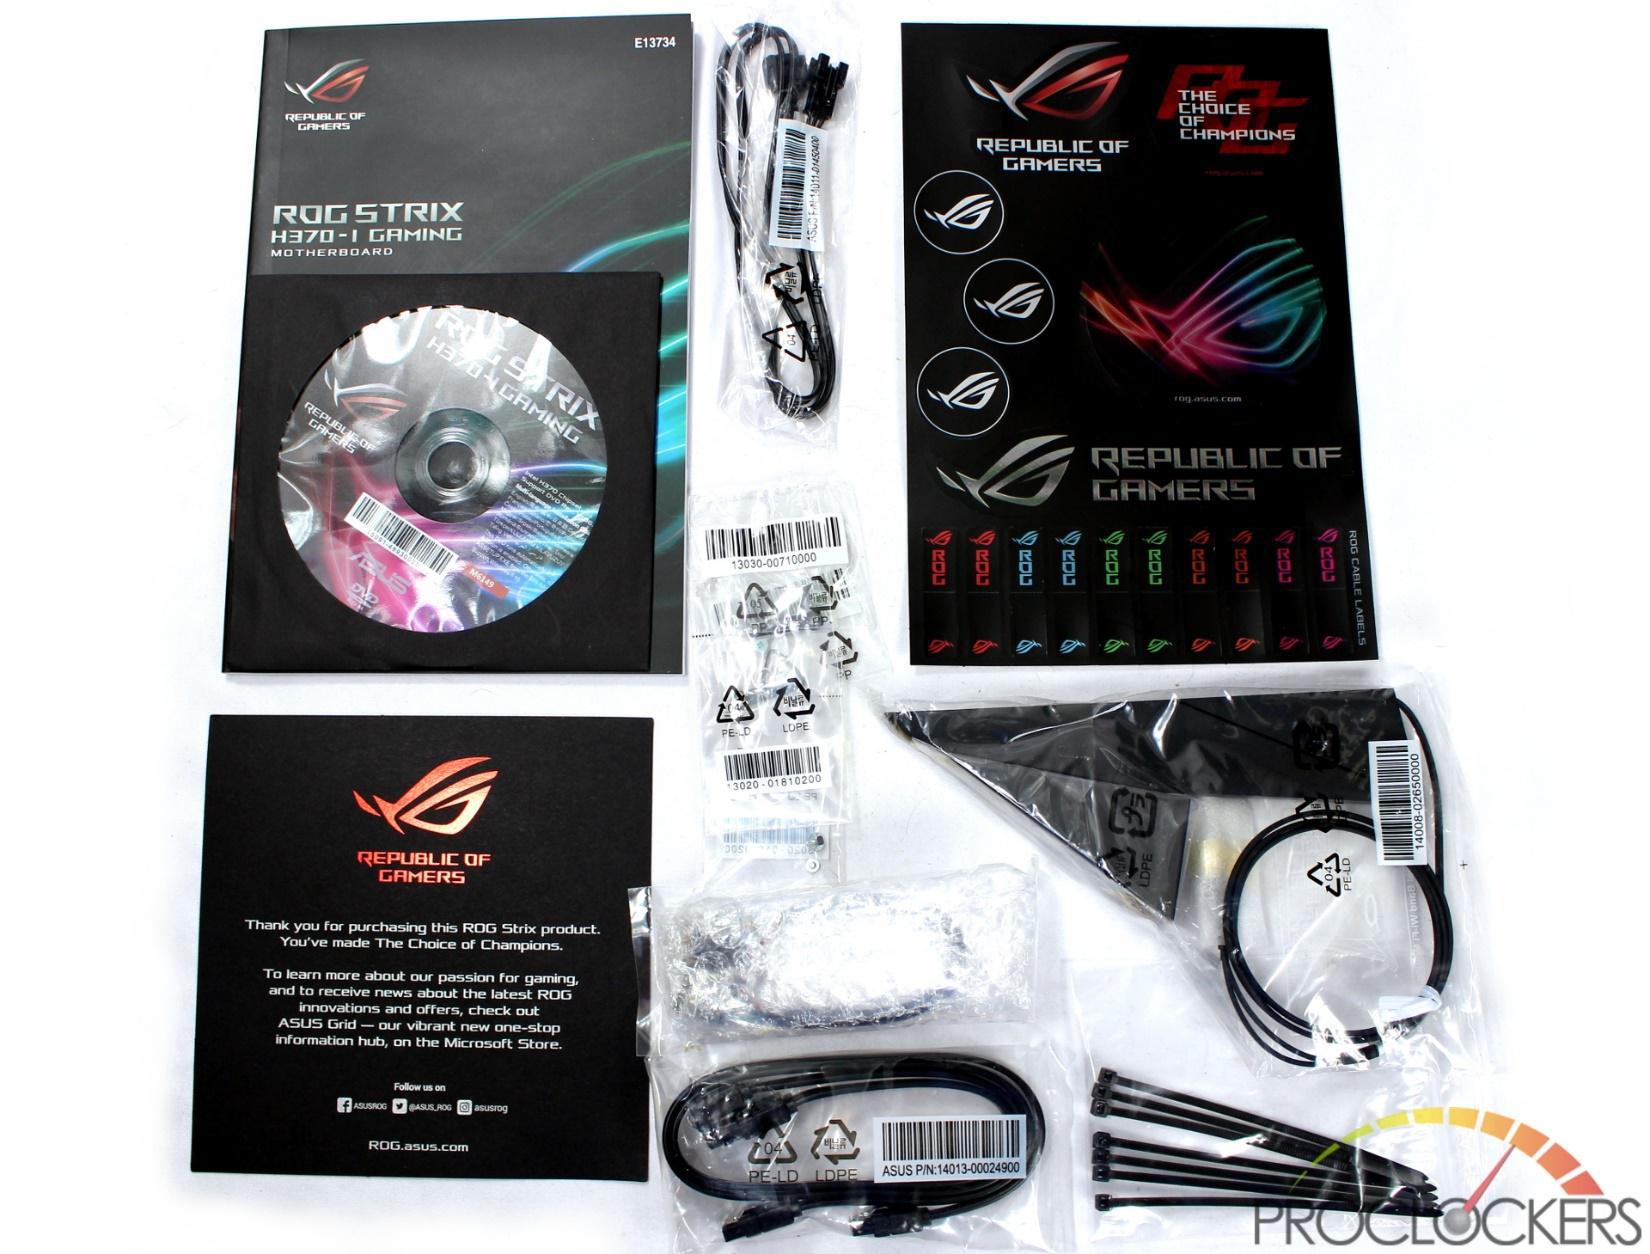
Being a small board, the pile of goodies included is also pretty small, but complete. Beyond the typical Manual, Driver Disk (does anyone still use these?) and a pair of SATA cables, you get the WiFi antenna, some M.2 mounting hardware which includes two adapters to mount 42mm drives on the 60mm mounting post, a RGB extension cable and a modified version of the ASUS Q-connector that is done over several inches of cable. You also get a small sticker sheet with some color-coded cable labels and a small bag of zip ties for cable management.
A Closer Look
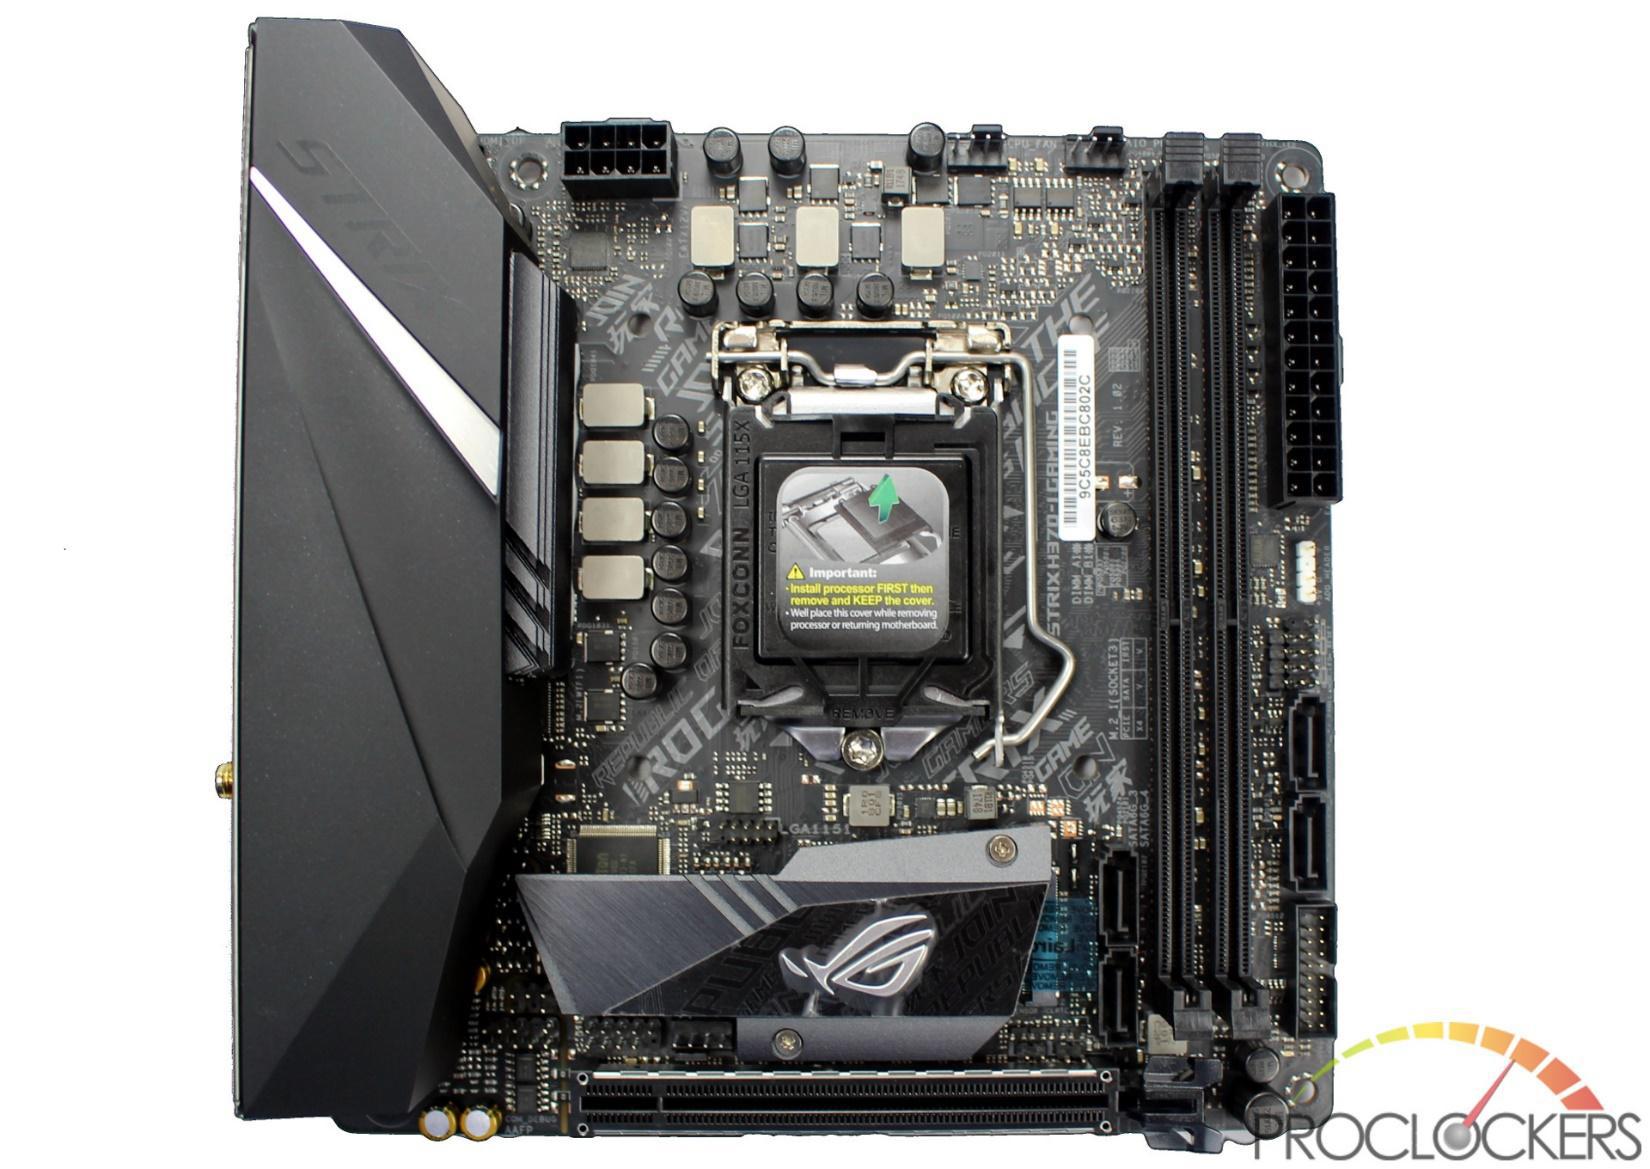
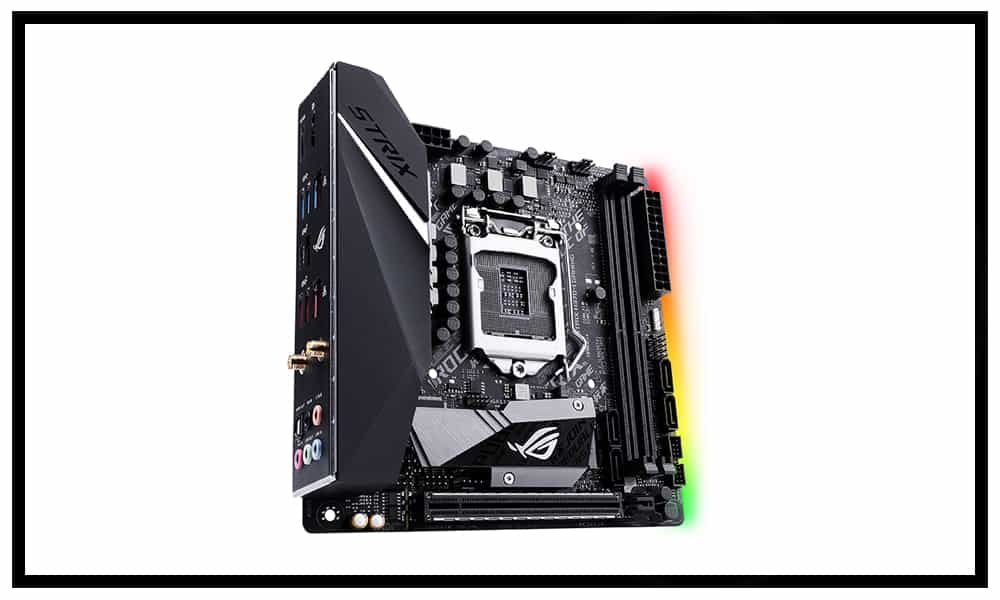
ASUS’s ROG Strix H370-I Gaming is your traditional diminutive mini-ITX form-factor board. Intel’s LGA 1151 socket sits near the center of the board flanked by a pair of DIMM slots and the rear I/O Cover. Between the lone PCIe slot sits the combination chipset and M.2 heatsink.
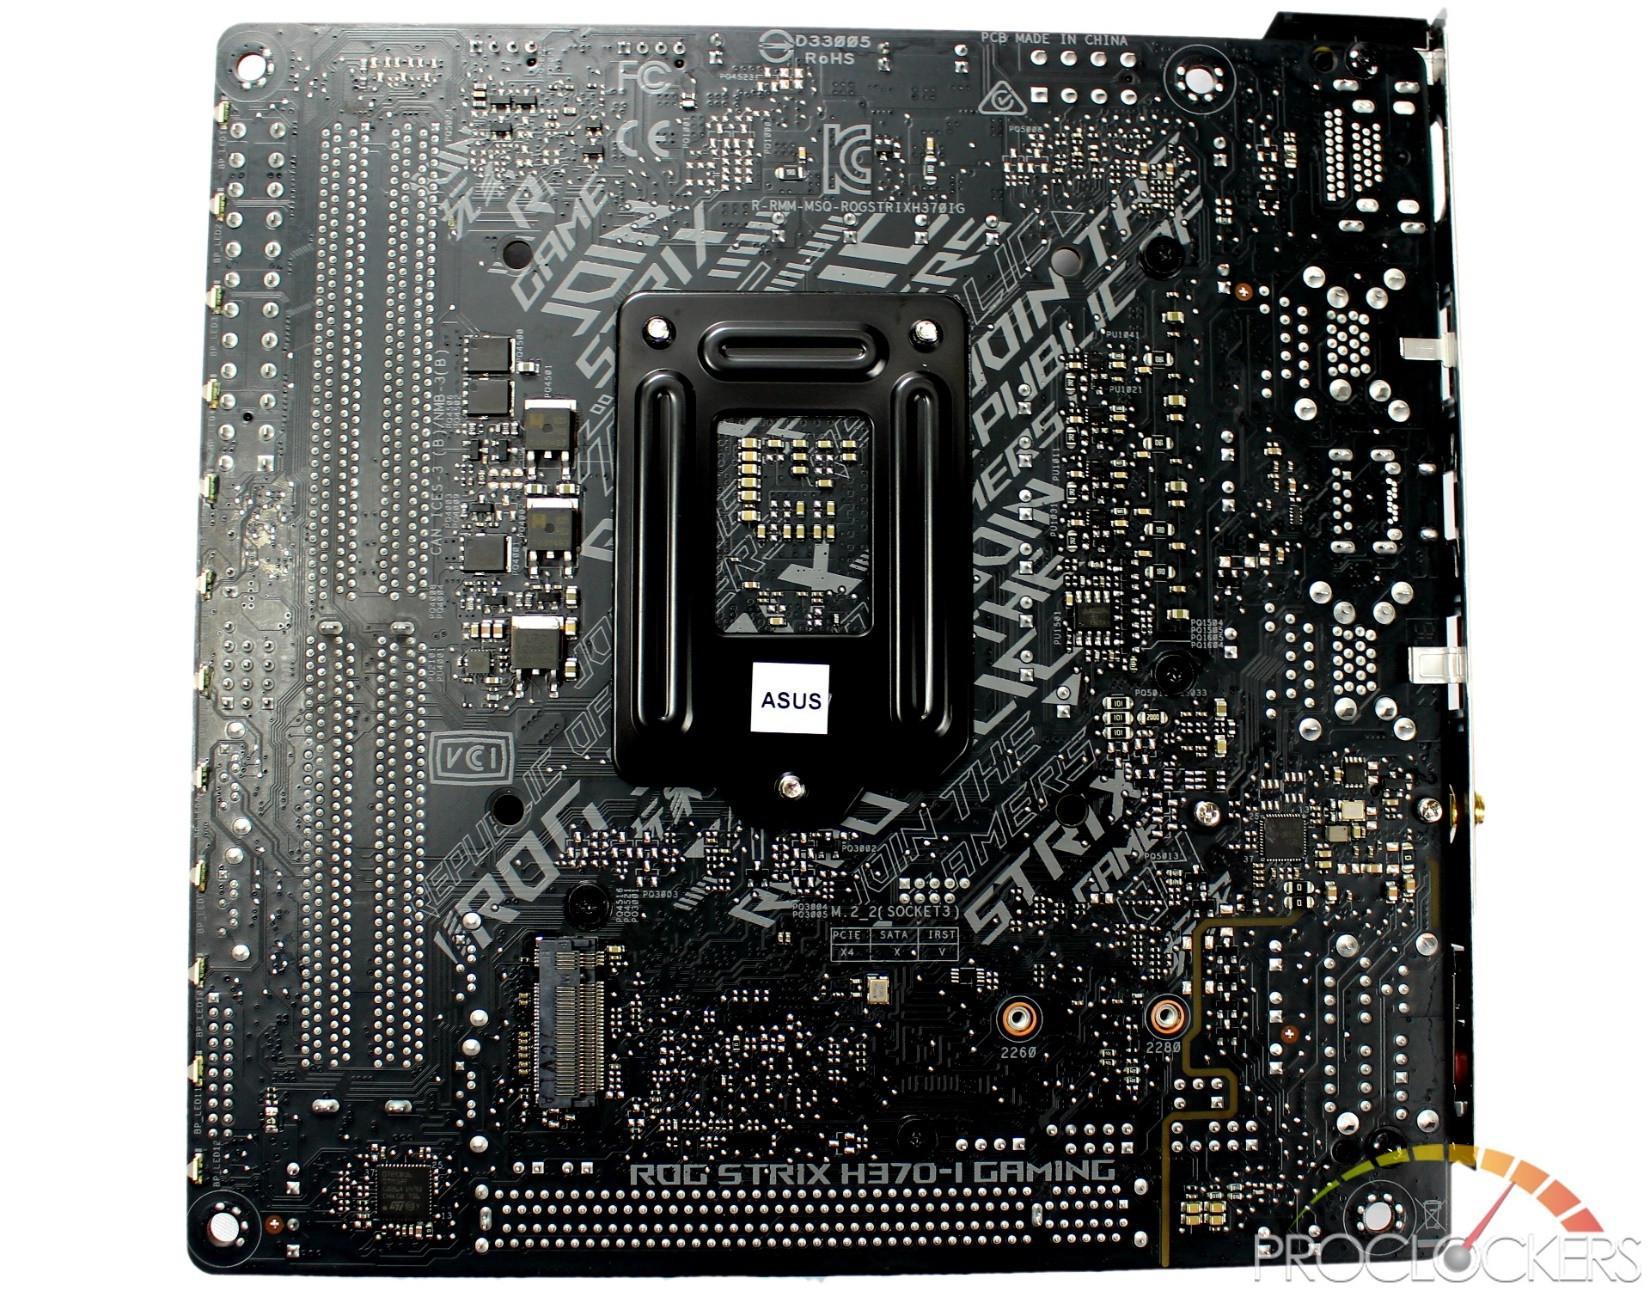
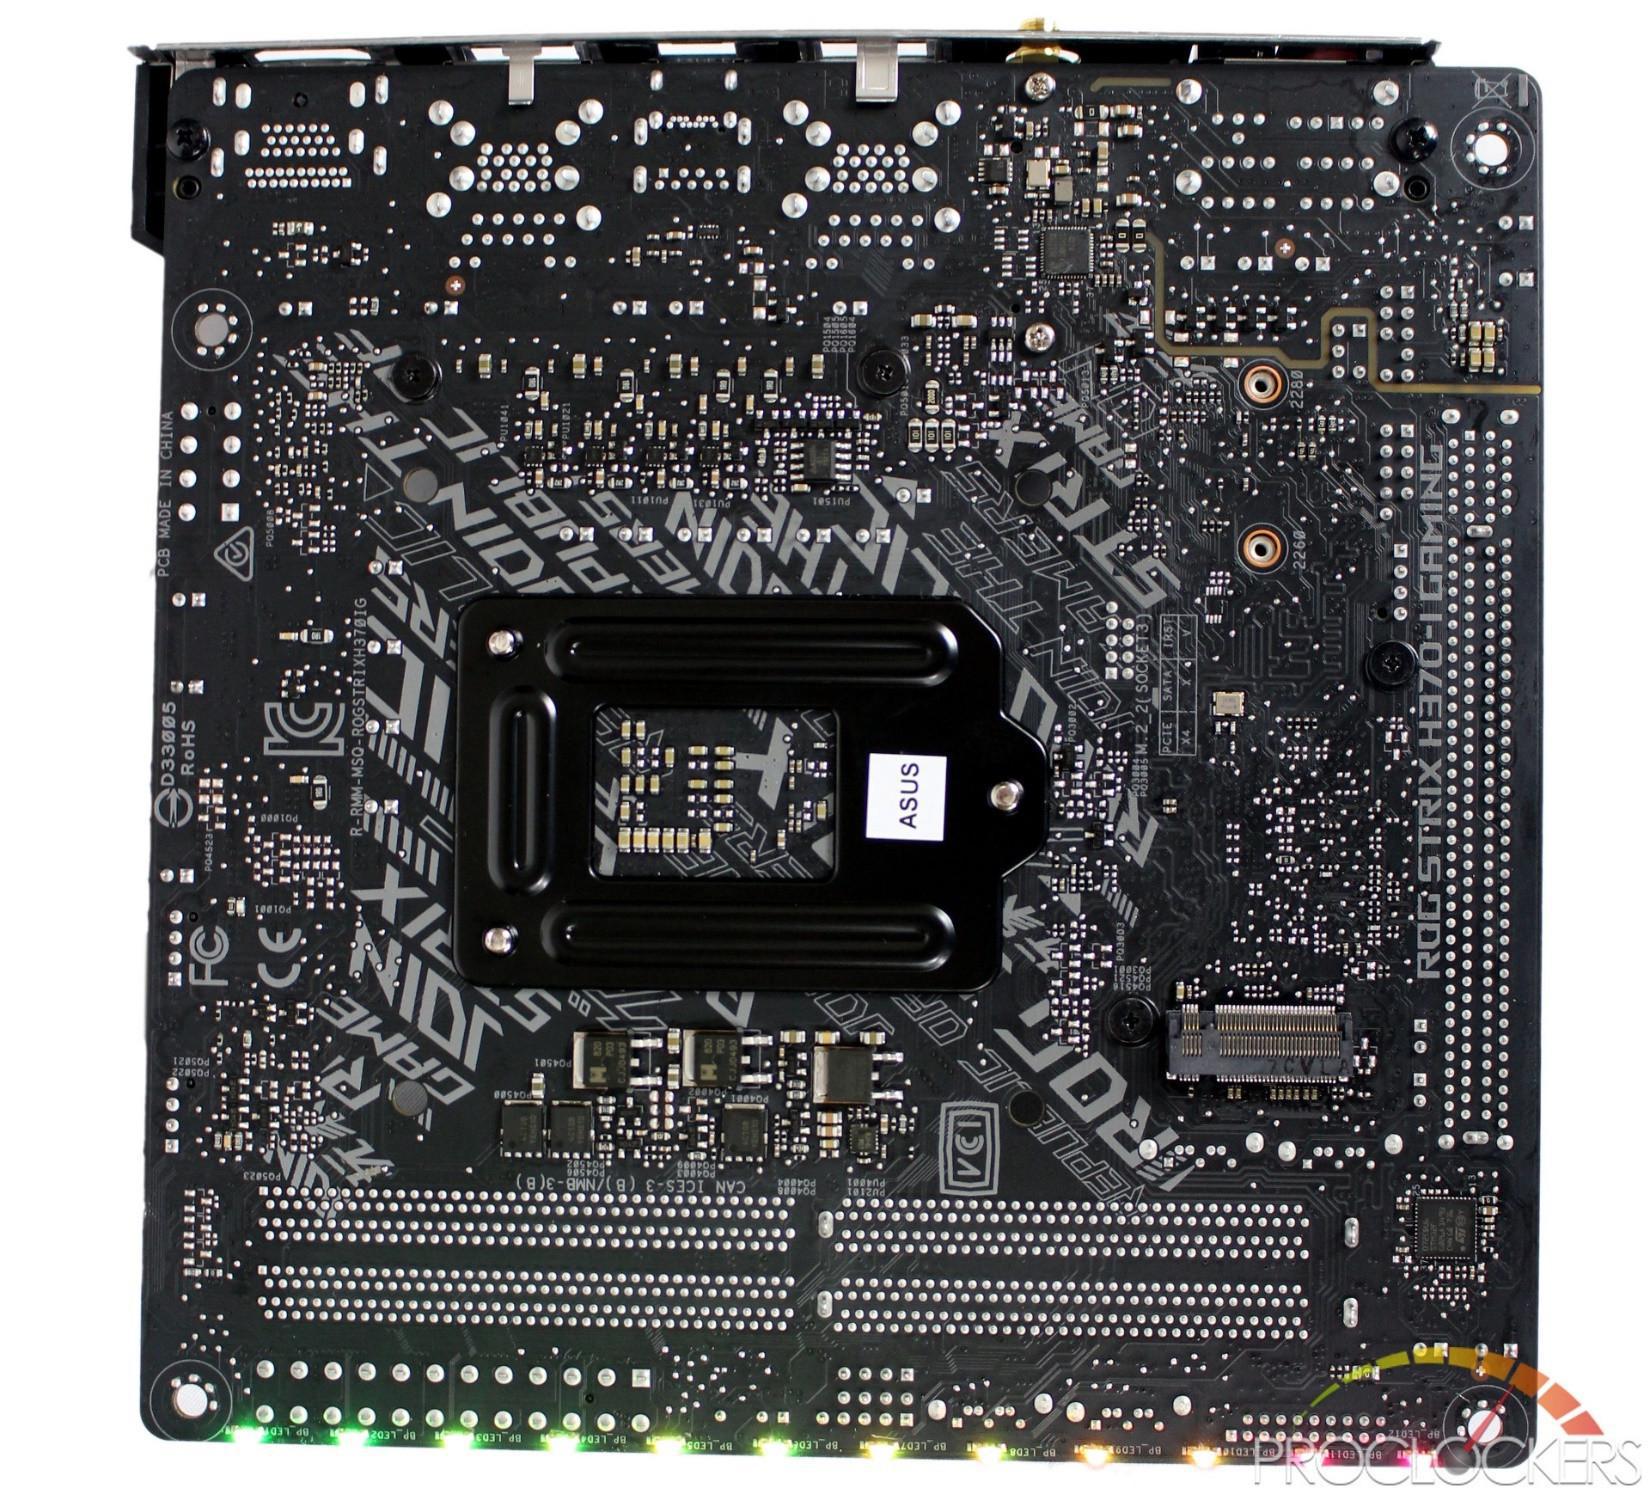
The rear of the board has quite a few surface mount components as is traditional of higher end ITX offerings, but two things here stand out. One is the new pattern printed on the PCB as an amalgamation of ASUS slogans such as ROG, Strix and Join the Republic of Gamers. The second is the rear M.2 slot, capable of using PCIe and SATA drives.
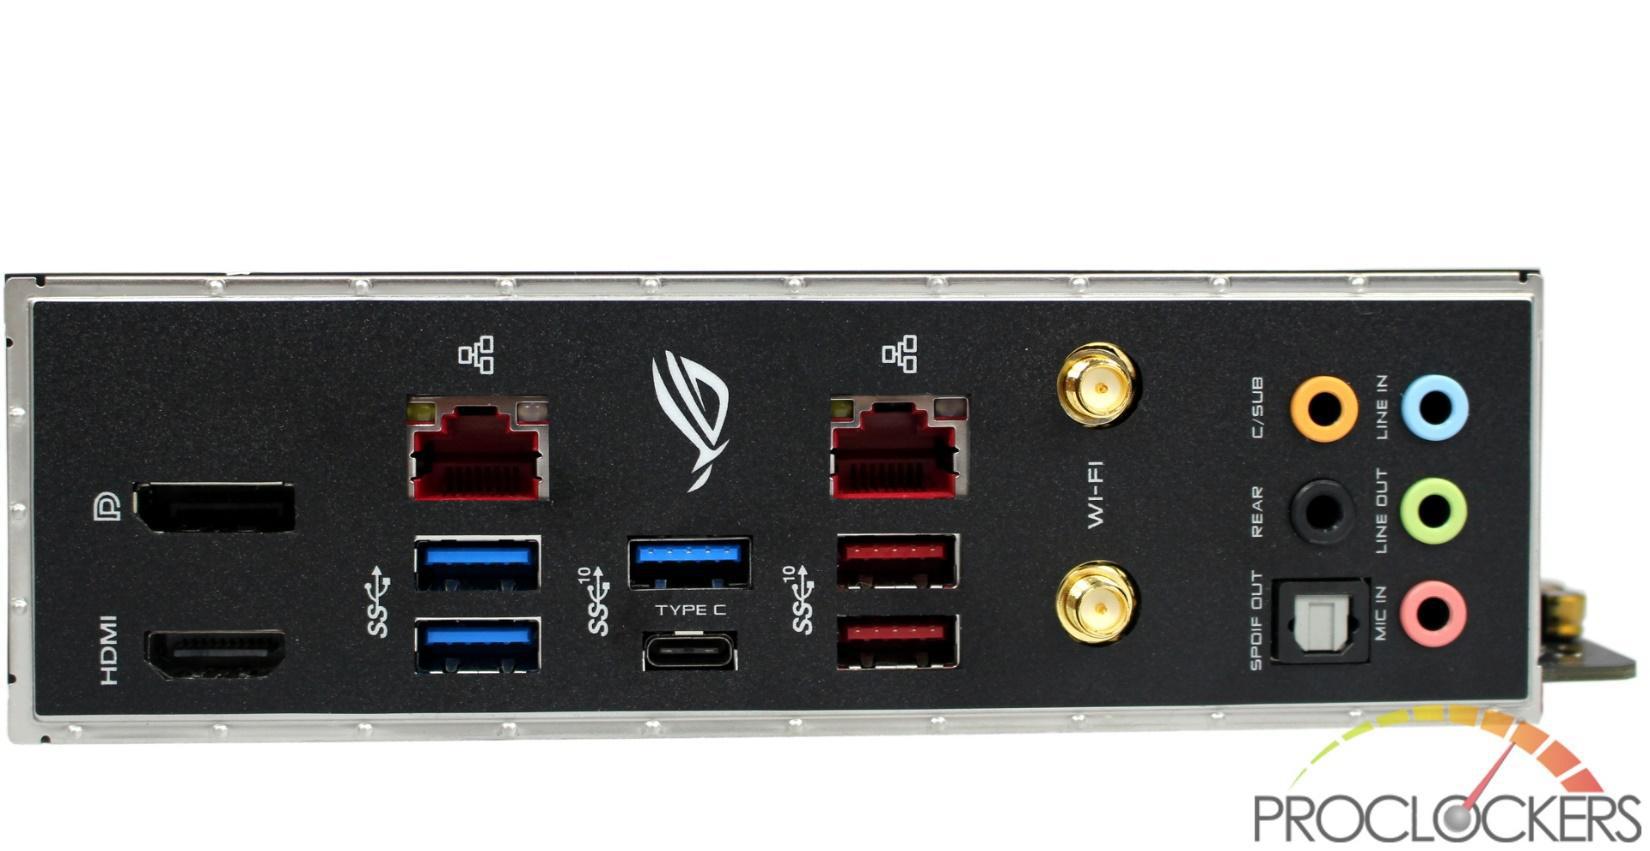
Rear I/O is fully enclosed with a pre-installed I/O shield, a first for this market segment. I/O itself is comprised of DisplayPort 1.2 and HDMI 1.4b video outputs, a pair of Intel Gigabit Ethernet jacks, three USB 3.1 gen 1 and three USB 3.1 gen 2 ports, Dual WIFI antenna connectors, and traditional 8-channel audio outputs with a single optical output.
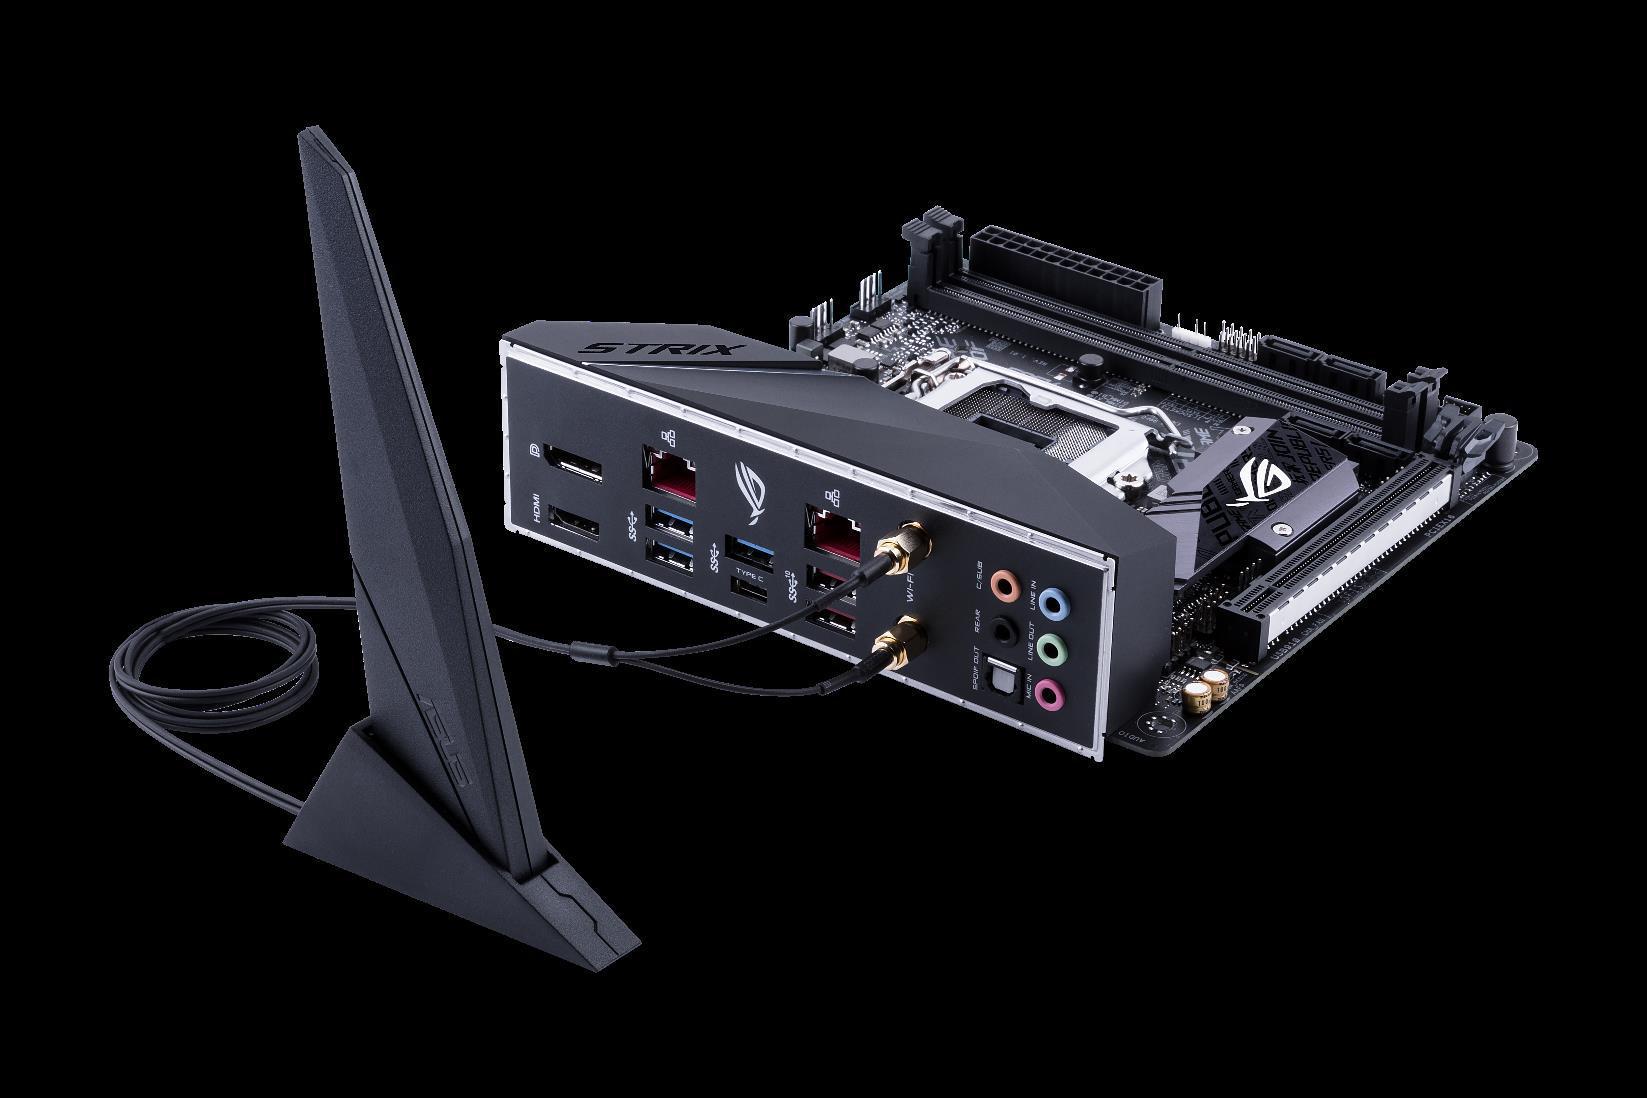
The included Wifi antenna has its own magnetic stand the antenna slots in to for easy mounting to steel cases or placing where you can get the best signal.
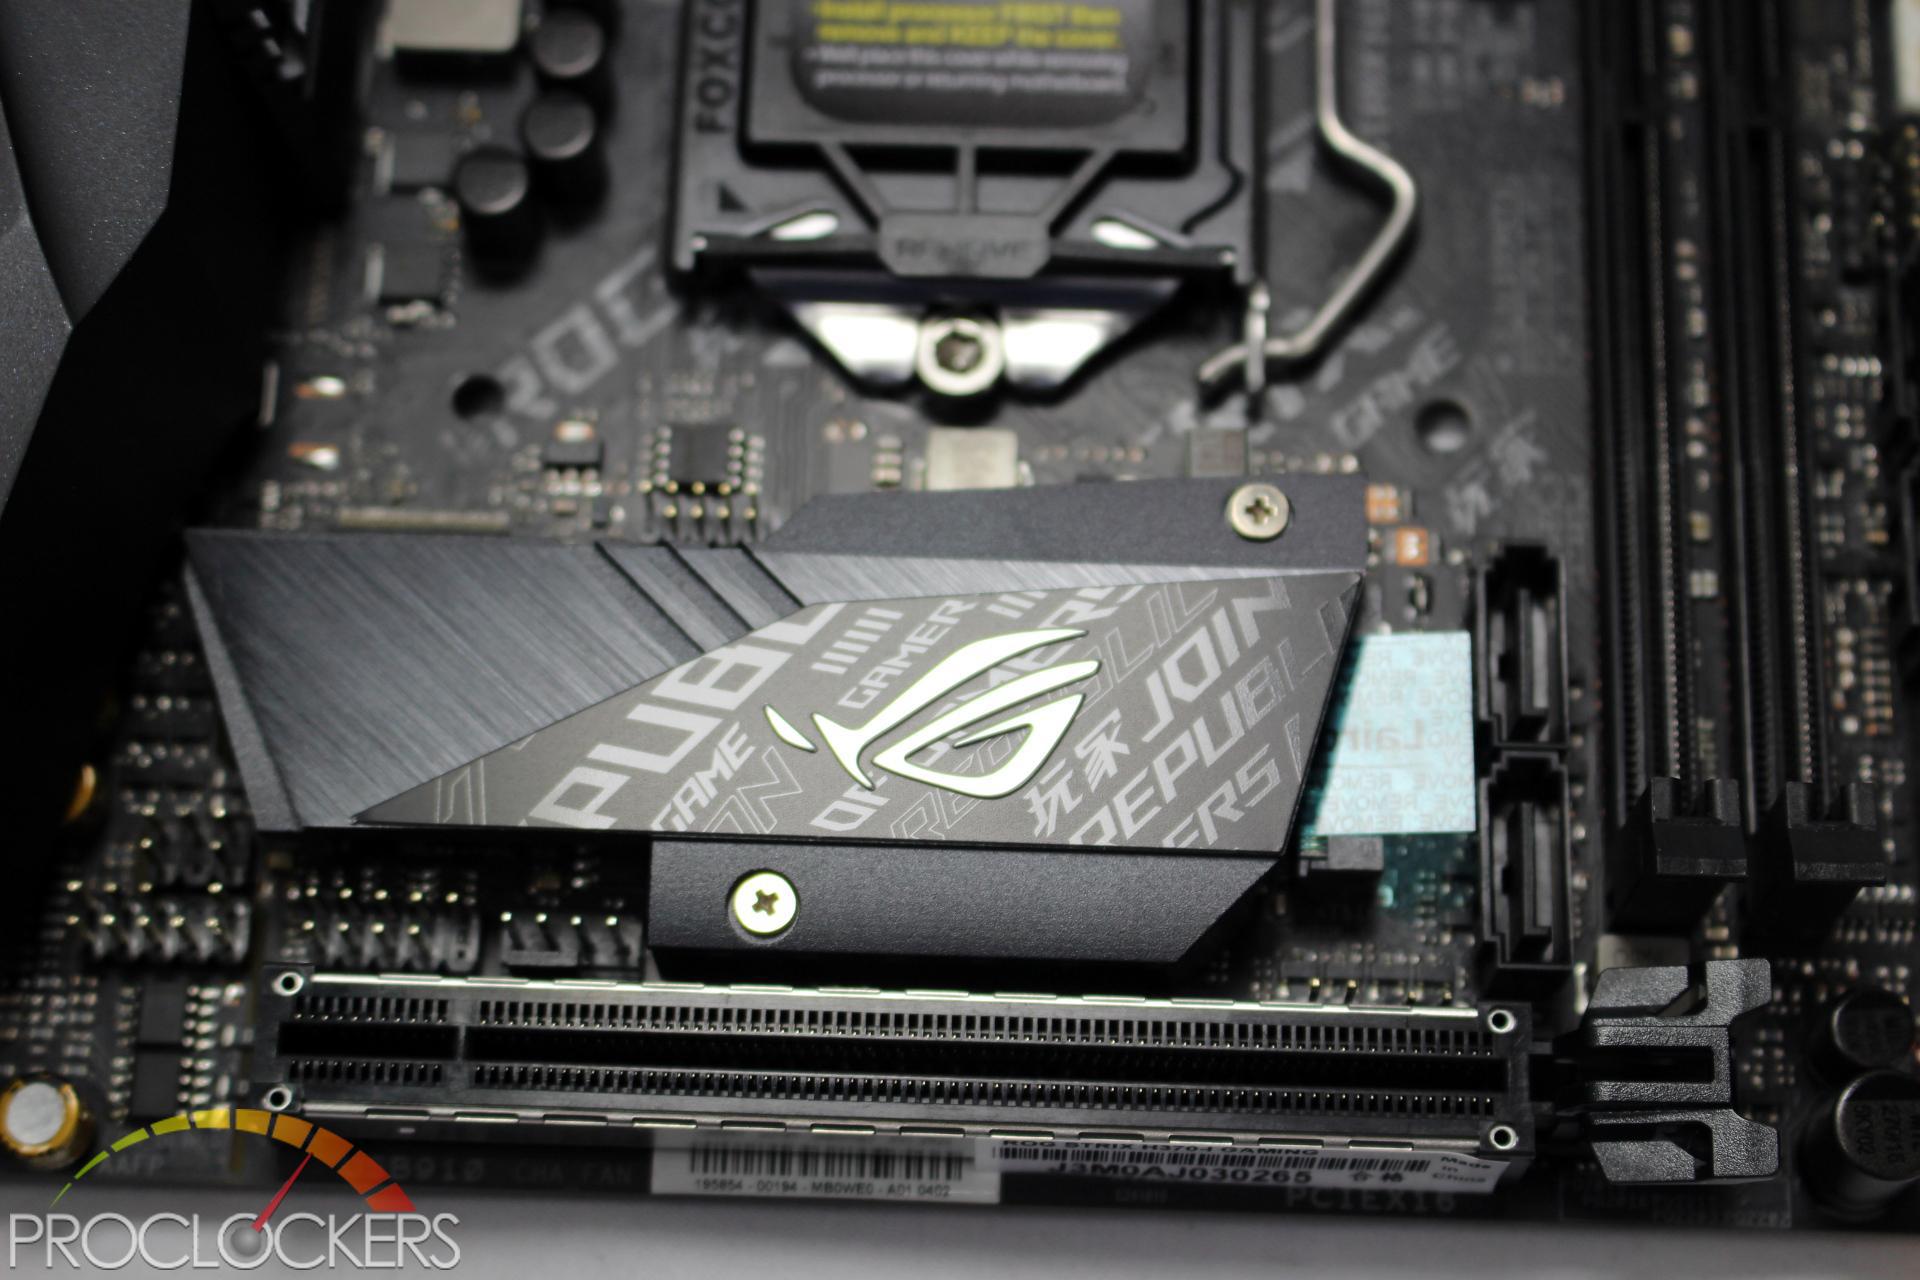
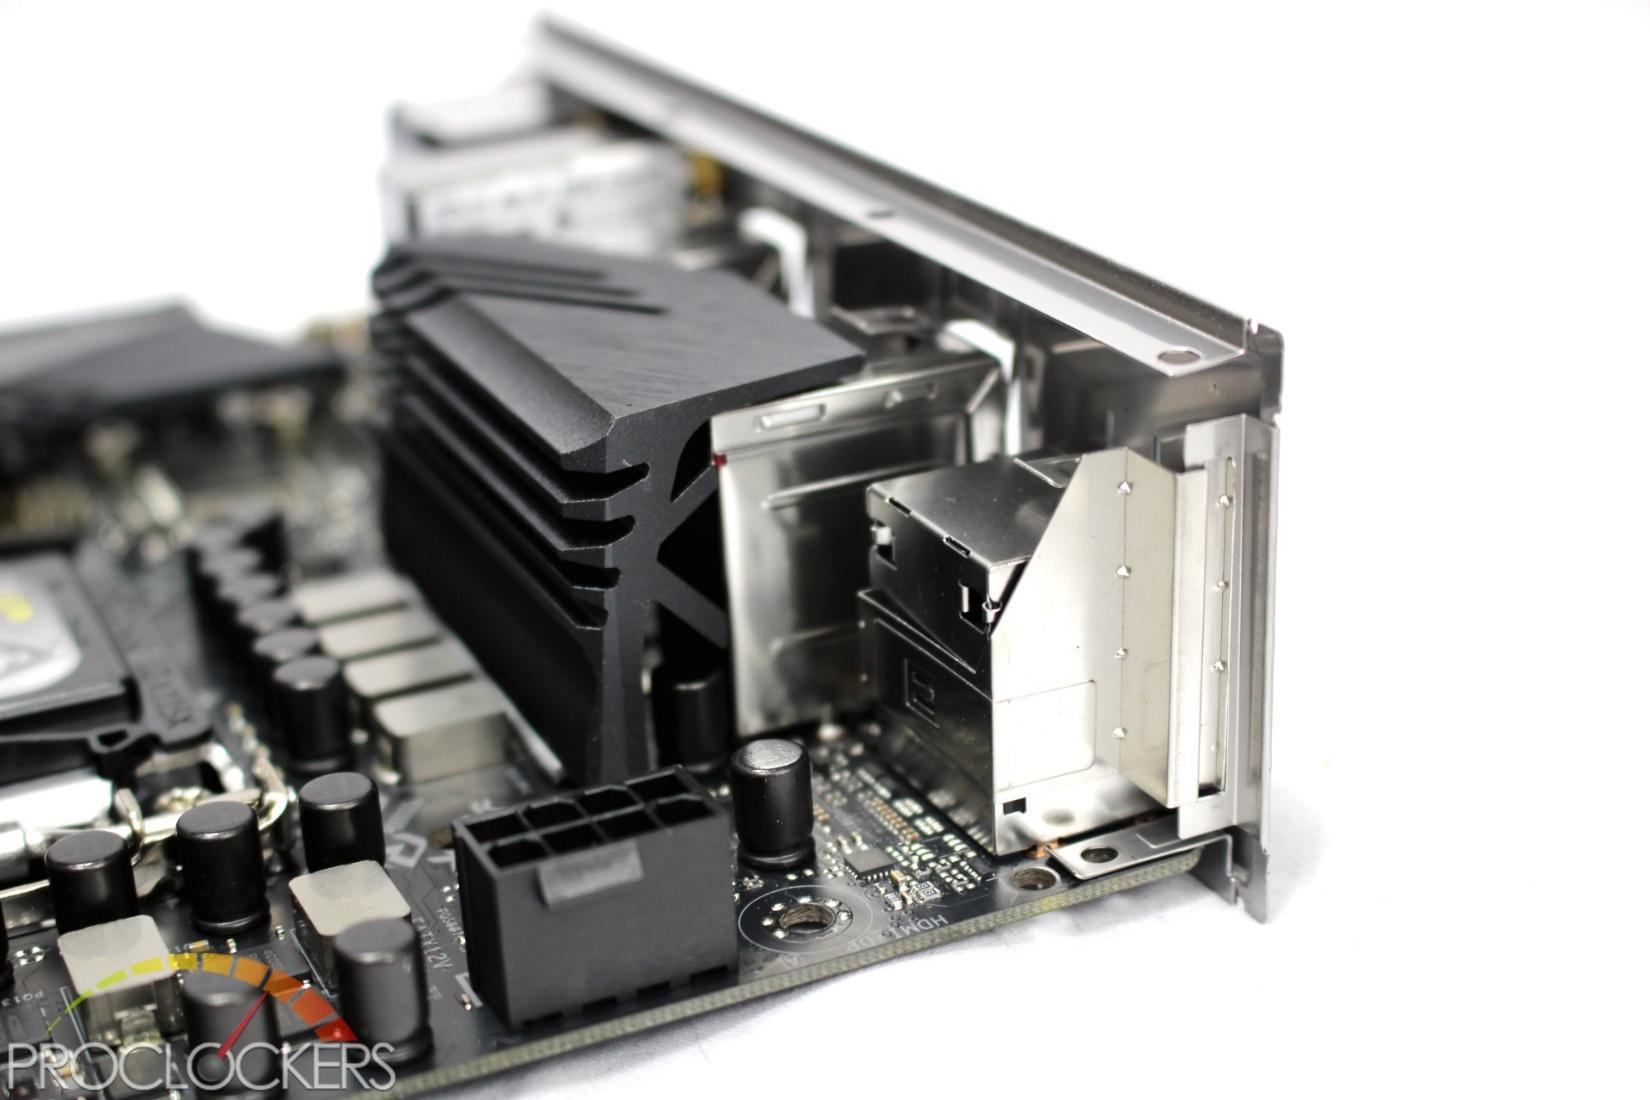
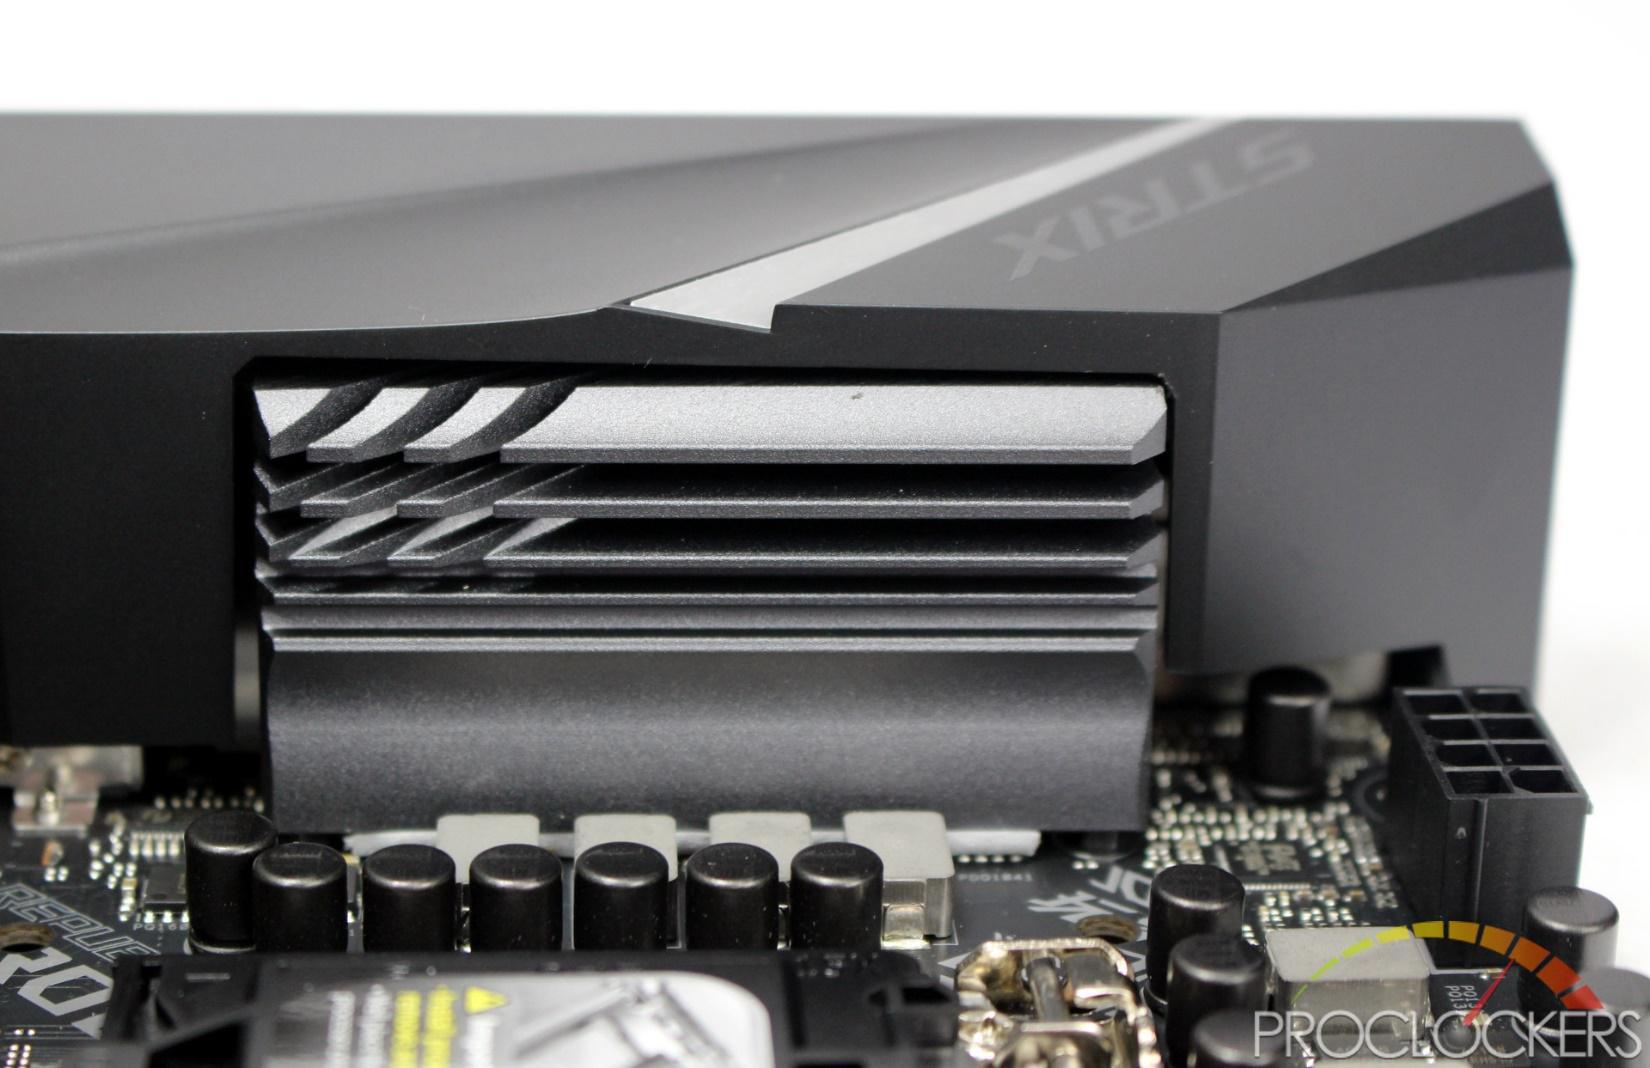
The heatsink cover doubles as a heat sink for your main M.2 drive as well as providing cooling for the chipset underneath.
Besides the armored SafeSlot PCIe x16, you have your front panel audio header, a USB 2.0 header, and a 4-pin fan header between the M.2 cover and PCIe slot. Towards the front of the board from the M.2 cover are a pair of the 4 total SATA slots.
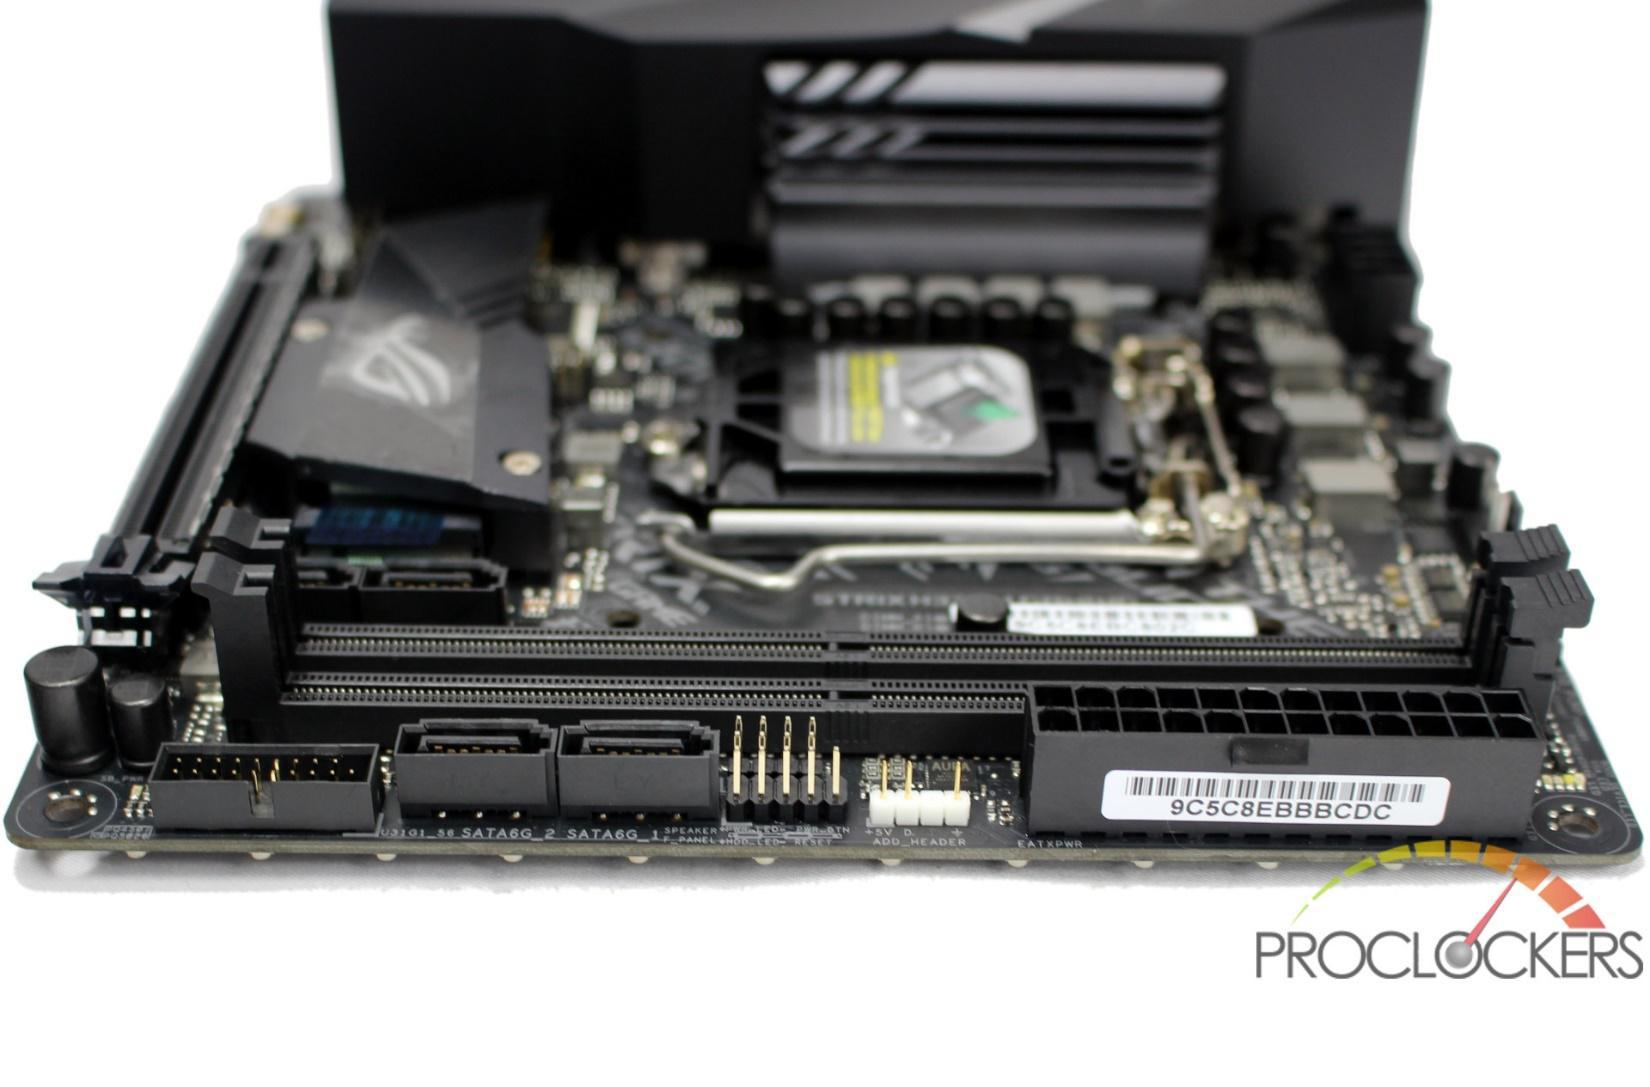
The front edge of the board is packed with connections. First up is a USB 3.0 header, two more of the SATA ports, the front panel I/O connections, a Digital RGB header and the main 24-pin power connector.
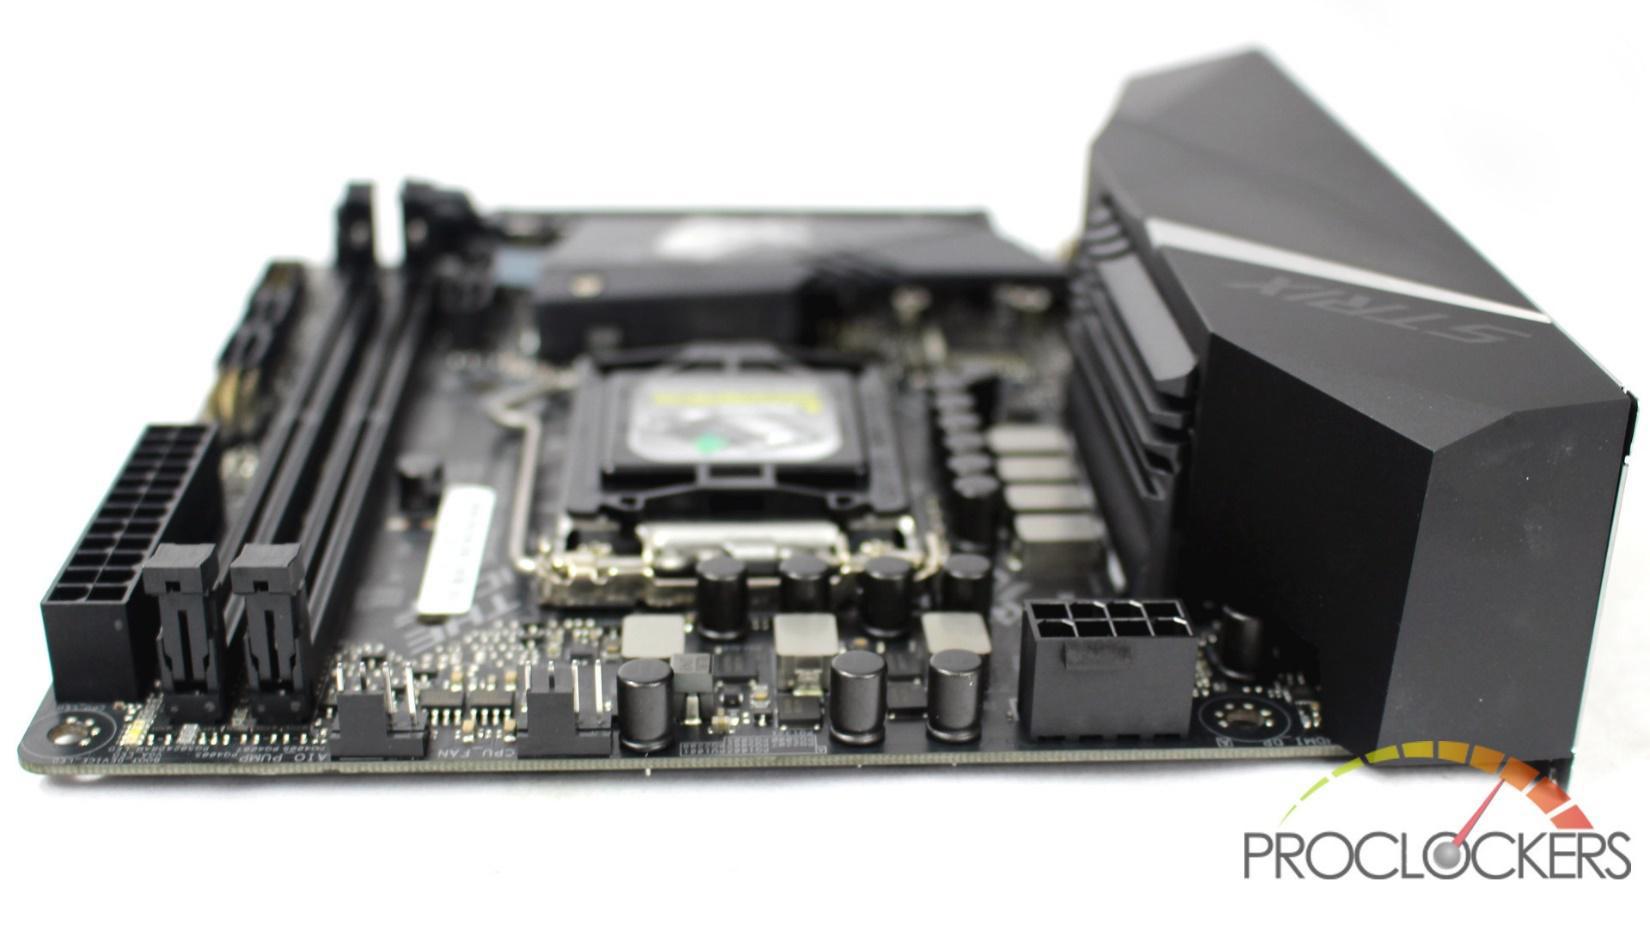
The top edge of the board has a pair of 4-pin fan headers, one ready for a pump and the 8-pin EPS connector for the CPU.
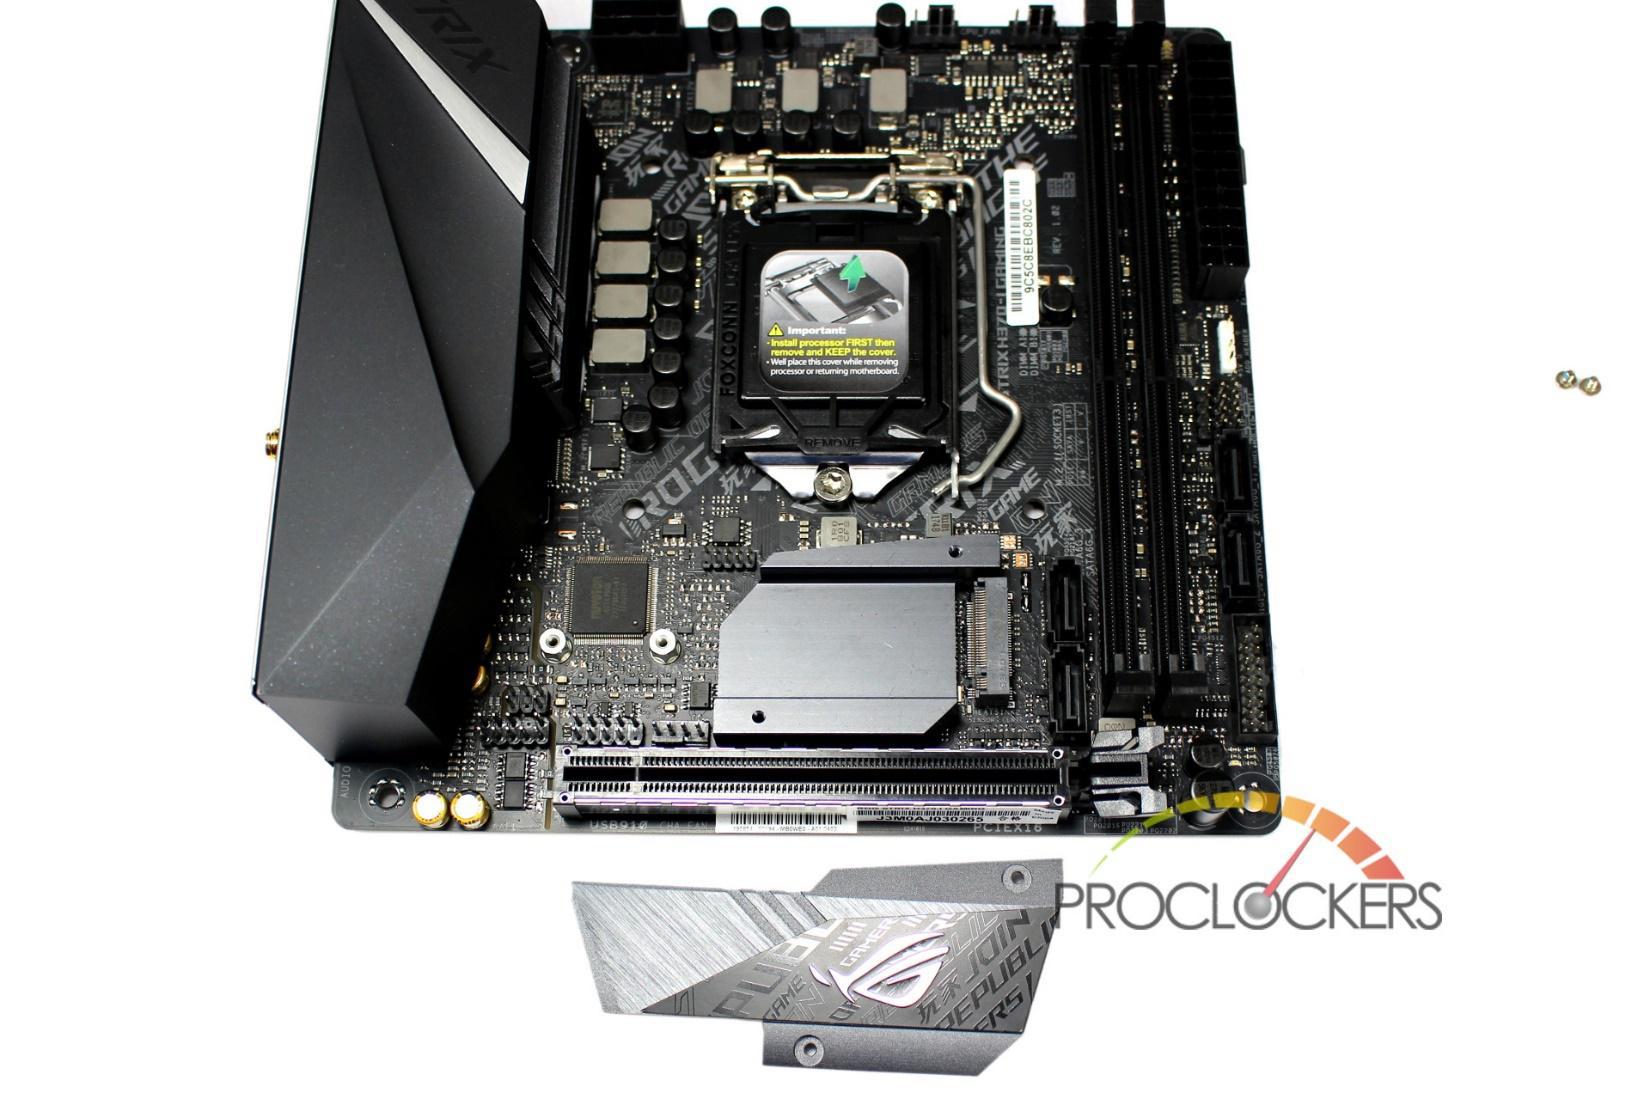
Removing two screws from the heatsink gives you access to the M.2 slot underneath. The top cover here has a thick thermal pad on it to help make contact with your M.2 drive to soak up the heat, just don’t forget to peel the protective film off.
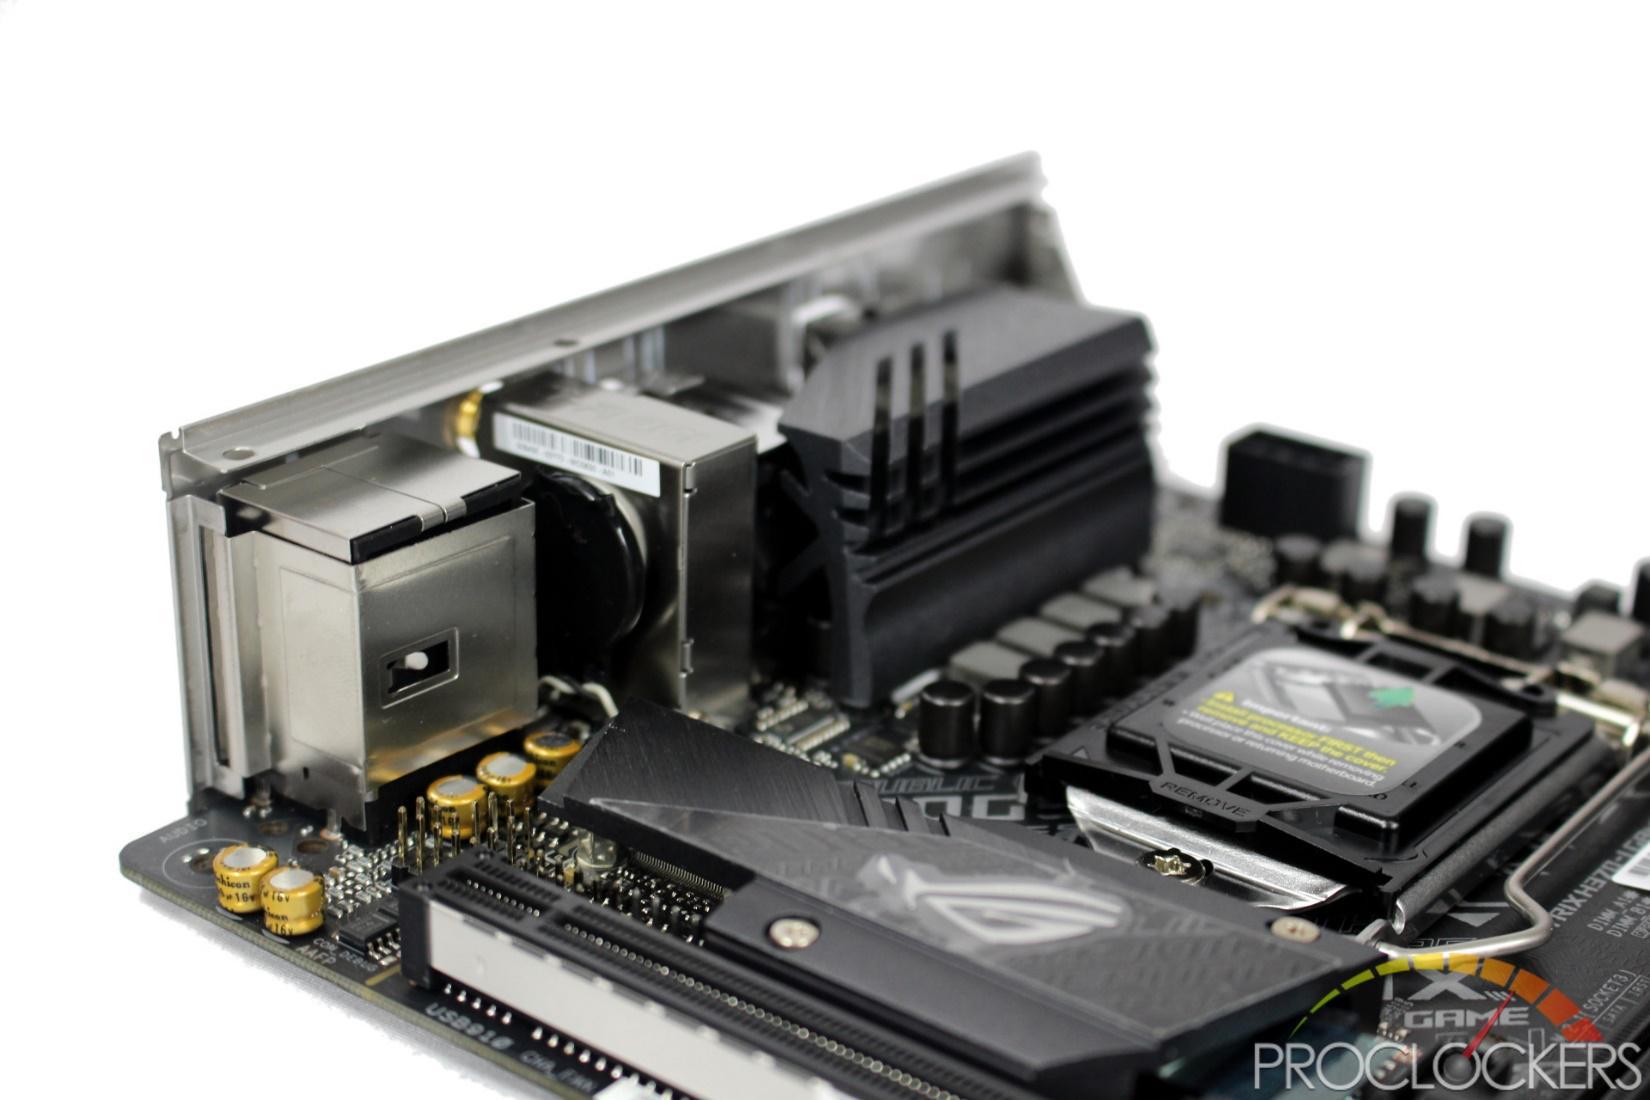
With the rear cover removed, we find the CMOS battery stuck to the Wifi adapter, which happens to be Intel’s new Wireless-AC 9560 + Bluetooth 5.0 module.
The VRM heatsink takes up quite a bit of the space under the cover. Even though the H series chipsets don’t permit overclocking, this ensures stable performance with 6 core CPU’s which are a heavy load for any small board.
The front edge of the board has a dozen RGB LED’s on it that scroll in a rainbow by default. They seem to operate as 6 distinct groups of 2 lights and can be adjusted from ASUS’s AURA software to your liking.
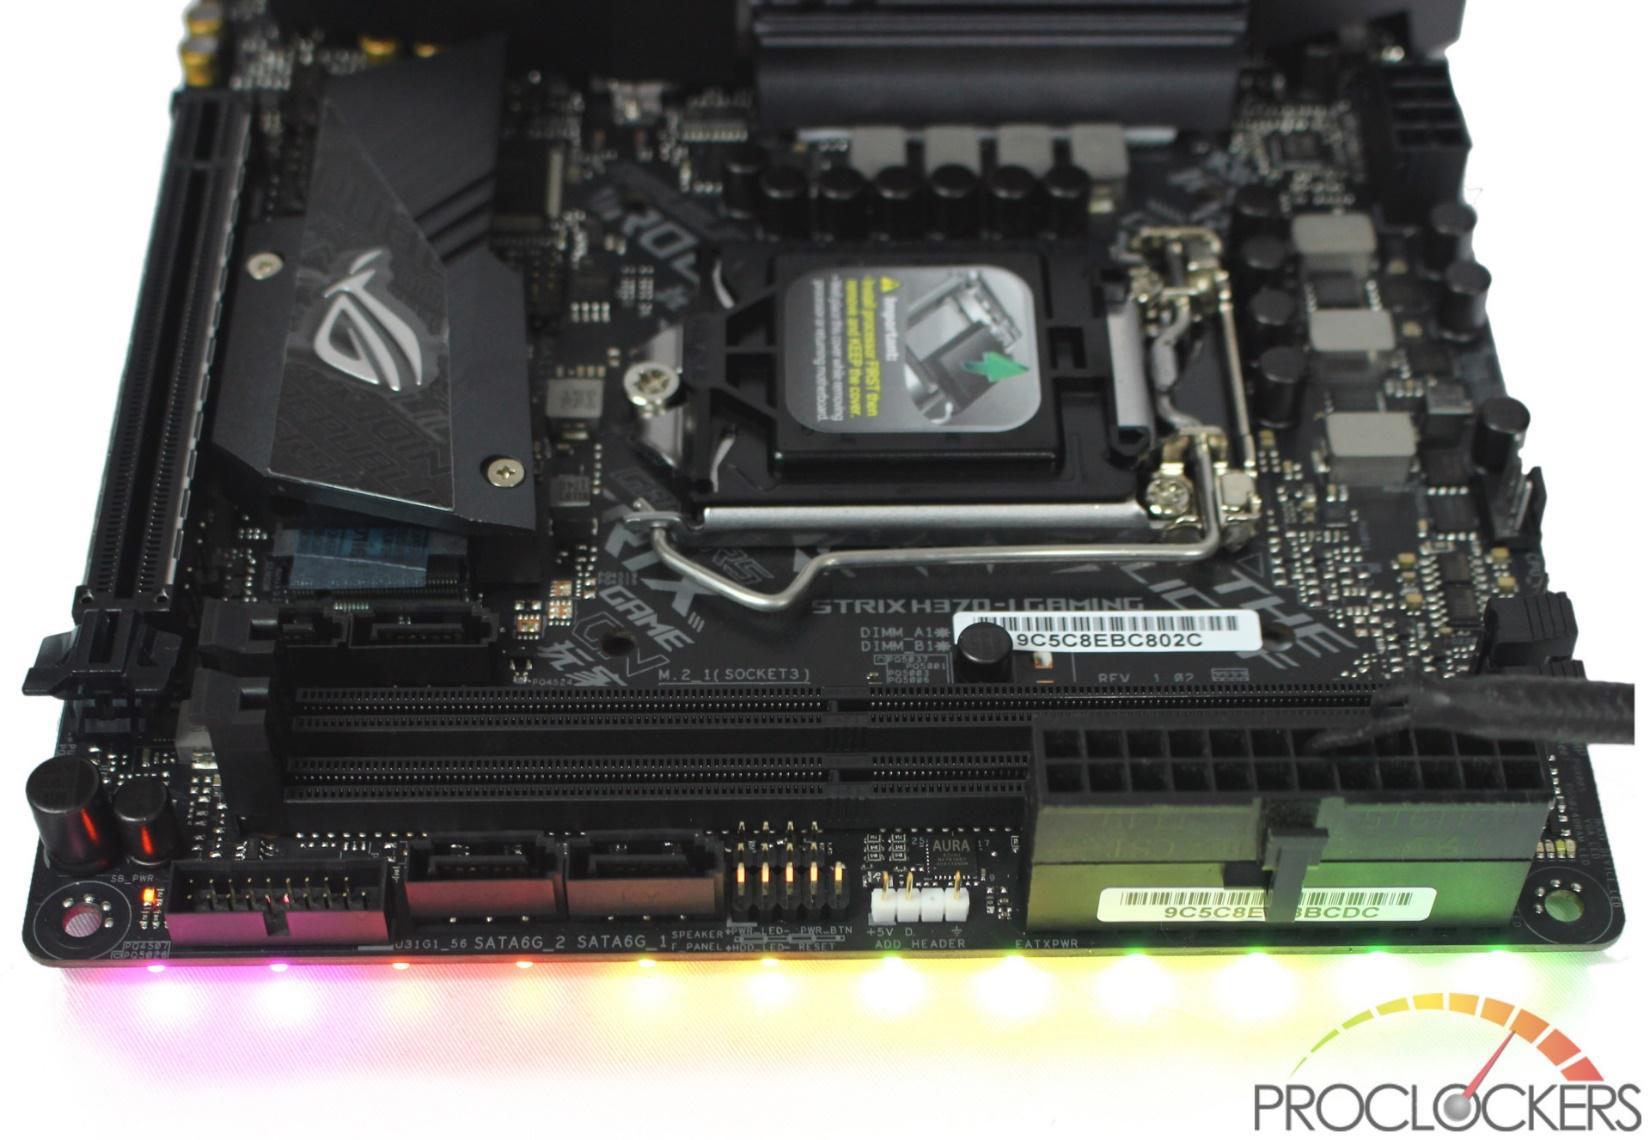
This single edge lighting provides your system a really nice wash of color. If you want more, there is an addressable header here for even more fun.
System Configuration & BIOS
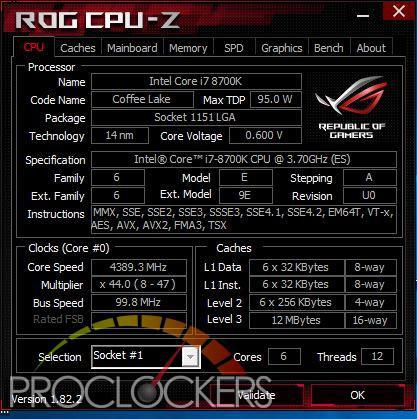
CPU: Intel Core i7-8700k
Motherboard: ASUS ROG STRIX H370-I
RAM: 16GB G.Skill TridentZ RGB 3200Mhz (platform capped at 2666Mhz)
GPU: Galax GTX 1070 HOF
SSD: Samsung 960 Pro 2TB
OS: Windows 10 Professional X64
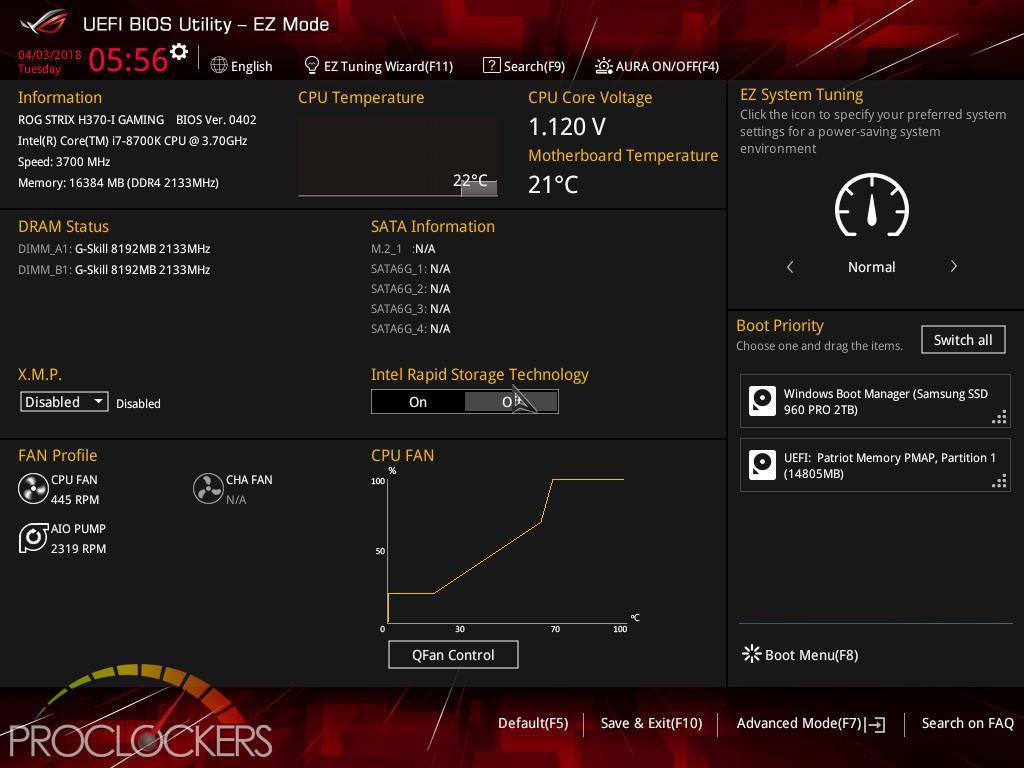
Like most of ASUS’s boards, with the ROG Strix H370-I Gaming, you start out on a simplified landing page when entering the UEFI BIOS.
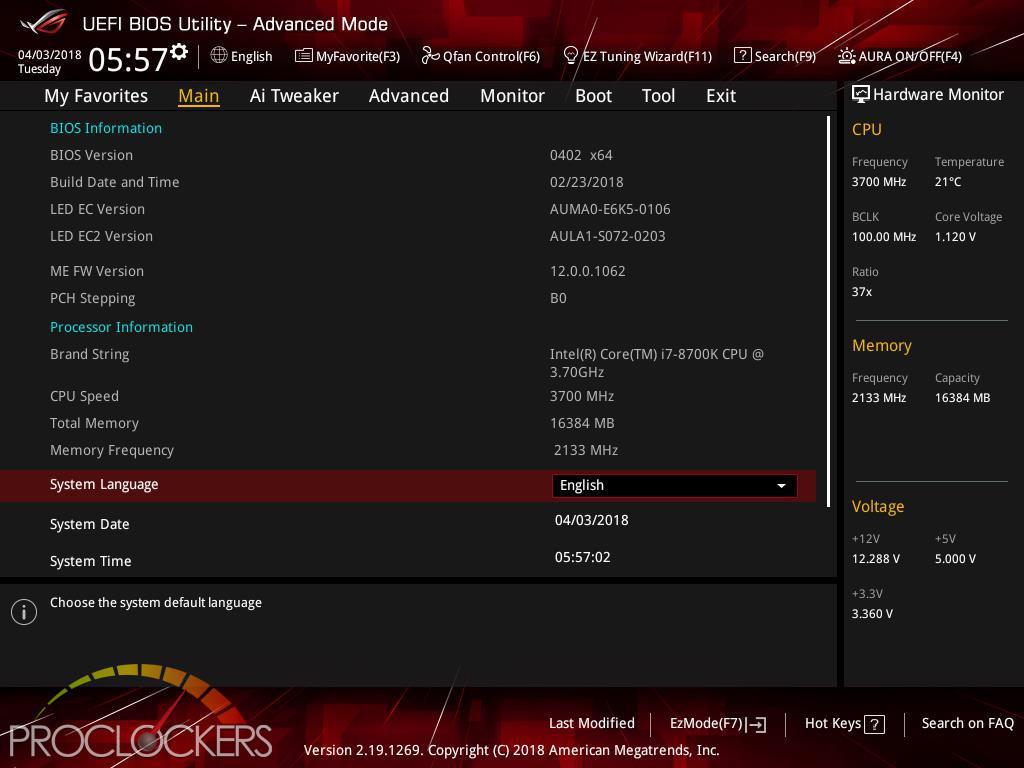
Hitting F7 brings you to the advanced part of the BIOS. This Main page gives a quick overview of your system.
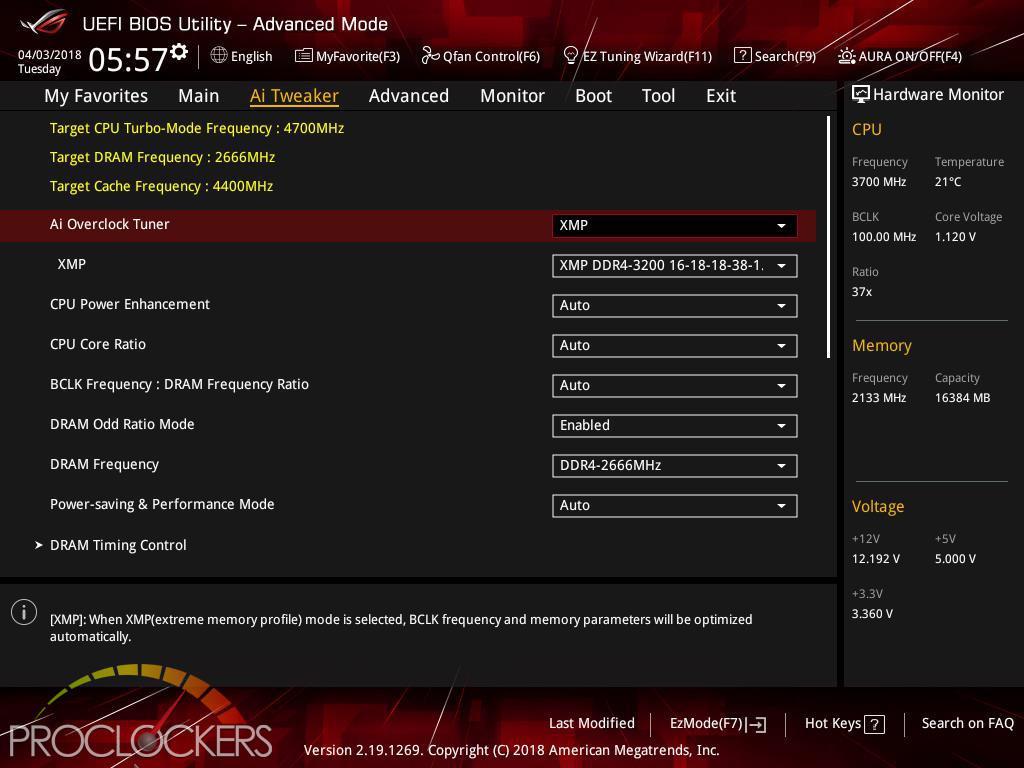
The Ai Tweaker page is where most would normally spend their time in the BIOS. We stopped by to kick XMP on and noticed it only goes up to 2666Mhz when we turn it on. The specifications list a maximum of 2666Mhz memory support, it looks like we may be capped here, but to be fair, this platform is not meant to support overclocking. We’ll circle back later on and see if we can push this a little more.
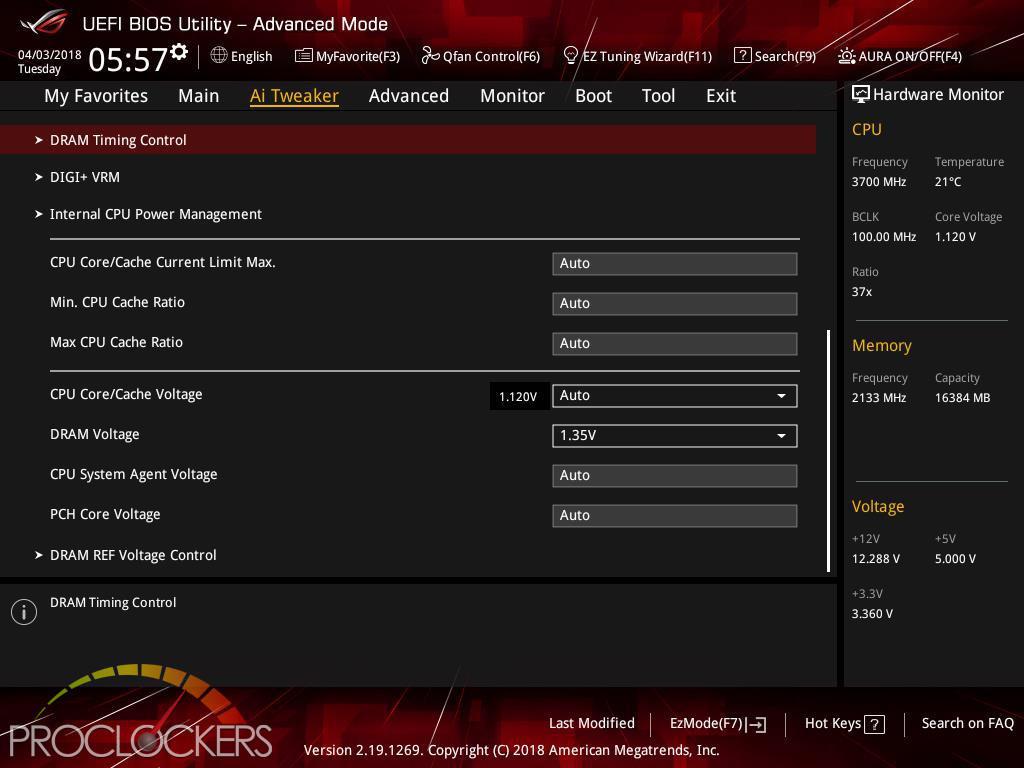
There are a few more settings on the page, but not to the extent we are used to seeing in the Z370 series boards.
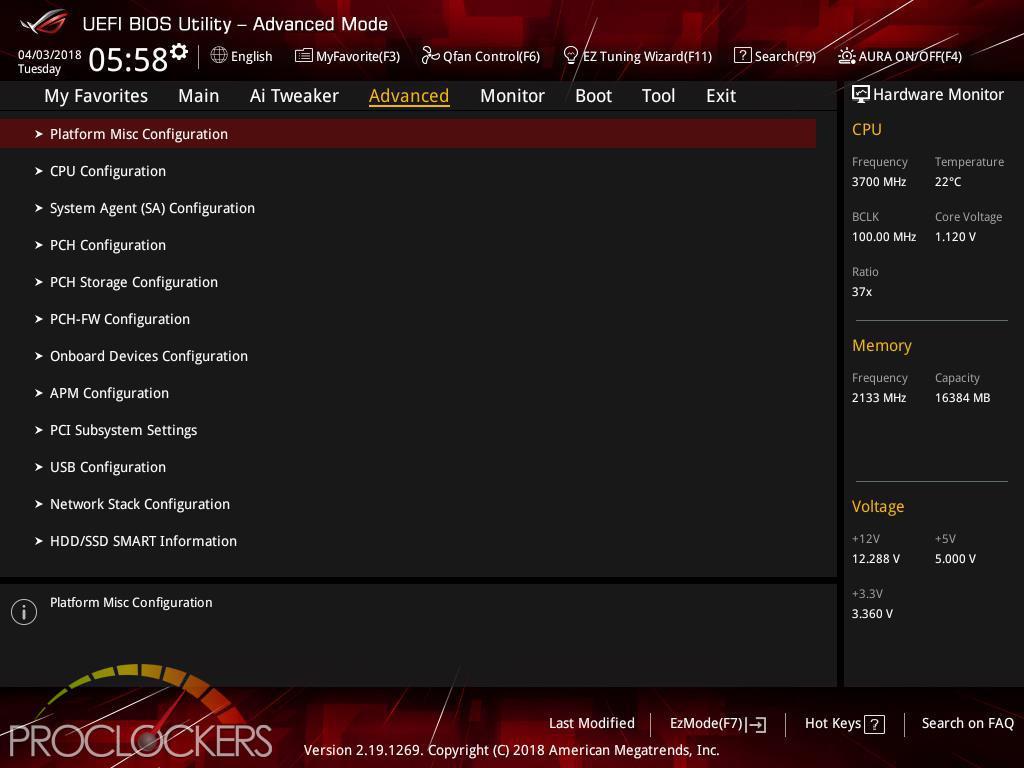
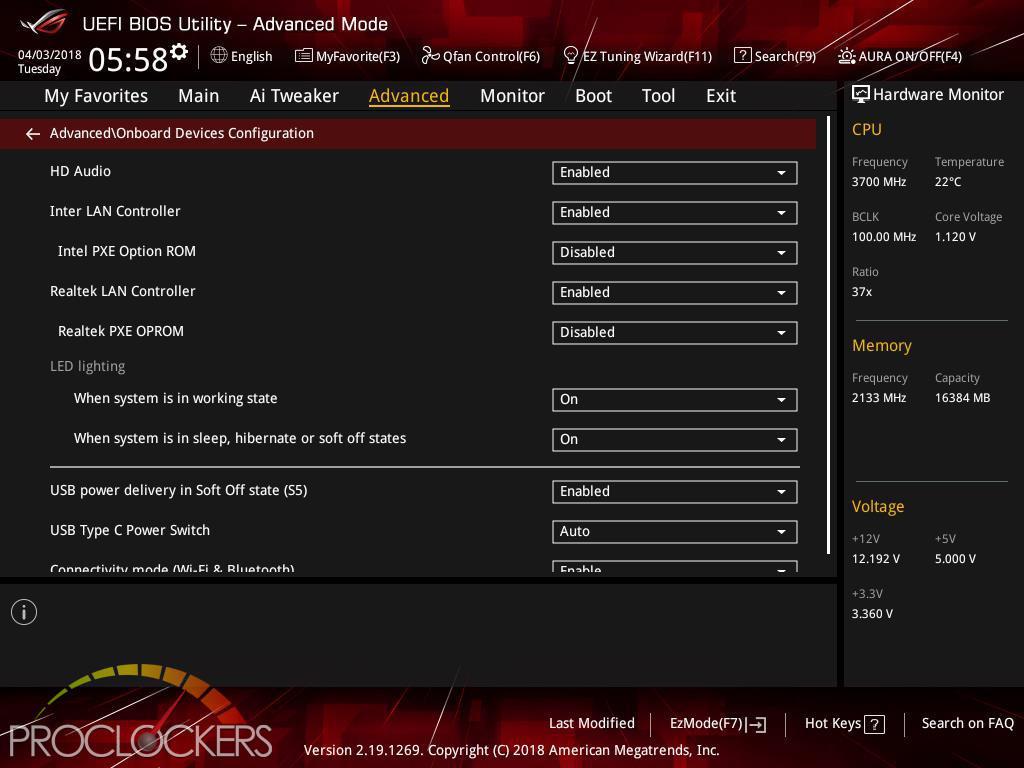
The advanced tab has several useful things if you need to dig deep into the guts of the system, but a few things are here such as PXE booting if you wanted to network boot this system for example.
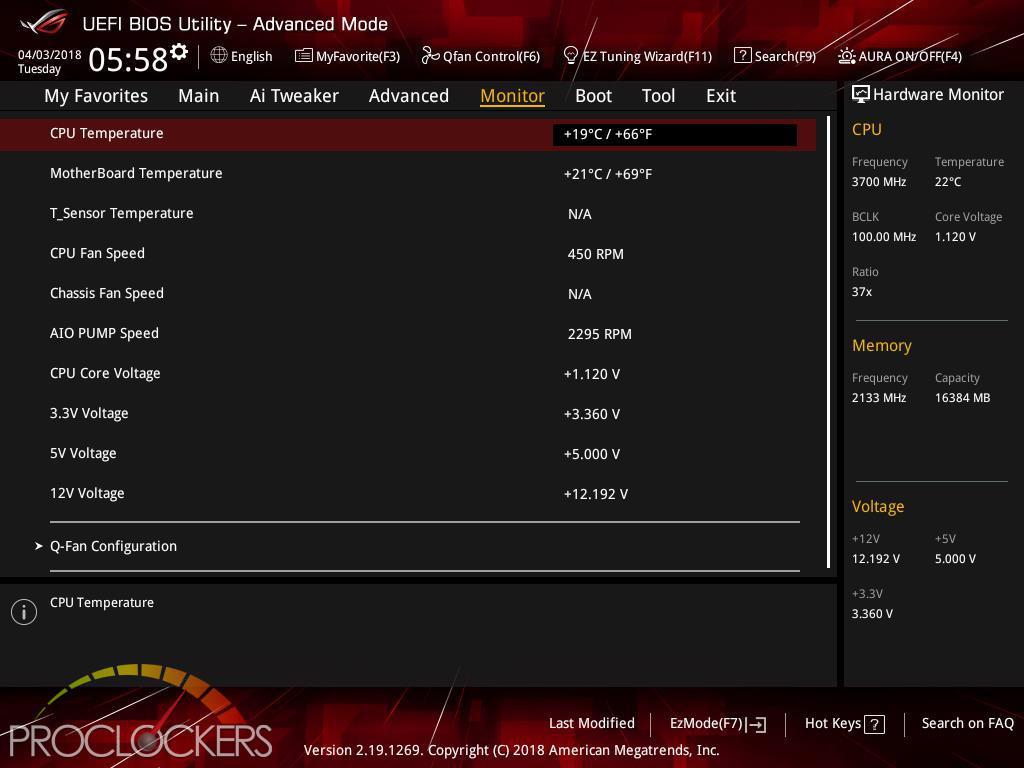
The Monitor tab is pretty short, with only 3 fan headers, 3 voltages, and a handful of temperatures to monitor, you don’t need much.
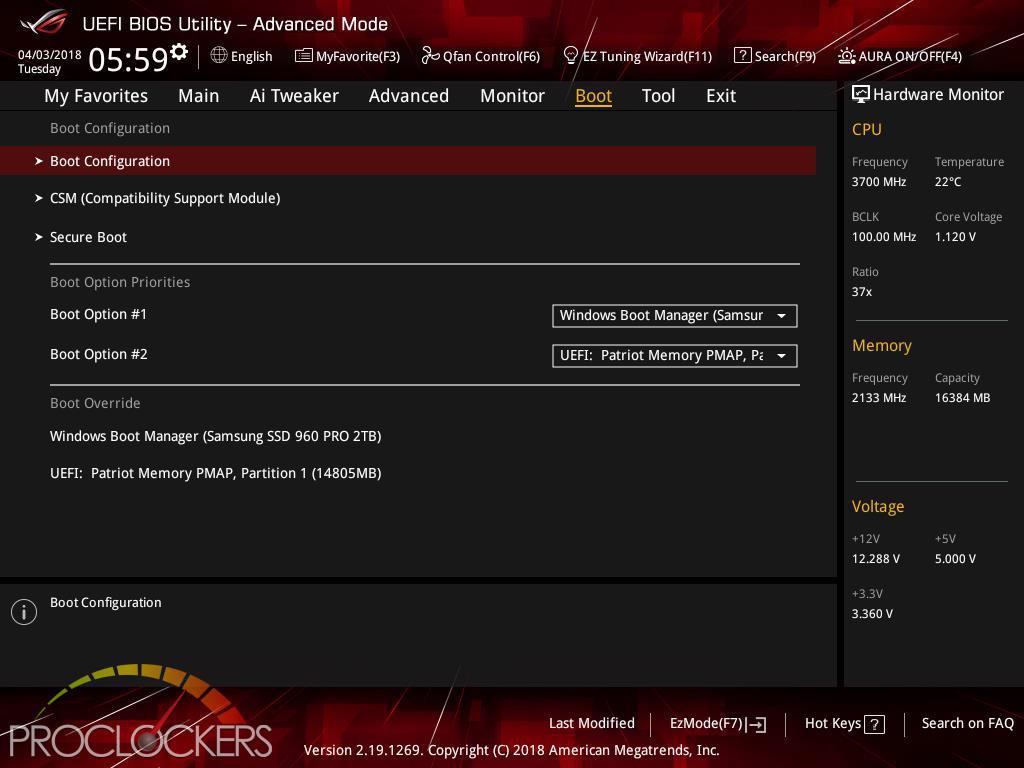
The Boot tab is pretty self-explanatory. In our experience, the need to visit this tab is pretty rare, most boards are pretty good about picking the right device and settings to get you to your chosen OS with little intervention.
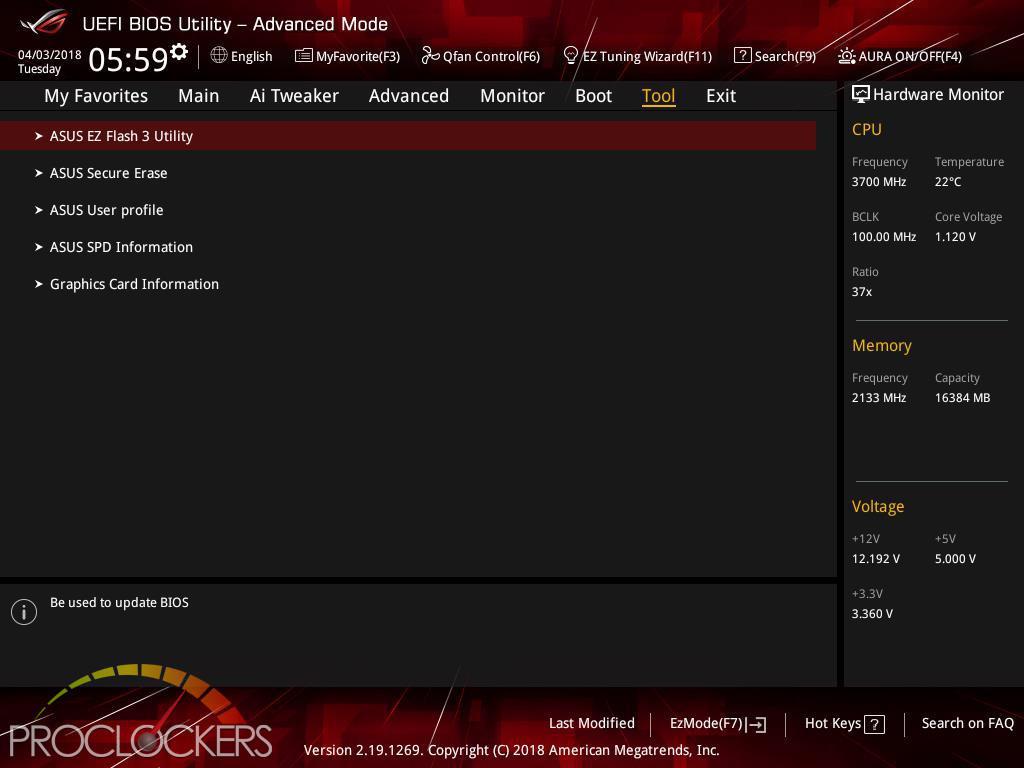
The Tools tab should be the first stop on any new build if for no other reason than to update the BIOS. As we are checking this out prior to launch, there aren’t any new versions publicly available yet.
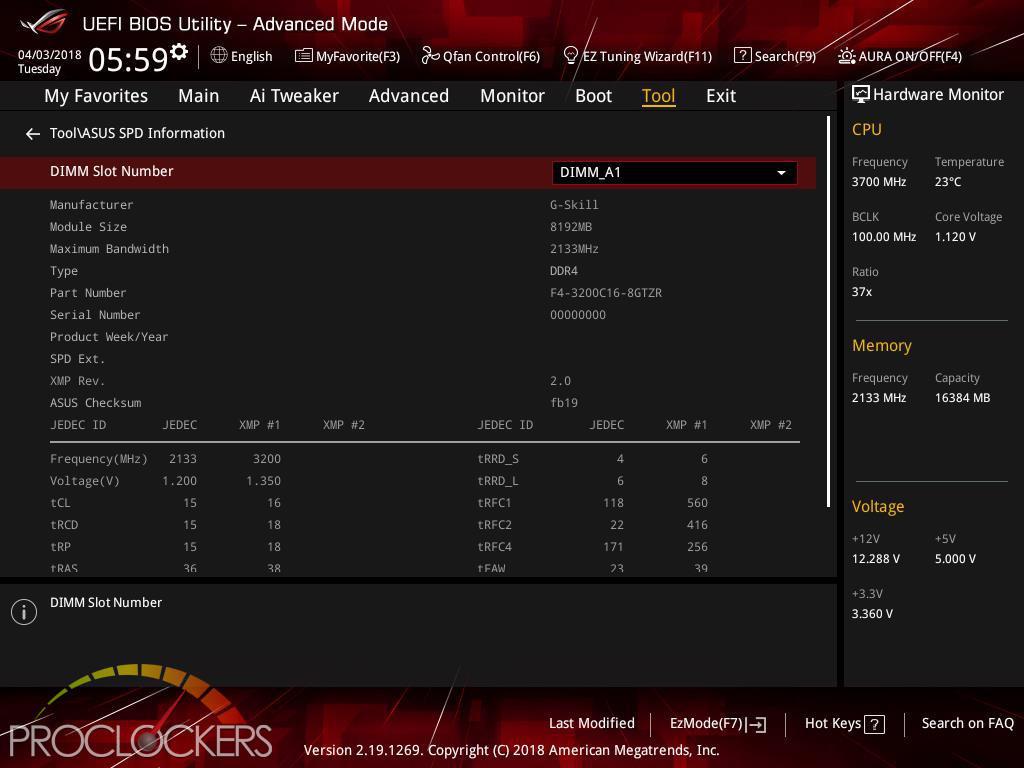
Another useful tool here is the SPD info page. This shows us our kit of memory is indeed rated for 3200Mhz operations.
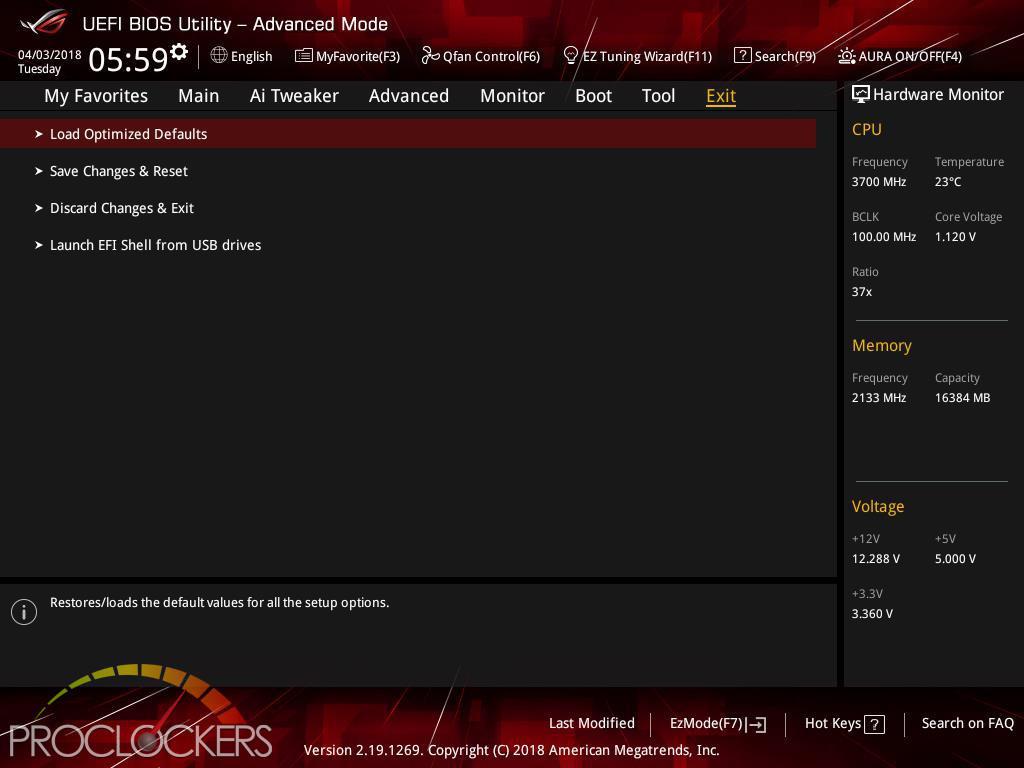
The exit page has some useful things, even if you are used to hitting F10 to save and exit, you may find the need to load defaults or even force load an EFI shell from USB such as the Windows installer.
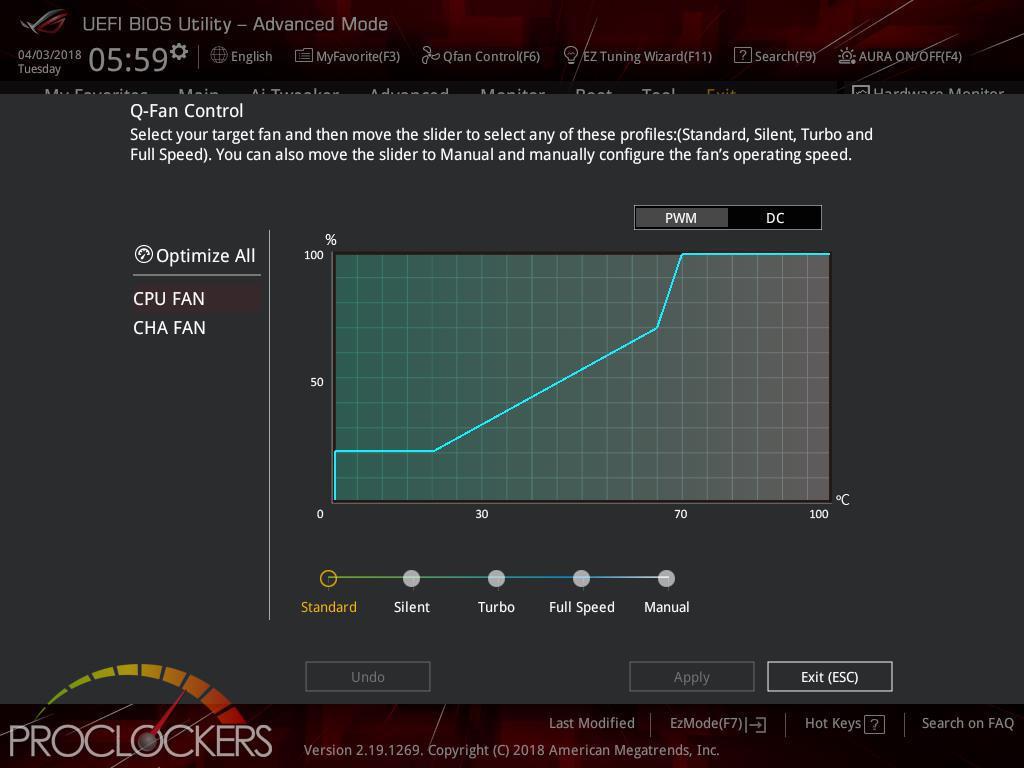
ASUS Q-fan can be accessed from the bottom of the Monitor tab, or at any time by hitting F6. The CPU and Chassis fans can be controlled from here

Since Intel’s H and B series chipsets done support overclocking, the EZ Tuning wizard can only help you set up storage configurations like RAID.
Software
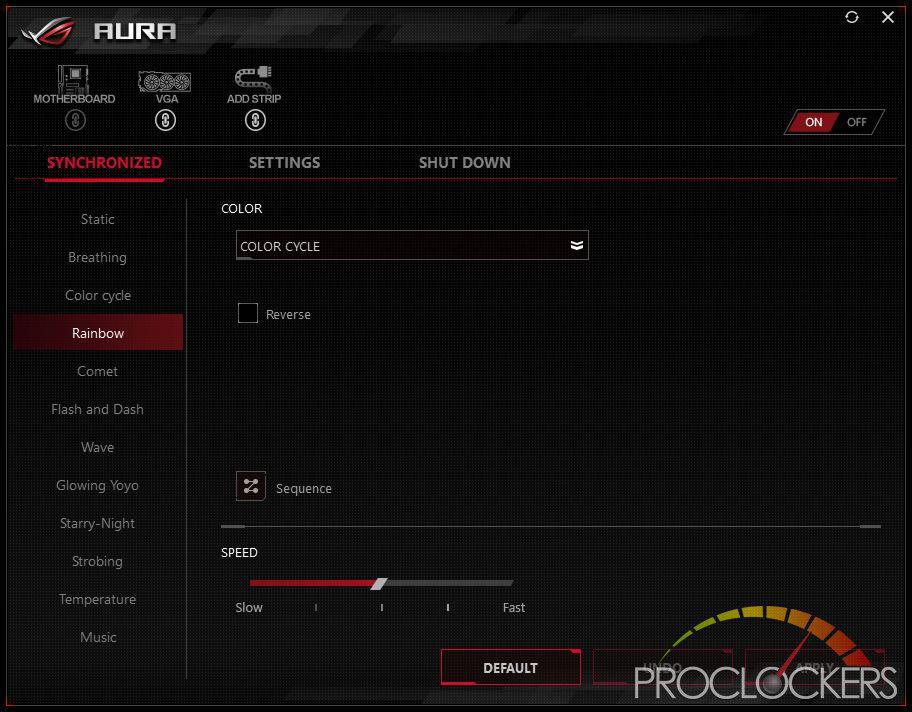
The front edge lighting, as well as the Digital RGB header, are controlled by ASUS’s AURA software. There are quite a few effects to choose from, both static and dynamic, but our favorite was the Flash and Dance, as well as the Temperature mode. Other Aura compatible devices can be controlled from here as well.

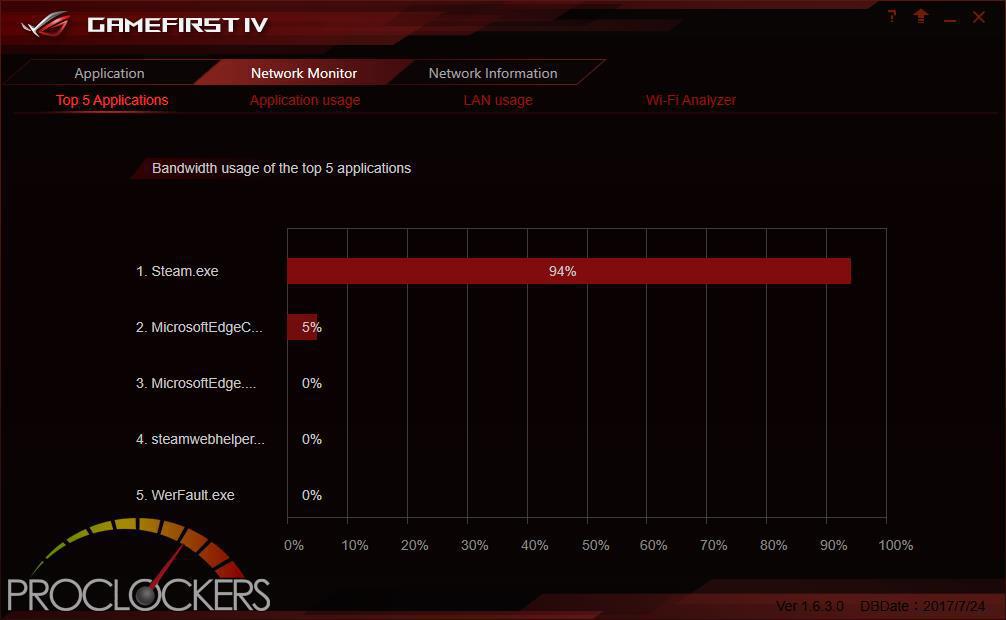
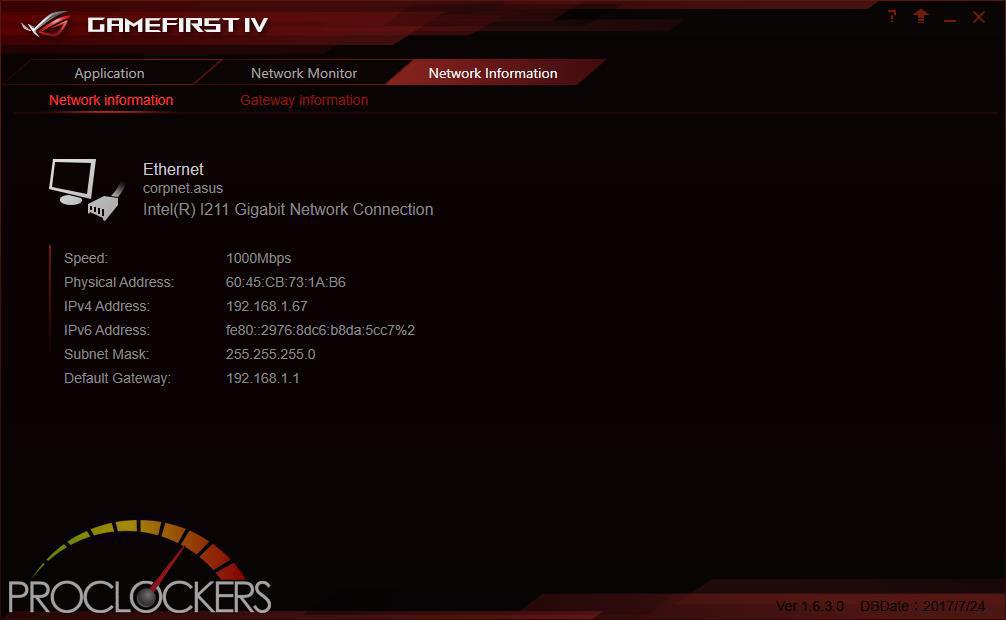
The GameFirst IV Application allows you to Monitor and control all traffic over the Intel Gigabit Lan connection, as well as see statistics and vital information. By Default, the application runs in intelligent mode and will prioritize Traffic based on its purpose, but you can switch to Manual mode and take over full control. You can see here while browsing the web and installing games on Steam for benchmarking where most of the bandwidth is being used.
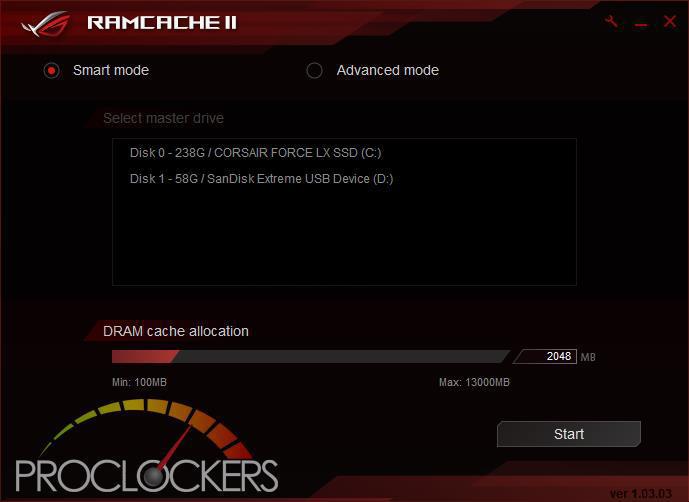
ASUS’s RAMCACHE II carves off a user selectable portion of system memory to speed up Disk transfers. Even if you have the fastest NVMe drive out there, using your ram as a cache can speed it up significantly.
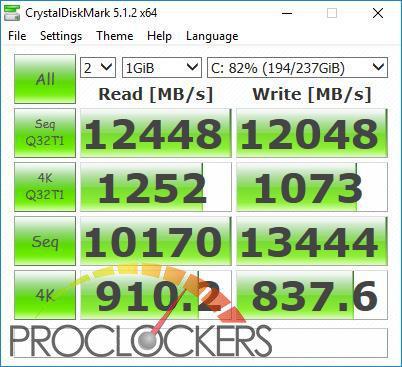
As you can see, this makes a standard SATA SSD into a Monster! More than 12GB/s from a drive rated for 500MB/s is pretty snappy, and at the cost of a few unused GB’s of ram.
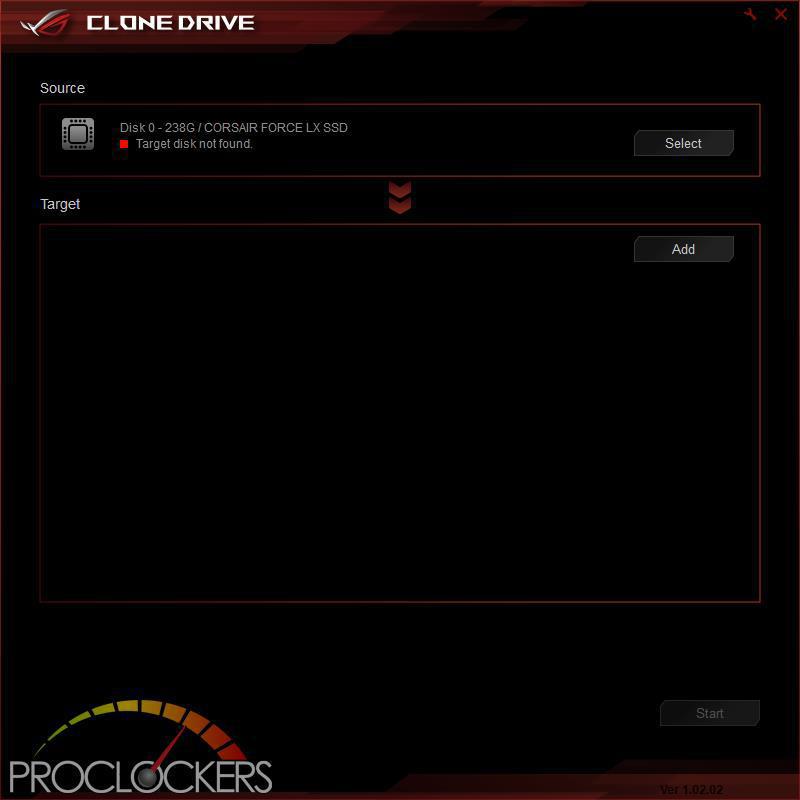
Clone Drive does exactly what the name implies. If you need to migrate to a new larger or faster SSD down the road, simply cone it over and away you go. It does work for data drives as well, not just your OS drive.
Overwolf
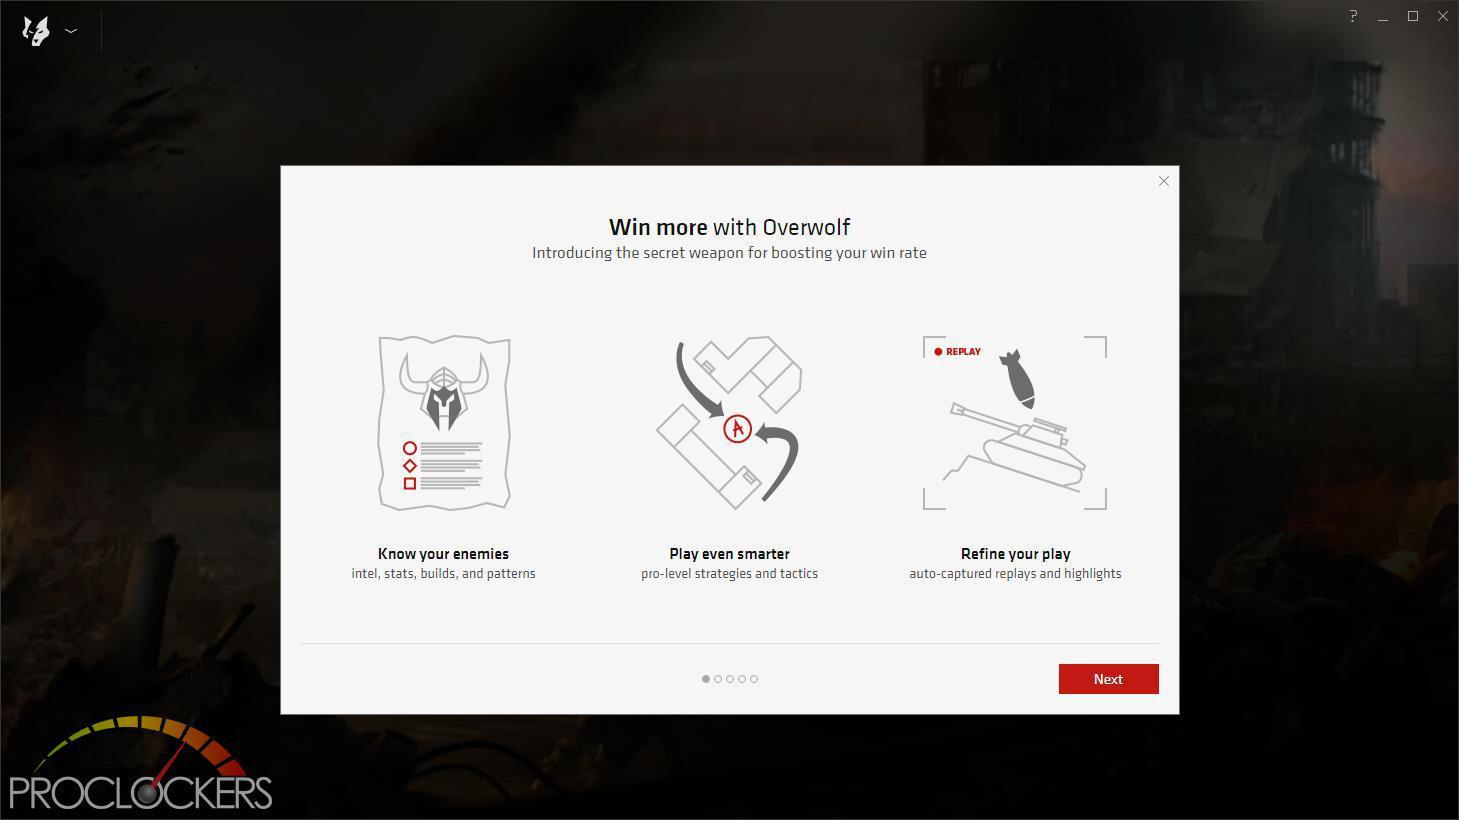
Overwolf is a clever, unobtrusive overlay that keeps you in the game and allows you to browse the Web, email, IM, stream or record while you play. The overlay features color-matched ROG skins that show you’re part of an elite pack. Grab it now from the Overwolf Appstore!
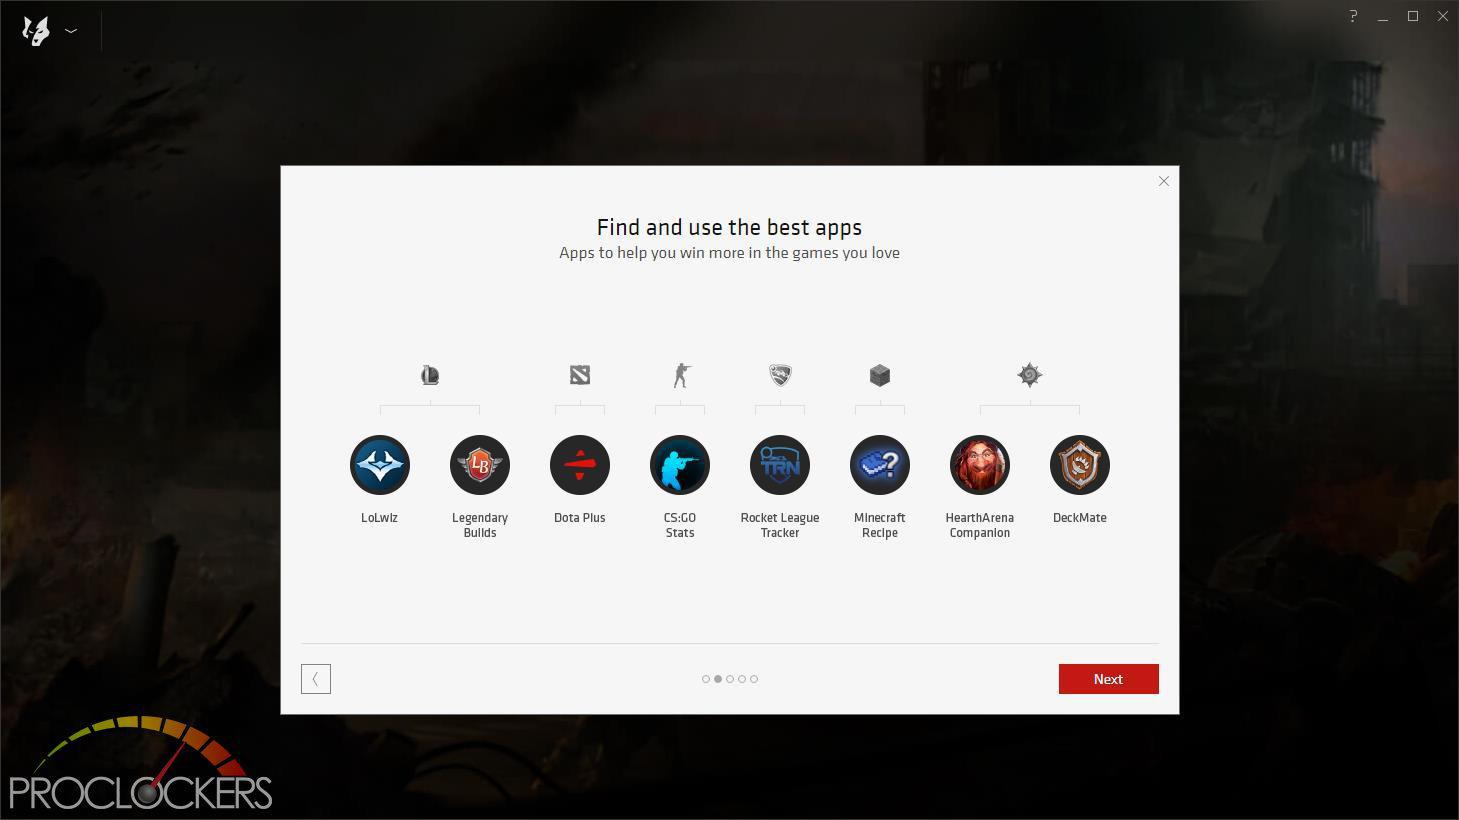
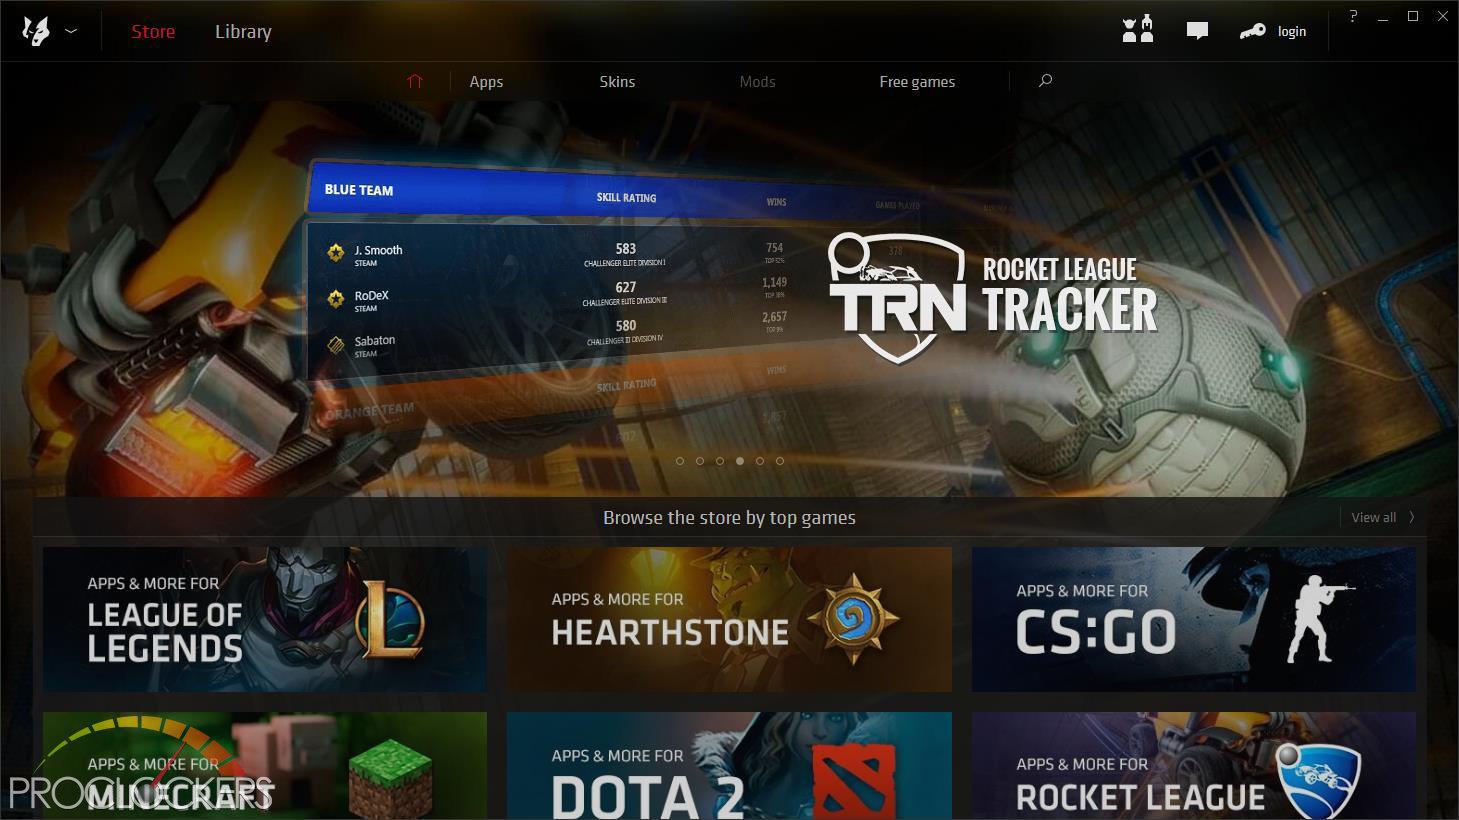
Overwolf provides access to lots of tools for many popular games, as well as some handy utilities for streaming and online play.

Overwolf also comes with a small desktop widget similar to Dual Intelligent Processors 5.
Testing & Performance
General Performance Testing
All performance testing was done with an i7-8700K and GTX 1070 at default clock speed. CPU was left with Speed Step and Turbo Boost enabled. The only setting changed was enabling XMP memory settings in the BIOS. Games where ran at a resolution of 1920 x 1080 and higher settings enabled as noted.
PCMark 8
“Use the PCMark 8 Storage benchmark to test the performance of SSDs, HDDs and hybrid drives with traces recorded from Adobe Creative Suite, Microsoft Office and a selection of popular games. You can test the system drive or any other recognized storage device, including local external drives. Unlike synthetic storage tests, the PCMark 8 Storage benchmark highlights real-world performance differences between storage devices.”
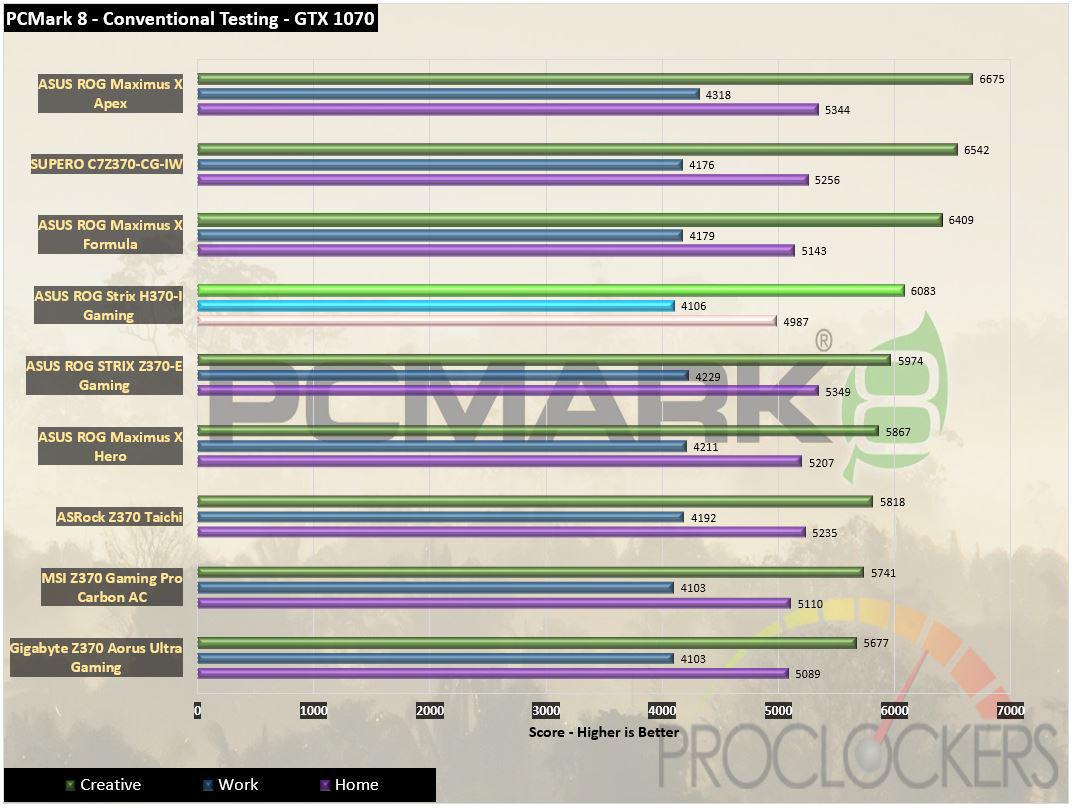
Being our first H370 board to test, we can only compare it to other 300 series boards which until this date have only been the Z370 boards. Our first H370 comes out of the gate to get things done and does it, scoring towards the top of the list in PCMark 8’s testing. It suffers a bit in the Home tests that are heavy in photo editing and similar that do rely on ram speed, but 2666Mhz is only a small step down from our normal 3200Mhz test point.
PCMark 10
PCMark 10 is the complete benchmark for the modern office. It is the ideal test for organizations that are evaluating PCs for a workforce with a range of performance needs. The tests in this benchmark cover a wide range of activities from everyday productivity tasks to demanding work with digital media content.
PCMark 10 uses a modular approach to build relevant benchmark tests around common end-user scenarios. A Test Group is a collection of workloads that share a common theme or purpose. There are four test groups in PCMark 10, we use three of them.
Essentials: covers the common, everyday ways that people use a PC. The workloads include Web Browsing, Video Conferencing, and App Start-up time.
Productivity: measures system performance with everyday office applications. This test group includes the Spreadsheets and Writing workloads.
Digital Content Creation: This test group’s workload reflects the demands of working with digital content and media. The tests include Photo Editing, Video Editing, and Rendering and Visualization.
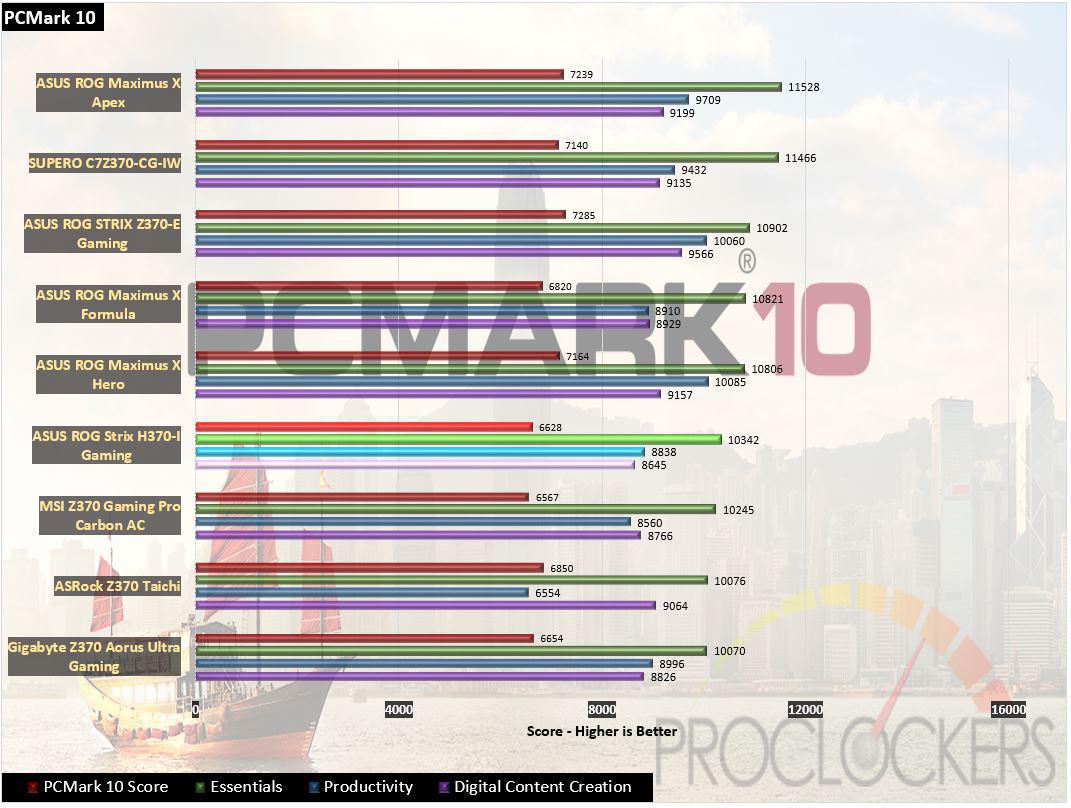
PCMark 10 shows a similar trend with the H370 fighting its way into the middle of the pack of Z370 boards.
WebXPRT 2015
WebXPRT 2013 uses scenarios created to mirror the tasks you do every day to compare the performance of almost any Web-enabled device. It contains four HTML5- and JavaScript-based workloads: Photo Effects, Face Detect, Stocks Dashboard, and Offline Notes. WebXPRT is run with the latest stable release version of Google Chrome browser, in this case, Version 65.
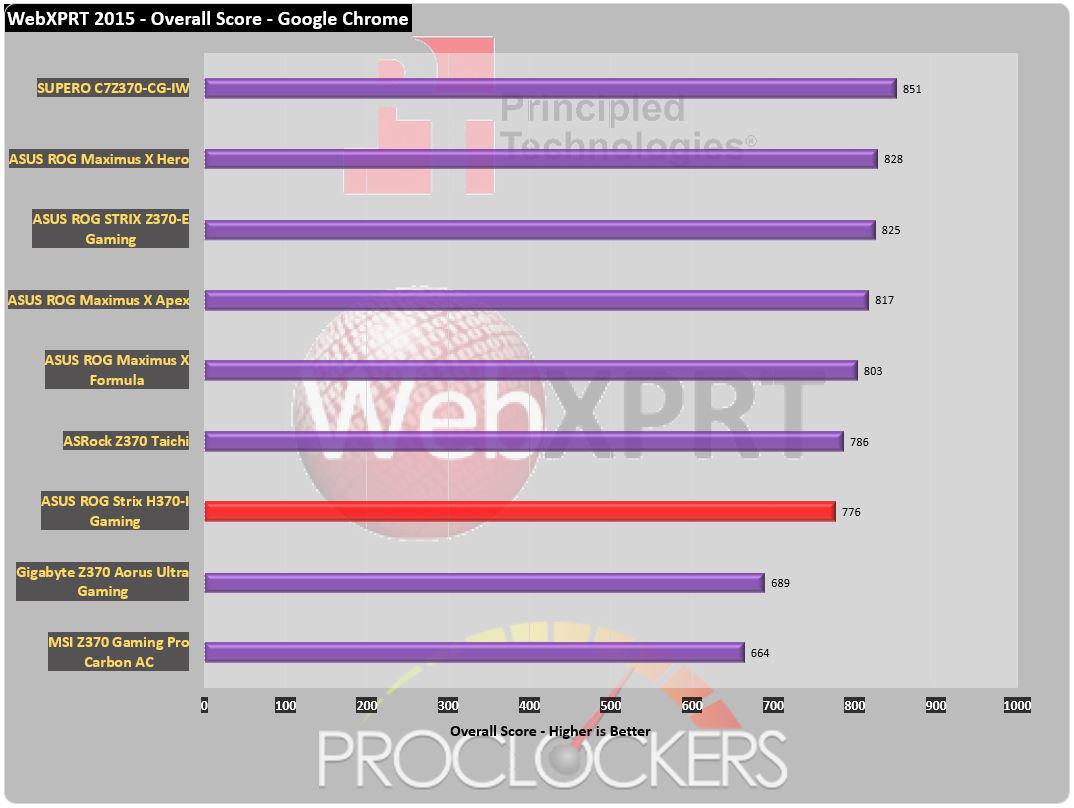
WebXPRT is browser-based workloads so it will depend heavily on CPU and memory performance. We see the H370 a few steps from the bottom, but not doing too badly at all.
CPU Performance Testing
Super PI Modded 1.5
“In August 1995, the calculation of pi up to 4,294,960,000 decimal digits was succeeded by using a supercomputer at the University of Tokyo. The program was written by D.Takahashi in collaboration with Dr.Y.Kanada at the computer center. This record should be the current world record. (Details are shown in the windows help.) This record-breaking program was ported to personal computer environments such as Windows NT and Windows 95. In order to calculate 33.55 million digits, it takes 3 days with a Pentium 90 MHz, 40 MB main memory and 340 MB available storage.”
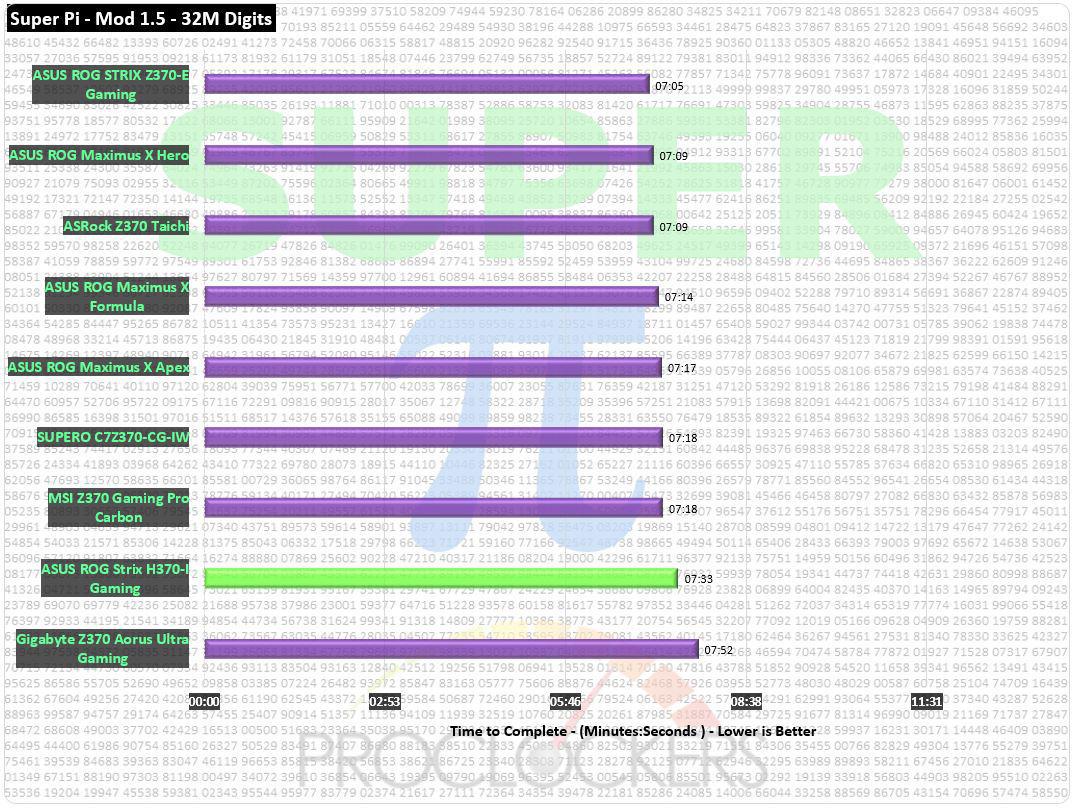
Super Pi comes in at 7 Minutes and just under 33 seconds, certainly not our fastest time, but nor our slowest either.
CINEBENCH R15
“CINEBENCH is a real-world cross platform test suite that evaluates your computer’s performance capabilities. CINEBENCH is based on MAXON’s award-winning animation software CINEMA 4D, which is used extensively by studios and production houses worldwide for 3D content creation. MAXON software has been used in blockbuster movies such as Iron Man 3, Oblivion, Life of Pi or Prometheus and much more.
CINEBENCH is the perfect tool to compare CPU and graphics performance across various systems and platforms (Windows and OS X). And best of all: It’s completely free.”
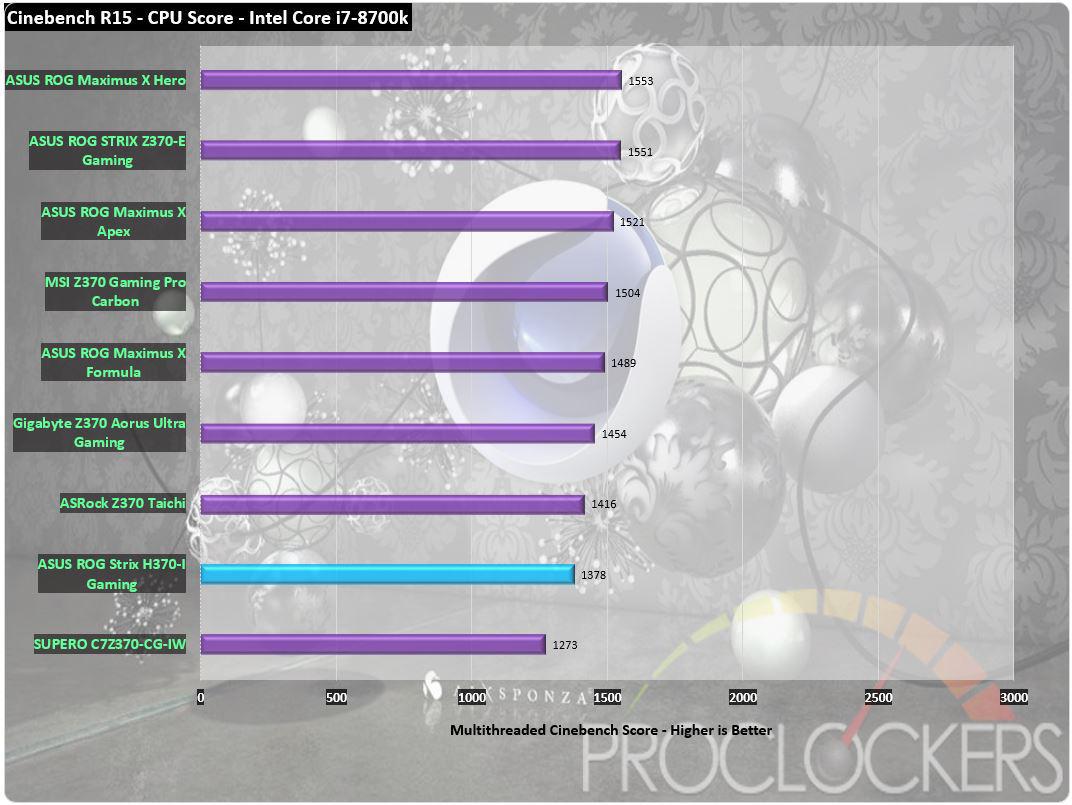
Our Cinebench testing results are dominated by ASUS Z370 boards as ASUS by default applies its own ‘MultiCore Enhancement’ to system multipliers and clocks when XMP is enabled. Here that doesn’t happen, and coupled with the lower memory speed ceiling, we see a score towards the bottom of the list, but still not terrible.
7-Zip
The benchmark shows a rating of MIPS (million instructions per second). The rating value is calculated from the measured speed, and it is normalized with results of Intel Core 2 CPU with multi-threading option switched off. So if you have modern CPU from Intel or AMD, rating values in single-thread mode must be close to real CPU frequency. There are two tests, compression with LZMA method and decompression with LZMA method. Once the total passes reach 100, the score is taken.
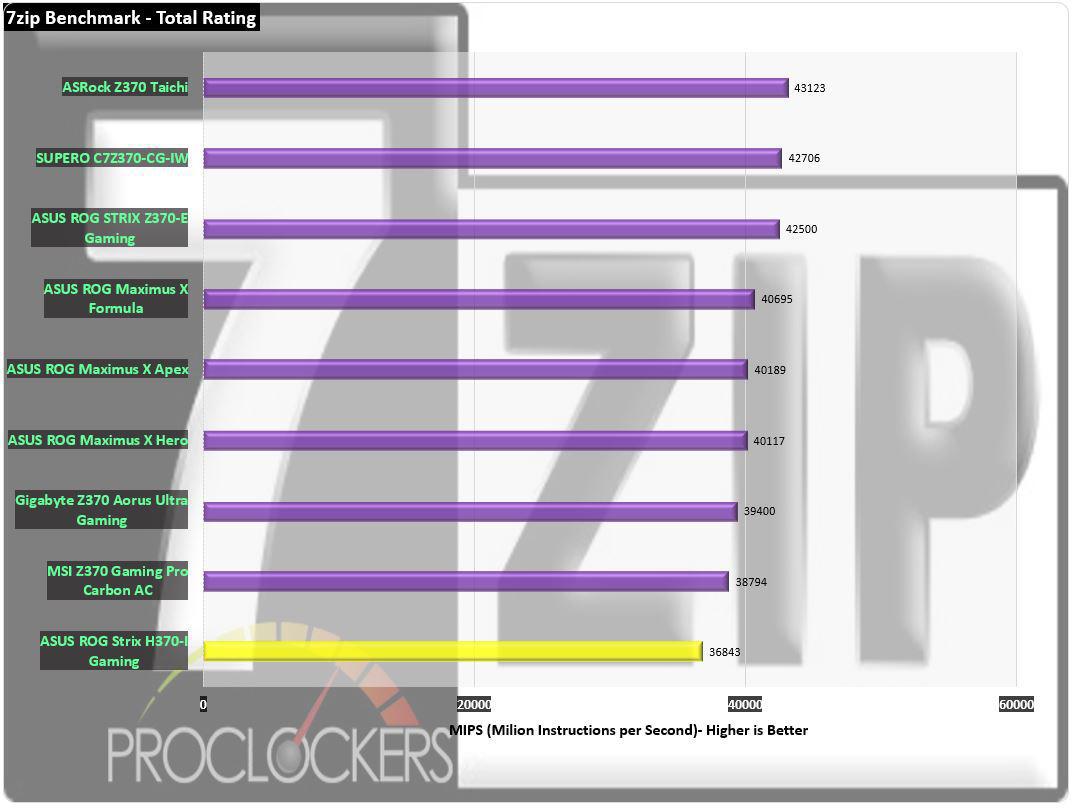
For the same reasons as Cinebench, 7Zip testing brings the H370 board in below all of the Z370 boards.
Memory Performance Testing
AIDA64 Engineer Edition
“FinalWire Ltd. today announced the immediate availability of AIDA64 Extreme Edition 1.50 software, a streamlined diagnostic and benchmarking tool for home users; and the immediate availability of AIDA64 Business Edition 1.50 software, an essential network management solution for small and medium scale enterprises. The new AIDA64 update implements AVX-optimized benchmarks for the upcoming Intel Sandy Bridge processors, adds a brand new video encoding benchmark, and supports the latest AMD and NVIDIA graphics processors.”
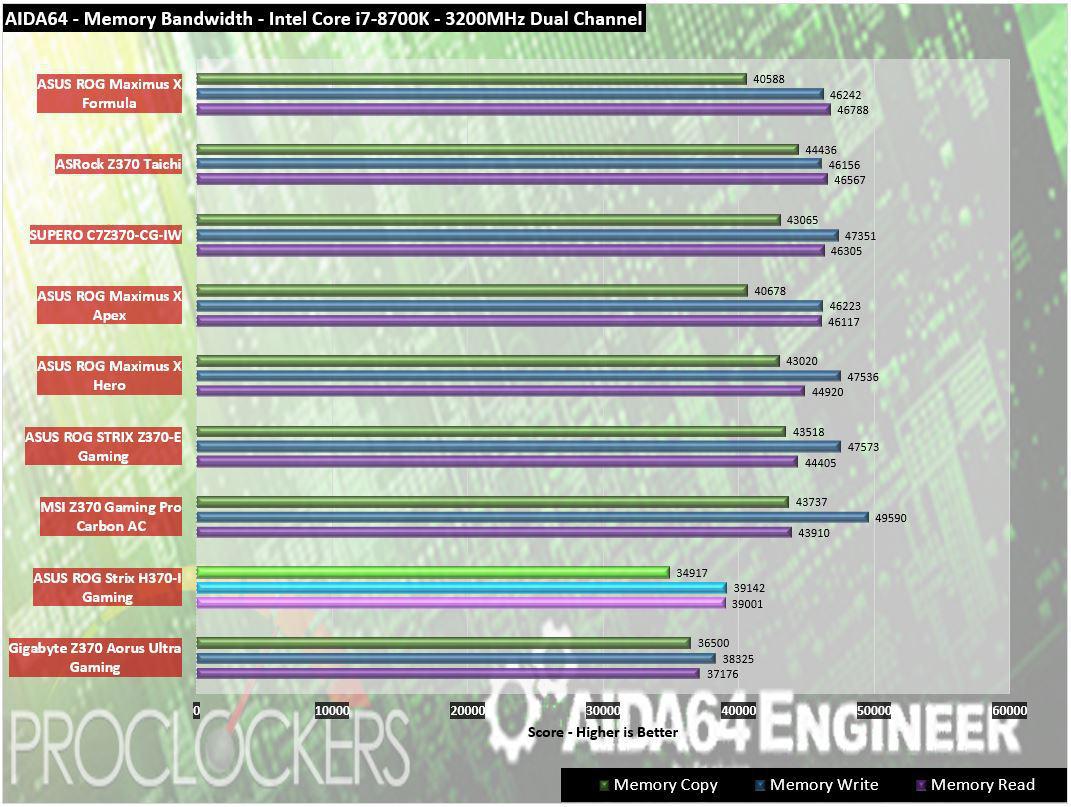
We’ve talked about the memory ceiling being the limiting factor on some previous benchmarks and here you can see why. All of the scores are coming in 5-10GB/s slower on average than comparable Z370 platforms. You won’t notice this in anything but applications that are extremely memory intensive.
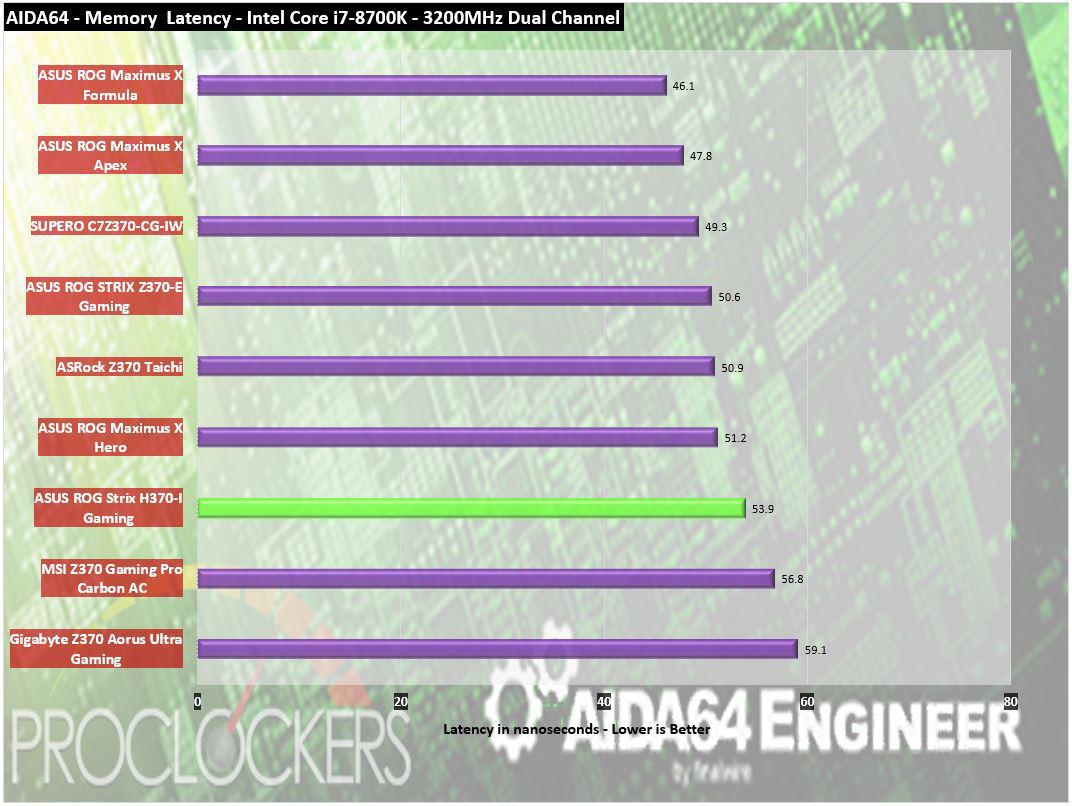
Without changing the timings, lowering the speed of any memory kit increases its overall latency, In this case, we end up near the 54 nanosecond mark.
Passmark Performance Test – Memory Mark – Threaded
“Fast, easy to use, PC speed testing and benchmarking. PassMark PerformanceTest ™ allows you to objectively benchmark a PC using a variety of different speed tests and compare the results to other computers.”
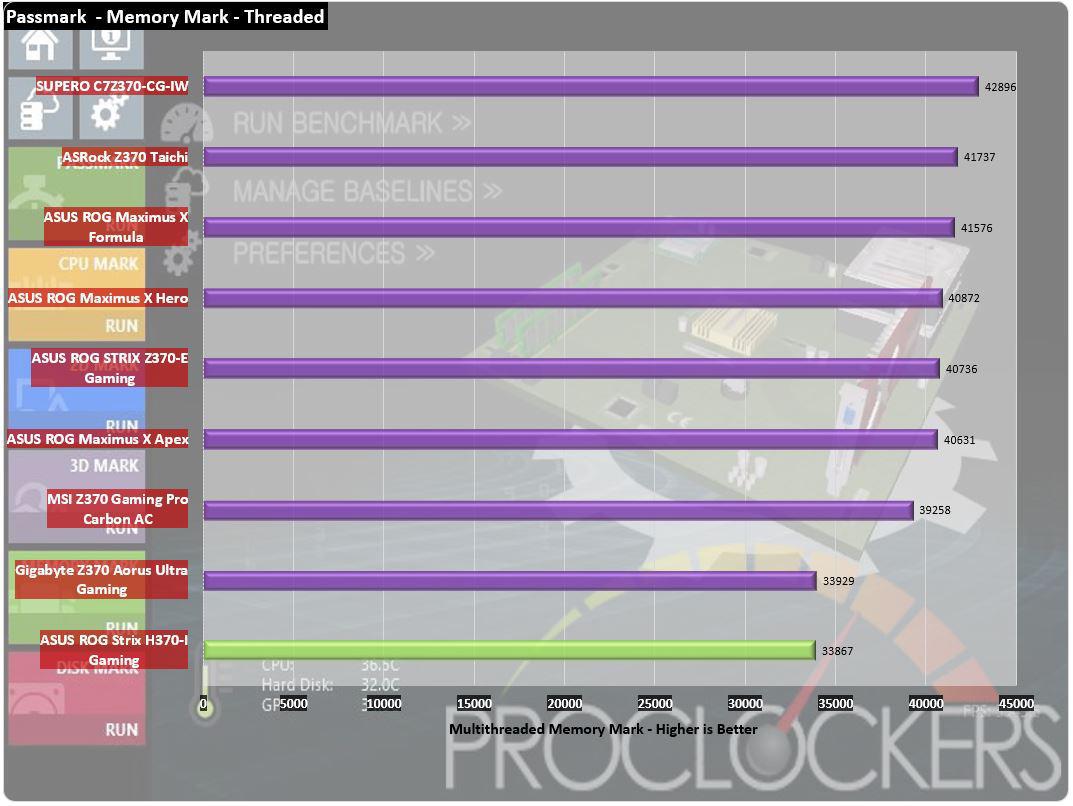
Passmark shows this speed change quite clearly, loosing as much as 25% of its score compared to Z370 boards running a full 3200MHz.
SiSoft Sandra
“SiSoftware Sandra provides a robust package of diagnostic tools for testing your system and teasing out its problems–or potential headaches.”
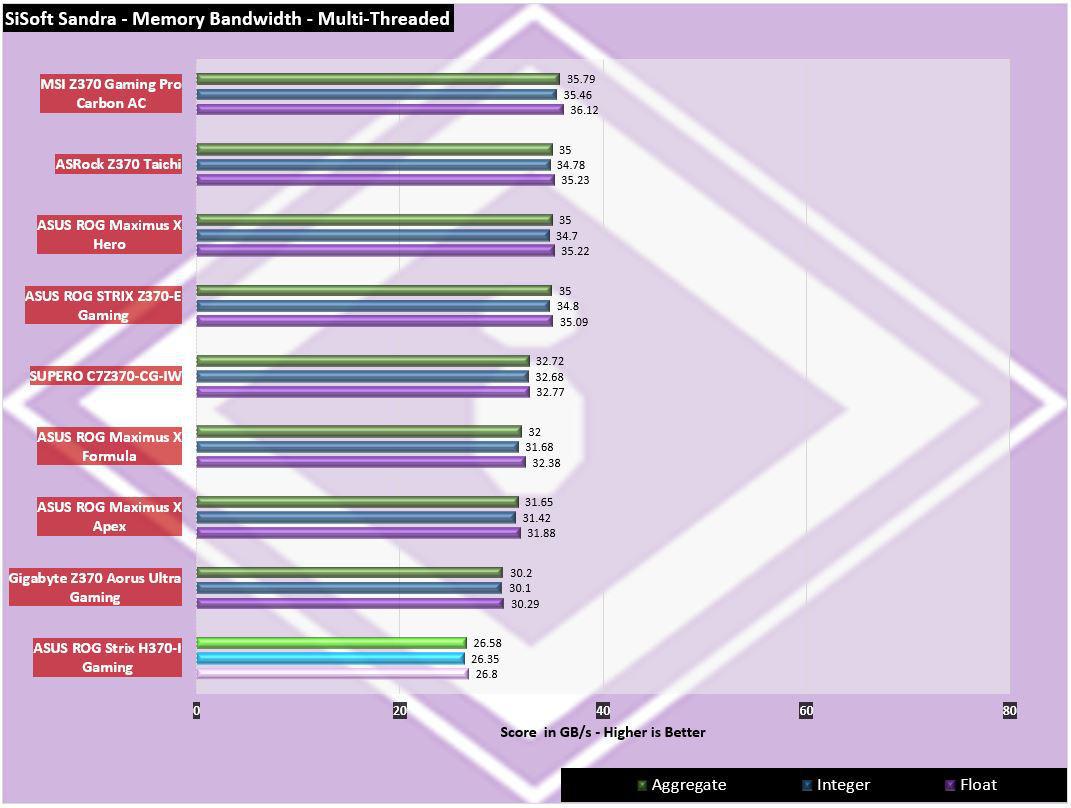
Sisoft Sandra again shows this speed difference clearly, scoring just of 26GB/s in all 3 aspects of it’s testing.
Storage Testing
ATTO Disk Benchmark
“As the industry’s leading provider of high-performance storage & network connectivity products, ATTO has created a widely-accepted Disk Benchmark freeware utility to help measure storage system performance. As one of the top tools utilized in the industry, Disk Benchmark identifies performance in hard drives, solid state drives, RAID arrays as well as connections to storage. Top drive manufacturers, like Hitachi, build and test every drive using the ATTO Disk Benchmark”
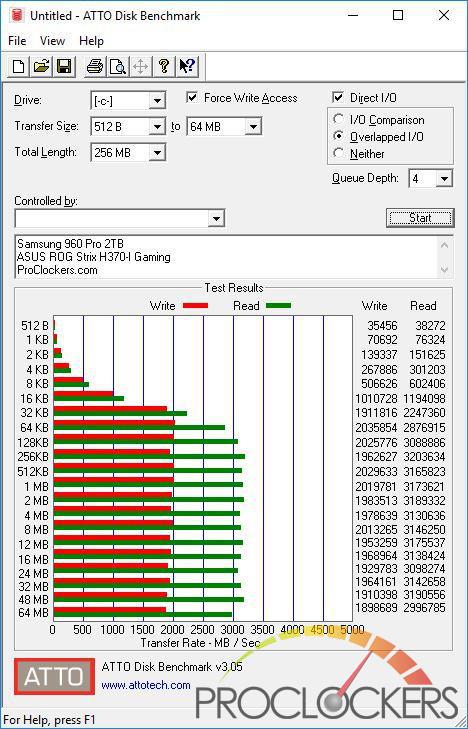
While memory speeds might hit some programs, it appears to have little effect on storage. Our Samsung NVMe drive has no problem hitting near its rated speeds on the front M.2 port.
CrystalDiskMark 6.0
“CrystalDiskMark is designed to quickly test the performance of your hard drives. Currently, the program allows measuring sequential and random read/write speeds.”
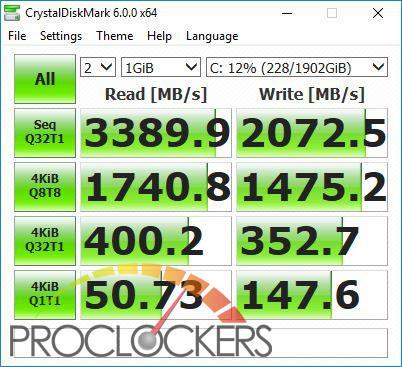
CrystalDiskMark also shows near the rated performance.
AS SSD
The AS SSD benchmark determines the performance of Solid State Drives (SSD). The tool contains six synthetic and three copy tests.
The synthetic tests determine the sequential and random read and write performance of the SSD. These tests are performed without using the operating system cache. In the Seq test, the program measures how long it takes to read and write a 1 GB file. In the 4K test, read and write performance is determined for randomly selected 4K blocks. The 4K-64 Third test is equivalent to the 4K procedure, except that the read and write operations are distributed to 64 threads. This test should show differences between the IDE operating mode where NCQ is not supported and the AHCI mode for SSDs with Native Command Queuing (NCQ). The additional compression test can measure the performance of the SSD as a function of the compressibility of the data. This is especially important for the controllers that are used to increase the performance and life of the cell compression.
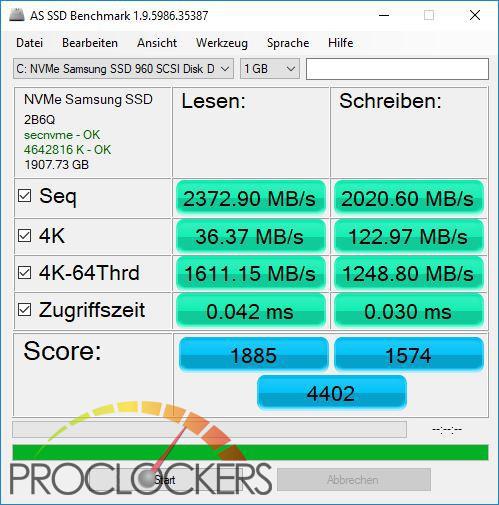
AS SSD has quite different testing methods and shows different scores, but these are pretty similar to what we were expecting. It’s clear there are no bottlenecks here.
Game Testing
3DMark – Fire Strike
“Fire Strike is a showcase DirectX 11 benchmark designed for today’s high-performance gaming PCs. It is our most ambitious and technical benchmark ever, featuring real-time graphics rendered with detail and complexity far beyond what is found in other benchmarks and games today”
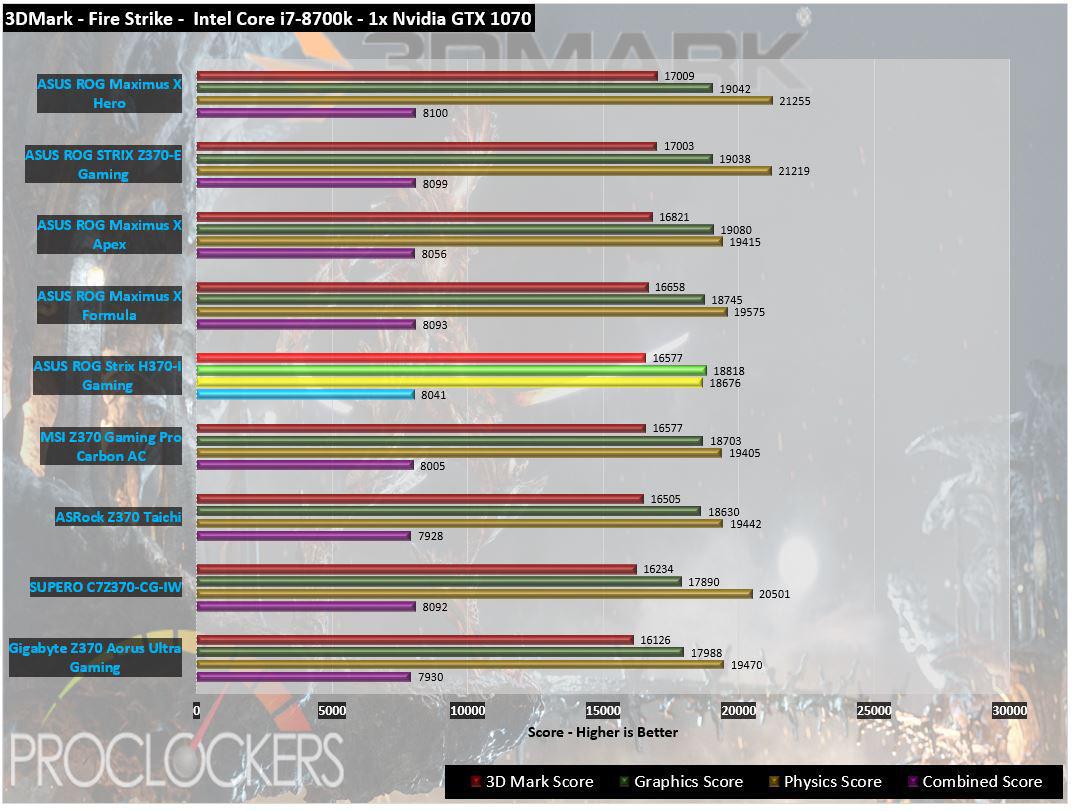
Memory speeds this, storage performance that, what really matters on a product with gaming in its name is… well, gaming. In #D Mark’s popular DX11 test Firestrike, the Strix H370-I has no issue hanging with the big dogs.
3DMark – Time Spy
“3Dmark Time Spy is a new DirectX 12 benchmark test for Windows 10 gaming PCs. Time Spay is one of the first DirectX 12 apps to be built “the right way” from the ground up to fully realize the performance gains that the new API offers. With DirectX 12 engine, which supports new API features like asynchronous compute, explicit multi-adapter, and multi-threading, Time Spy is the ideal test for benchmarking the latest graphics cards.”
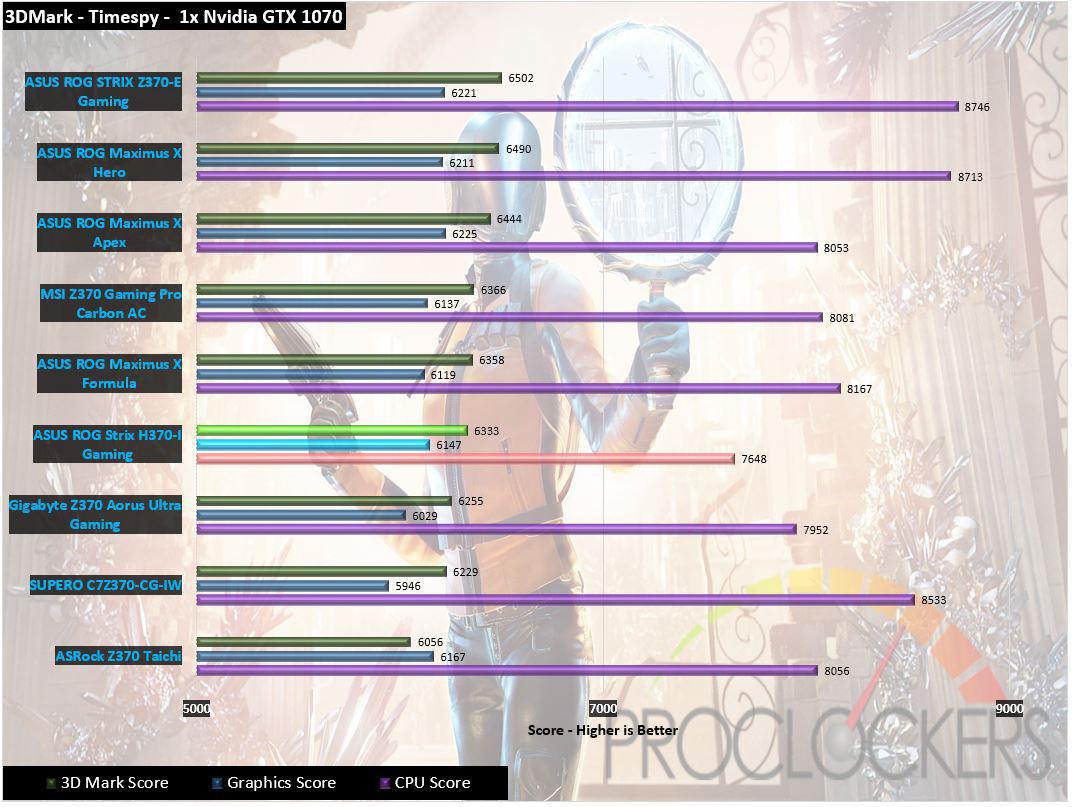
In Timespy, the memory performance and ‘factory’ clock speeds show a small hit to CPU physics scoring, but graphics and overall scoring are largely right in the middle of the pack.
Grand Theft Auto: V
“When a young street hustler, a retired bank robber, and a terrifying psychopath find themselves entangled with some of the most frightening and deranged elements of the criminal underworld, the U.S. government and the entertainment industry, they must pull off a series of dangerous heists to survive in a ruthless city in which they can trust nobody, least of all each other.”
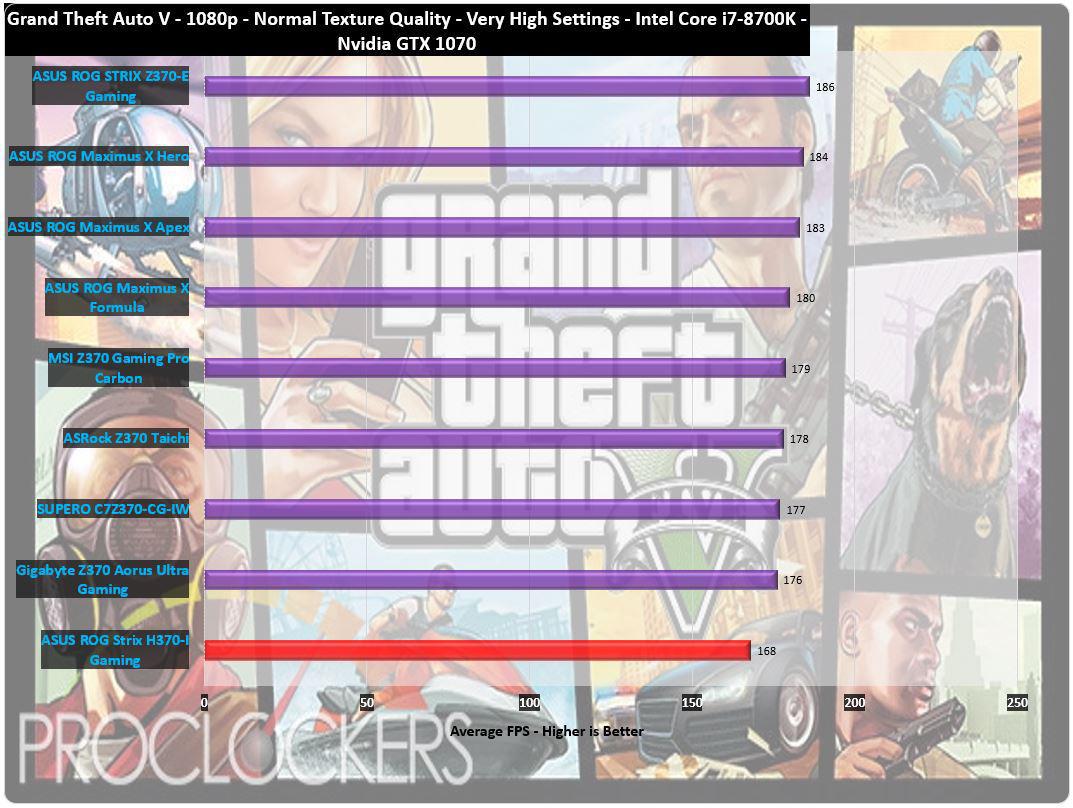
It’s not secret these days that Grand Theft Auto V likes CPU and memory performance. We get a solid score here, but not as great as a Z370 system.
Metro: Last Light
“It Is the Year 2034. Beneath the ruins of post-apocalyptic Moscow, in the tunnels of the Metro, the remnants of mankind are besieged by deadly threats from outside – and within. Mutants stalk the catacombs beneath the desolate surface, and hunt amidst the poisoned skies above.”
Developed by 4A Games and published by Deepsilver, Metro: Last Light uses the 4A game engine. At its highest settings, the 4A game engine is capable of bringing all but the most extreme gaming systems to their knees.
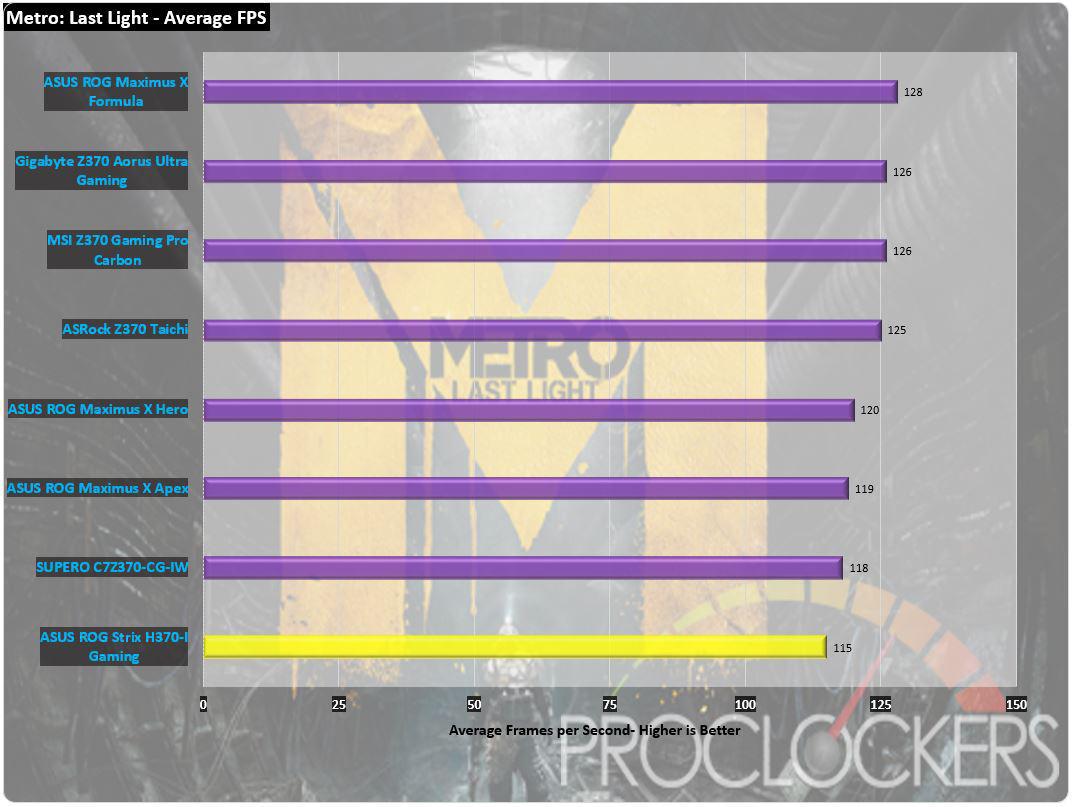
Metro: Last Light seems to depend on memory performance more than some games, here it shows a reduced but still playable 115 FPS average via its built-in benchmark.
Thief
“Garrett, the Master Thief, steps out of the shadows into the City. In this treacherous place, where the Baron’s Watch spreads a rising tide of fear and oppression, his skills are the only things he can trust. Even the most cautious citizens and their best-guarded possessions are not safe from his reach.”
Thief was developed by Eidos-Montréal and published by SQUARE ENIX, Eidos Interactive. The newest game in our benchmark suite, Thief is also one of the most demanding and has the highest recommended system requirements. Those heavy requirements allow it to use the Unreal 3 game engine to great effect. It also features AMD’s Mantle API, as well as Microsoft’s common DirectX 11 API.
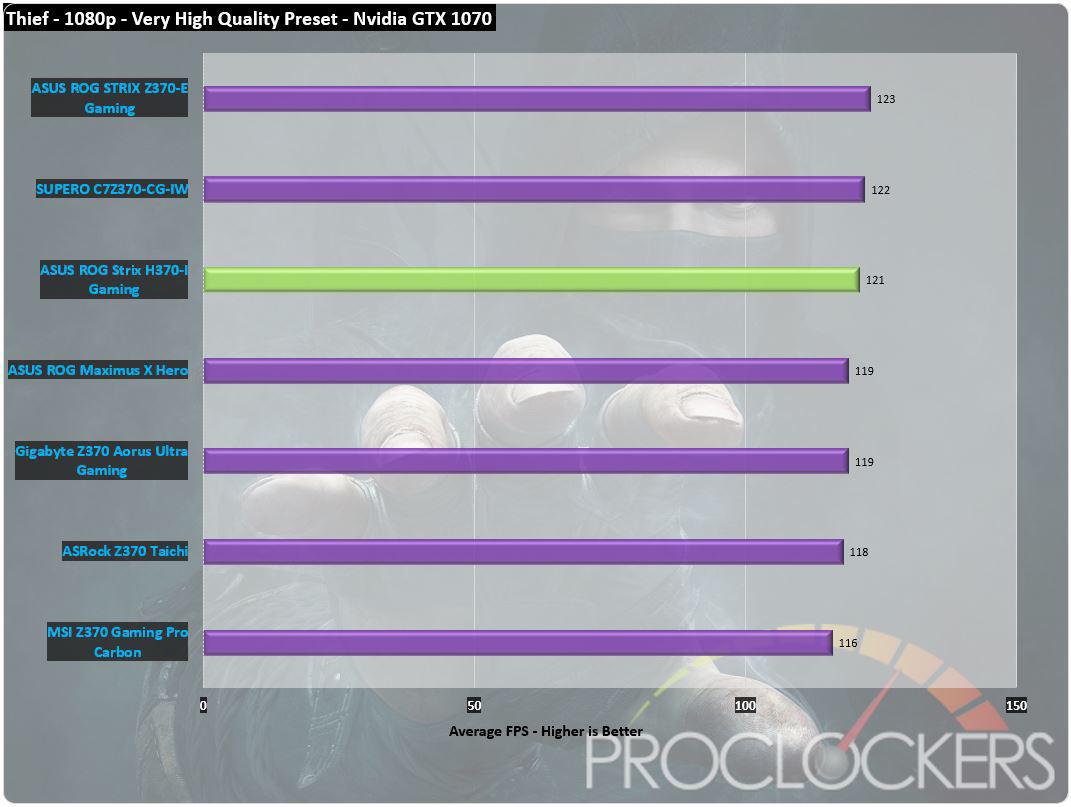
Theif, on the other hand, doesn’t care as much about memory like most games and shows a very good average frame rate of 120.7 which is near the top of the stack.
Overclocking
While Intel’s H370 chipset pretty well explicitly excludes overclocking support from the features list, we had to at least try right?
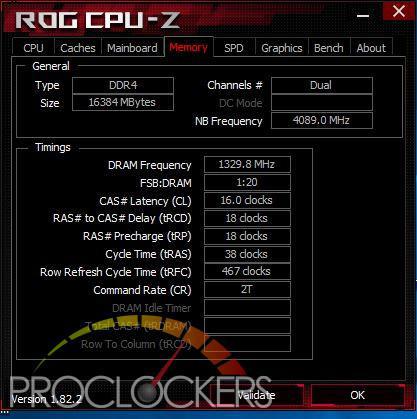
Per usual, we’ll start out with our Stock speeds, even if ‘stock’ is a reduced 2666MHz on our memory and see what we can do.
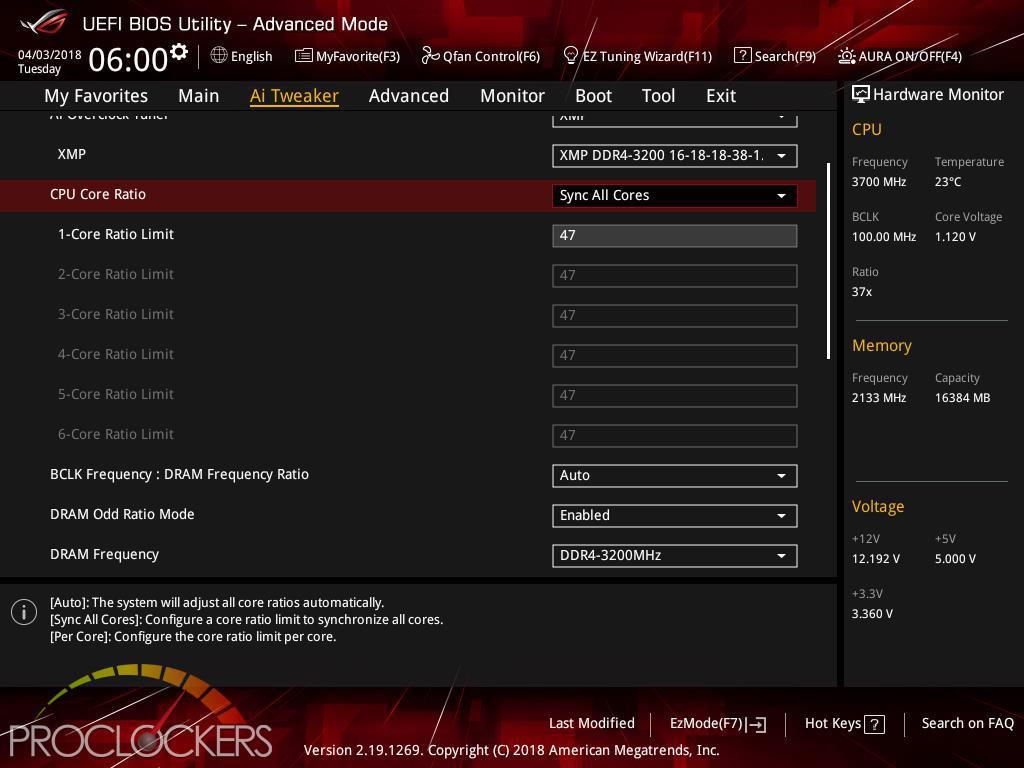
We set our CPU to a multiplier of 47 across all cores, the maximum it would allow.
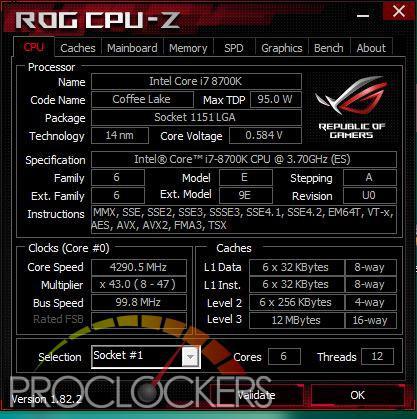
A save-and-reboot later, we fire up Cinebench and find that with all 6 cores loaded, we are still stuck at 4.3 GHz. We were hoping to at least hold all cores at the max boost, but alas, that doesn’t seem to be the case.
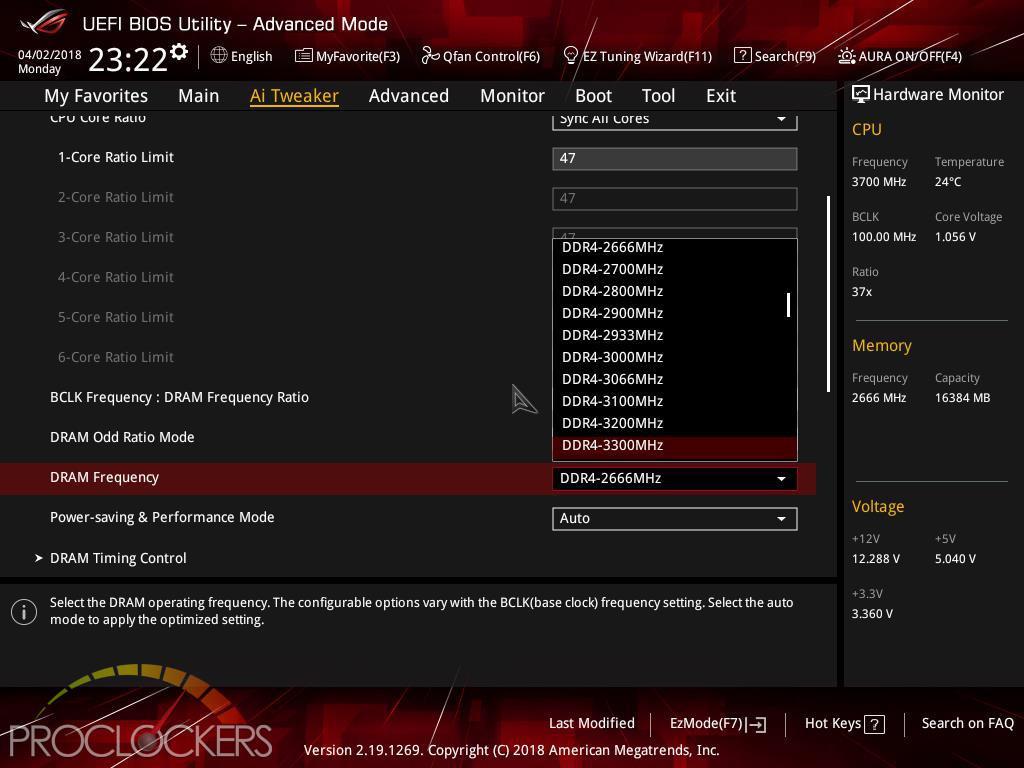
While we were tweaking CPU multipliers we noticed a few slots down you could pick your memory speed.
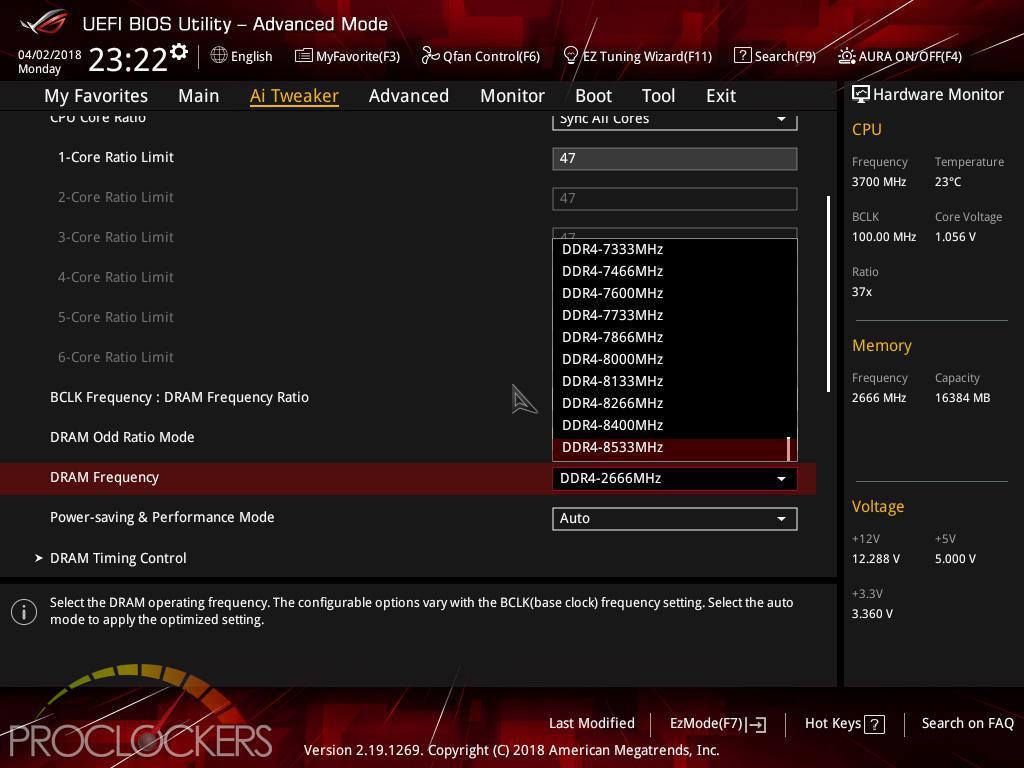
Amusingly, you can select clear to 8533MHz, a number not even LN2 overclockers have achieved, yet anyway.
Either way, we’ll jump to 3200MHz, save and reboot.
…
No dice. Won’t even boot. After power cycling, the board came up in safe mode so we went in and tried 2700Mhz, the next step up from current.
….
Still, won’t even boot.
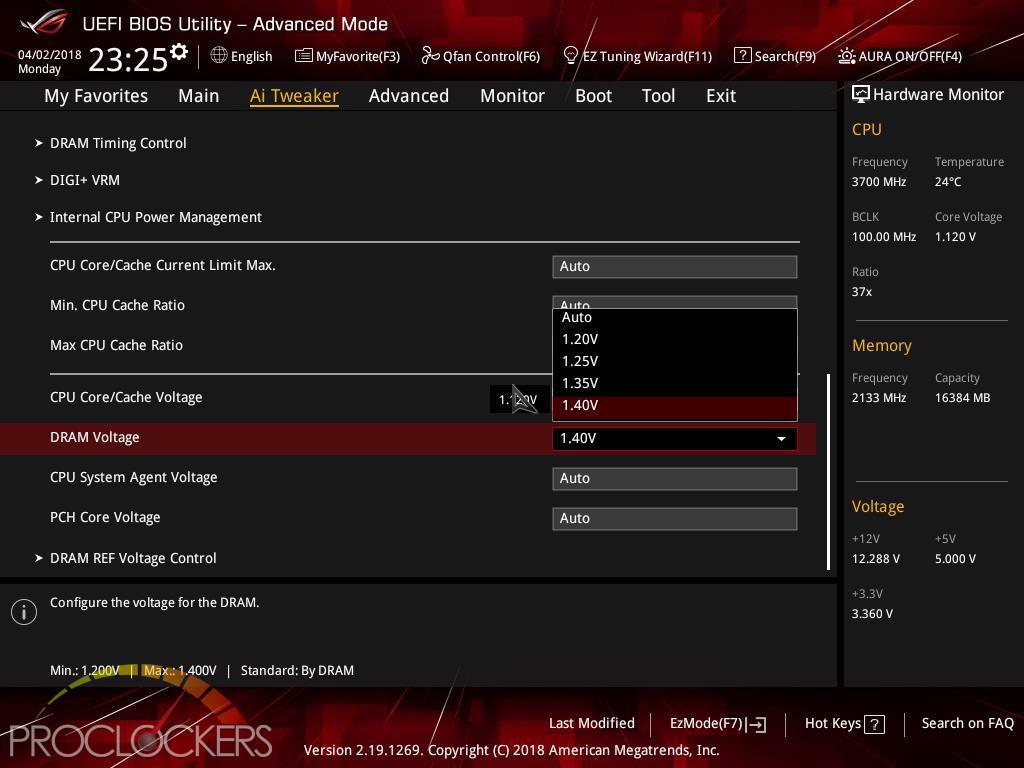
Well, we can go to 1.4V on the memory, let’s try that.
…. Maybe… Nope. No matter what, if we force a speed above 2666Mhz, the Strix H370-I Gaming just won’t boot at all.
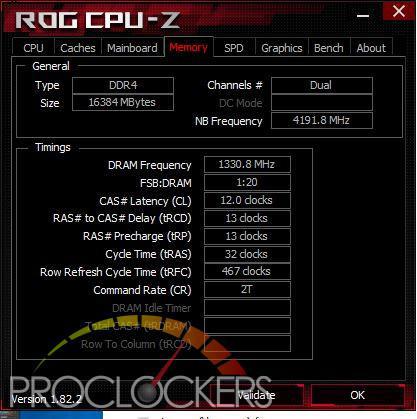
We do have control of timings, so we worked on it and got the kit down to 12-13-13-32 which is pretty good.

This gives us a very minute bump in bandwidth, but more importantly, it knocks our latency down from 53.9 to 48.2 nanoseconds.
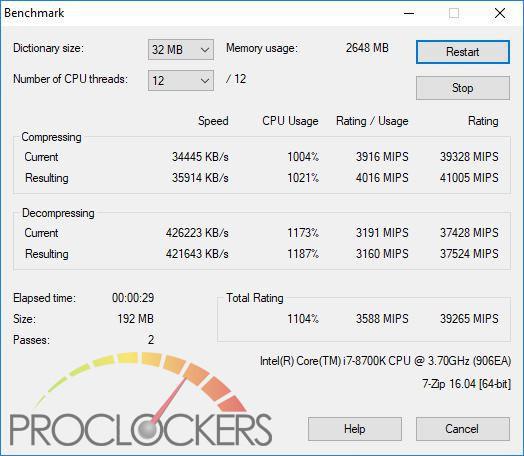
Well, it helps… kinda. Our score goes from 36843 to 39265 MIPS… a but nearly within the margin of error.
There ya have it, kids, You really can’t overclock on H370.
Final Thoughts & Conclusion
One thing gamers always have to decide on is where to spend their hard-earned dollars to get the best experience. This usually means making compromises around estimated performance impacts of your favorite games. While everyone knows at this point you can overclock the snot out of your system and squeeze a few more precious frames a second, the simple truth is many gamers aren’t interested in that. Whether for heat and the accompanying noise or the warranty voiding chance at instability right as you make a critical game-winning move, many gamers choose to just turn the computer on and get to fragging. Do you really need the top end Z370 powered boards to game? If you don’t have a very specific reason to say yes here, the answer is quite likely ‘no’. You do get a ton of nice things here, like Dual gigabit Ethernet ports, and the very latest Dual band WiFi and Bluetooth onboard, and even a snazzy pre-mounted I/O Shield, so there’s still a lot to love.
The H370 chipset drops a few things some enthusiasts wouldn’t be caught dead without, like the ability to overclock, but for the majority, it’ll do everything you want to do and do it well. Our initial reaction to memory limited to 2666MHz was a bit of a cringe, but when you stop and think about it, this saves you money on your motherboard, it saves you money on your CPU, and in the current market, it saves you money on your memory kit. We’d like to say you could spend that difference on the next higher GPU, but those are still a bit harder to find at the moment, but it does seem to be getting a LITTLE bit better recently. If you can live without the warranty voiding clock speeds, and want full power in a diminutive size, ASUS’s ROG Strix H370-I Gaming is a great choice to win your future games. Great Job ASUS!


The 25 Best Anime Cats, Ranked
What are the best anime cats? Cats are something you either love with every fiber of your being or vehemently...


The 25 Best Anime Teachers, Ranked
Who are the best anime teachers? With high school being such a prevalent setting in anime, it makes sense that...


The 25 Best Orange Hair Anime Girls, Ranked
Who are the best orange hair anime girls? Orange hair is interesting in anime because it can either be a...